
Here's the dress we are working on today:

Looks like fun, right? =) I apologize in advance for any blurry, grainy, or off-color photos... my camera was having a bad day.
First, the pattern. Find a shirt that fits you well in the shoulders and arms, fold it in half, and lay on top of your pattern paper. I'm using Swedish Tracing Paper... I like it so far! It's sew-able, and slightly transparent, but still easy to draw on with a pen. It does tear more easily than fabric, but not as easily as plain paper. Anyway, put the shirt like this:

Trace around the body of your shirt, including your armhole seams. You should get something like this:

I realized after tracing that this shirt was too wide for me, so I made a line 2 inches from the side for a tighter fit. I free-handed the front neckline later on. Measure from your shoulder at the base of your neck down to under your bust where you want your waistband to sit, and mark that line on the shirt you just traced... the horizontal line in the photo above. Also measure the circumference where you want the waistband to sit, and subtract 2-3 inches.
Divide your finished waistband circumference by 4 and mark that from the center front line out, and make a gently curved line up to your side seam.

This will be your bodice back and front bodice underlay.

Add seam allowances to all of the edges except the center front, then cut it out along those lines. Put another piece of pattern paper on top and trace all the edges except the side seam. Mark the top and bottom of the side seam for reference.

Rotate your paper at the top side seam mark until the bottom of the side seam is 3 inches from the lower mark... this is for gathers:

Make a mark two and a half inches to the left of the center seam, and draw a straight line from that mark to the shoulder/neckline corner:

Measure yourself from your shoulder at the base of your neck to two and a half inches out from the center on the opposite side, on the line where your waistband will sit. So, follow the line where the crossover will be. Mark this on the paper, from the shoulder on your diagonal line. If you are like me, this will be shorter than your initial length. Curve that mark gently into your waist seam. This will be your front bodice overlay.

Now sleeves. Lay your sleeve on the paper folded up to your desired length, and trace around it.

Add seam allowances to all sides but the upper fold:

Make a waistband piece that is half your finished waistband width, plus 1 inch for seam allowances on each side, by 3 inches tall with seam allowances included. Sorry, no picture.
Measure the bottom of your sleeve pattern piece inside the seam allowances and draw a rectangle 2 inches tall by that measurement wide. On one long horizontal side, mark out 1/4 inch to each side, and mark lines from those marks to the other horizontal side. Add seam allowances to all sides except the widest one, that one will be a fold. These are your cuffs.

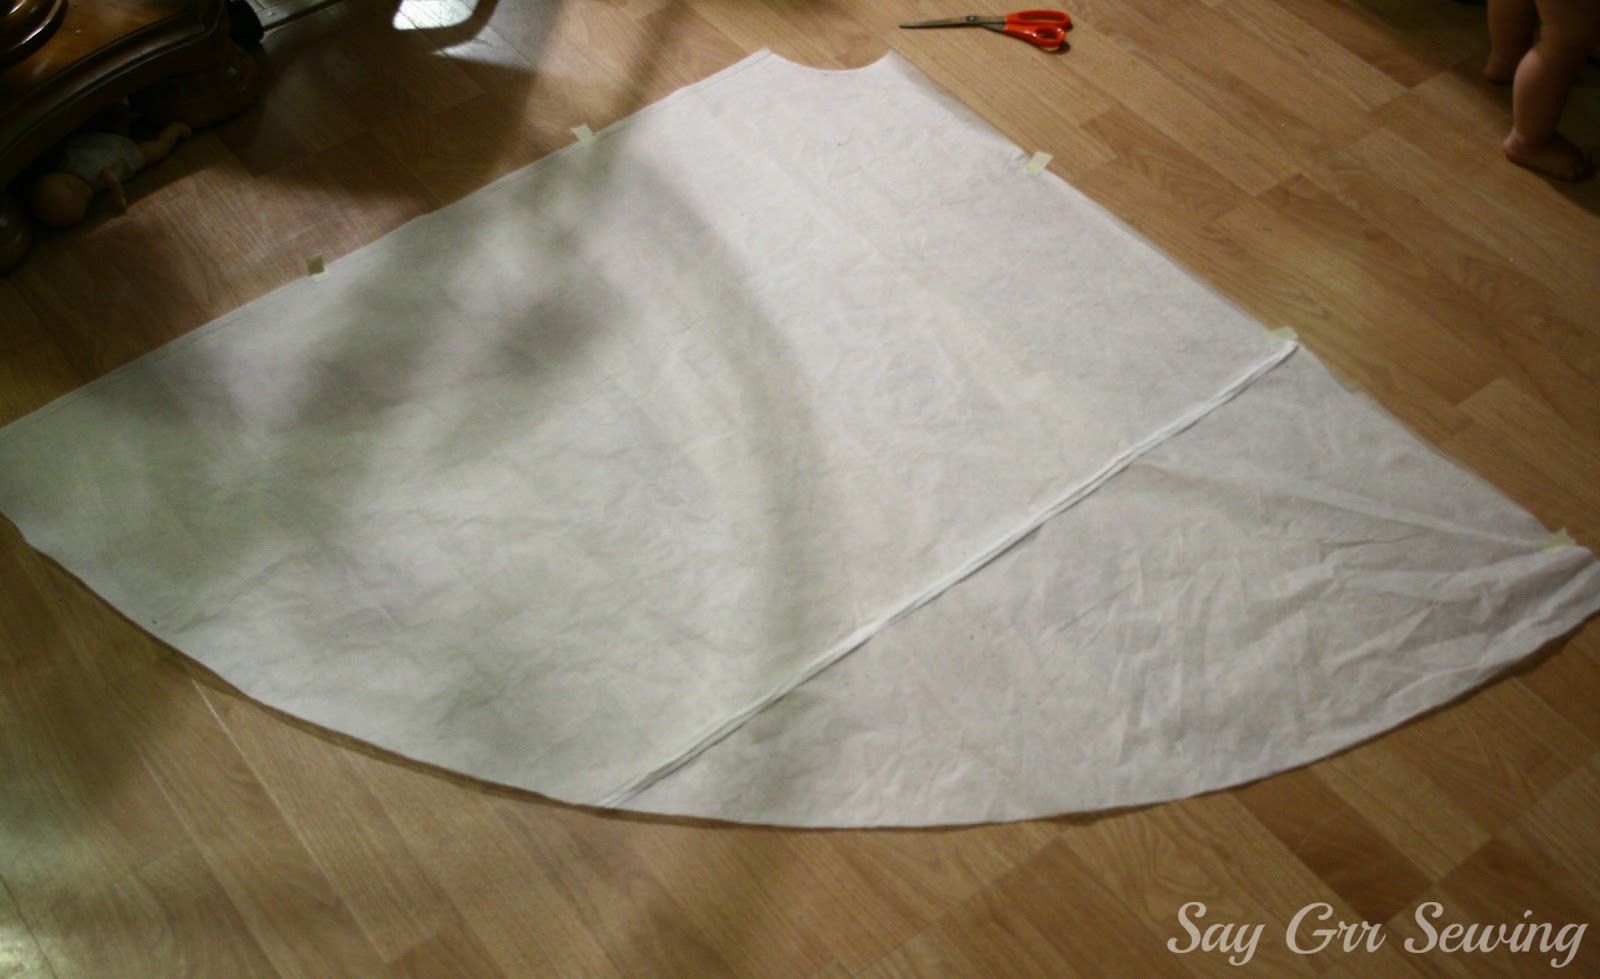
Now for some math. Take your finished waistband circumference (waist measurement minus 2-3 inches) and divide it by 3.14. That is your diameter... divide that by 2. If you come up with a really strange number, round down to the nearest quarter-inch for your radius. Next subtract 1/2 inch to include your seam allowances. On a super big piece of pattern paper, one with straight and perfectly perpendicular edges (I sewed two pieces together) draw a line down one entire side that is your seam allowance width from the edge. At the bottom edge, on that line, make a mark. Measure out from that mark in a quarter circle your finished radius amount, like this:

Now measure from your waistband mark down to where you want your skirt to hit... subtract two inches for the waistband, and add an inch for the hem. Add your finished radius amount to this number, and mark it out from the same spot as you did for the first quarter-circle.

You don't have to add any seam allowances to this piece, as we added them all in the math. The straight side that does not have the line down it will be on a fold. Make sure you don't cut down the long straight line! =)
One more piece: trace the front underlay neckline, and draw a line 1 inch down from it, and cut out. This is your underlay facing.
Now we've finished the pattern pieces, time to cut the fabric. This dress will only work in stretch fabric, I used a jersey sheet set (Queen sized) from Wal-mart. Make sure your stretch goes horizontally on everything. Cut:
- two skirt pieces on the fold
- one back bodice piece (with the back neckline) on the fold
- one front underlay piece (with the front neckline) on the fold
- two front overlay pieces, making sure they are mirror images
- four cuff pieces on the fold
- four waistband pieces
- one underlay facing on the fold
- one ruffle piece, 3 inches tall by the width of your fabric.
Update: The rest of this tutorial can be found here. =)
Thanks for stopping by!

PS: Praying for all of you who were/are being affected by Hurricane Sandy.
Charity,
ReplyDeletewhere have you been? Its time to come over and link up your stuff. I am due in November and I am going to need it all in one place.
http://shaffer-sisters.blogspot.com/2013/05/make-for-mom-link-up.html
Hope to see you there soon.
with love,
-Jo