Saturday, June 27, 2015

Jean Skirt and Gingham Shirt

  Well, I finished the item that took up most of my Kid's Clothes Week sewing time late last night, and today I spent some more time sewing a quick shirt to go with it. =)

  This is a fairly basic a-line denim skirt, with elastic in the back, a faux-fly (not a real one, because I didn't have a zipper that would work) and front and back pockets.

  You wouldn't think a simple design like that would take 5 days to sew! But there was a lot of top-stitching involved, and I picked out a few things and re-did them.

  I had to pick out the back pockets and re-sew... they were a good two inches too low where I initially placed them. They work where they are since the back is elasticized, but if it wasn't I'd prefer them even higher.

  Those back pockets are heart-shaped, because why not? =)

  The pocket facings and linings, as well as the waistband lining, are all sewn in a pink floral quilting cotton, but I didn't get any photos of those because my camera battery died.

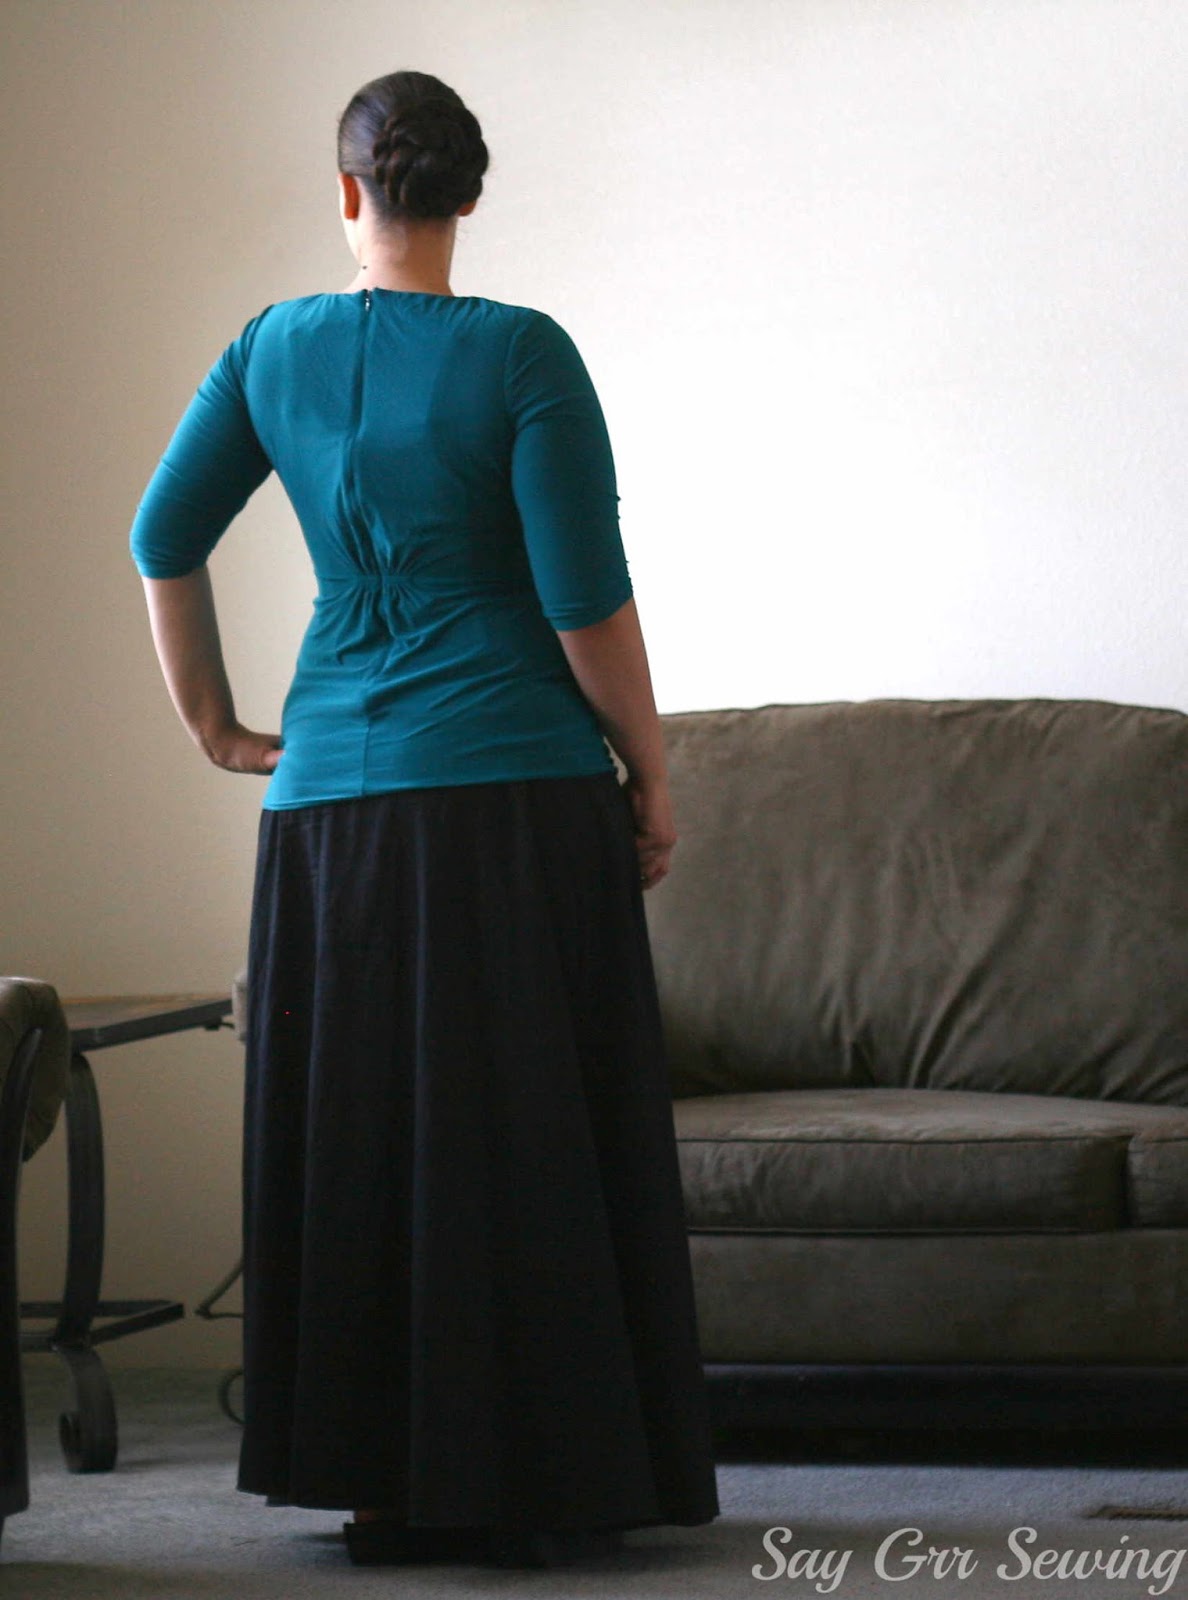
  I tipped the hem to be 1" longer in the back than the front, and it looks level from the side! At least it does in these photos. Booper has a propensity for pulling the fronts of her skirts very low, and the backs very high, so most of the time it's still a bit longer in the front.

  Hopefully this will be a sturdy and long-lasting basic and will get worn often. =)

  The shirt is made with a gingham knit from Girl Charlee (as usual).  It's thinner than I prefer, with not much stretch (it's only 30% if you really tug... I'd call it 20%), but it works for a lightweight summer shirt! And I love how fresh it looks on Booper.

  I used a basic tee pattern (this one) and cropped the bodice to a few inches under the arms, then added a gathered piece to bring it back to hip length. I also shortened the sleeves, although I think I should have shortened them about an inch less.

  I sewed it in a straight size 6 based on the chest and height measurements (her waist is apparently still a size 4, but that didn't matter for this design), and it fits decently. Next time I want to increase the shoulder width and slope slightly.
 
  I finished the neckline beautifully using the same method as the last two times, but when I went to try it on Booper it wouldn't fit over her head! I think it was the high neckline combined with the lack of stretch. I ended up cutting it off and adding a narrow band instead.

  As usual, the hem and sleeves are lettuce-edged. =) I don't like the look as much as on a stretchier knit, but I didn't want to lose any more length in either place.

  And that's it for my Kid's Clothes Week sews! There's one day left, and I'll be sewing, but the chance of actually finishing anything in the time left is minimal.

  Oh by the way! My new nephew arrived a few hours after I posted about his gifts! =) I haven't met him in person yet (we live 11 hours away) but he's a real cutie in photos.

Thanks for stopping by,

Thursday, June 25, 2015

Baby Boy Gifts

  My brother's first child is due to arrive very soon here. And it's a boy! Which means I got to sew boy baby things.... my last chance for that was the overalls I made for my sister-in-love's twins, nearly 3 years ago. =)

  I was waiting for a chance to buy some cute boy knit at Girl Charlee, when I remembered that I had quite a bit of camouflage fabric leftover from Christmas sewing, and decided that it would be perfect for a onesie. (The camo shirt in that post was for this little guy's mama!) =)

  I've been hearing quite a bit about the pattern company Brindille and Twig lately, and decided to test out their basic bodysuit pattern to make this.

  The pieces fit together decently, but overall I wasn't impressed with the pattern. In addition to the pattern instructions that were obviously cobbled together from other patterns (which resulted in a lot of information that simply wasn't relevant to making the onesie) there were a lot of seams that would be poking out if I hadn't altered it, as well as 'cut to fit' pieces. Also, the pdf was assembled in a way that felt awkward and would be easy to mess up.

  I added a hem instead of binding the sleeves, sewed everything in a slightly different order to keep the serged edges from poking out, and semi-followed this tutorial for the bindings. I made my bindings wider, and left some of the width on the inside of the garment, instead of wrapping the whole thing to the outside. I should have made the leg binding even wider for this size snaps.

  I love how it looks on the neckline though!

  I added a tag again, made with iron-on transfer paper (affiliate link).... only instead of ironing it on to another piece of fabric and sewing that fabric into the seams, I ironed it directly to the shirt. I hope it lasts! =) The end result is pretty cute, but I won't be buying from that pattern company again.


  Next up, a pair of pants! These were actually made some time last year.... I decided I wanted to sew pants for my twin nephews, finished one pair, and set them aside until I could finish the second pair. And then I got distracted sewing other things, never finished the second pair, and the twins grew out of this size by the time I remembered I'd sewn the first pair. I thought they might as well get used. ;-)

  I used Peek-a-boo Patterns Classic Chinos for these, and only swapped out the back welt pockets for patch pockets. This is another pattern I wasn't particularly impressed with. The instructions were not bad, but the pieces had some real discrepancies, and I had to majorly fudge the waistband to actually catch the faux-fly in it. That, and it has to be printed in color, since the lines are all solid.

  I did some fun stitching on the back pockets... luckily my new nephew's last initial is the same as the twins'! =) I used some red quilting cotton for the pocket lining and unfortunately it's peeking out a bit along the side edge.... I should have tucked the opening in better!

  The other change I made to the pattern was top-stitching, and lots of it. I'm happy with how these pants turned out in spite of the pattern issues, although I realized as I was photographing them that I should have added a back yoke to make them look even more like jeans.

  I sewed in a last-minute tag before taking these photos... I didn't just iron it to the denim, because I didn't think it would stick well. I ended up hand-stitching it in the back, since all of the seams were sewn solidly down and I didn't have enough of this color of thread to re-do any top-stitching.

  I was originally going to make these with a real fly, but realized just before sewing that I didn't have any zippers that would work, and decided an 18-month old wouldn't really need it anyway.

  Finally, I added a toy to the gift mix! This one is pretty simple... a basic ball, with some fun horse fabric for half of the panels, black broadcloth for the rest, and a rattle inside.

  It's a little lumpy in spite of my careful stuffing job, but I doubt a baby will notice. ;-)

  I used this free pattern from Grand Revival Designs in the smallest size for this one... though I wish I'd gone one size up to fit the horses a bit better!

And that's it for the baby boy gifts! I've been participating in KCW this time around, but I have yet to finish anything, let alone take pictures. I'll be back just as soon as I can!

Thanks for stopping by,

Friday, June 19, 2015

Black Floral Shirt

  Here's that shirt I mentioned in the last post!

  It's mostly a basic tee, but I added length and width to the front of the pattern over the belly, and gathered the sides to match the back.

  I also curved the front hem a bit so there would still be plenty of coverage later on.

  The fabric is a jersey rayon spandex that I bought it in this Facebook group a few months ago. It wasn't easy to sew with though! It's very thin and delicate, and my serger just wanted to eat it. I ended up spraying three layers of starch on all of the edges before I was happy with how it sewed! At least it's opaque, and the lightness of the fabric makes it more comfortable to wear in the hot weather we've been getting lately.

  I've also discovered since sewing it that this fabric 'grows' a lot over the course of a day... it's at least 2 inches longer at the end of the day than at the beginning!

  I tried a new method for the neck binding this time, and I'm really happy with how it turned out! I followed this tutorial, but cut my binding 1/2" wider so there would be some on the inside and outside of the shirt- it helped keep the shoulder seam serging from poking out. My stitching is a bit wobbly on this shirt, but I've already sewn more bindings using this method.

  As usual, the sleeves and hem are lettuce edged. =) I'm wearing the skirt I talked about in this post with it, and that's about all there is to say about this one!

Thanks for stopping by,

Tuesday, June 16, 2015

Another Half-Circle Maternity Skirt

  My wardrobe has been a bit limited lately. My belly is getting pretty big and most of my maternity clothes are worn out, so I was down to 3 wearable skirts, none of which were in good shape. So I did what any seamstress would do and made another!

  If you've been here since the last baby, you might remember a couple of half-circle skirts with curved waistbands I made. I liked those, but was never quite happy with the fit. This time, I decided to make a proper pattern based off my measurements. I did a lot of drawing and slashing and spreading and re-drawing, until I ended up with a curved waistband and a half-circle skirt below it. 

  I sewed it up in some black lightweight denim that I've had for a year or so, with a double layer of swimsuit lining for the waistband. And it fits! It still needs a bit of adjusting... the back portion of the waistband is higher than I'd like, and I need to level the hem. Overall though, it's miles better than the first two I made, and still a very quick sew. 

  I did a serged rolled hem on it... that led to a bit of an unfortunate rippling on the bias edges, but it worked otherwise, and was much quicker than most hem finishes would have been. However, I decided to re-hem after taking these photos... if I wasn't wearing tall shoes this skirt was dragging on the ground. I trimmed the hem down by almost two inches in the front, and an inch in the back, and it's a much better length now.

  I'm planning on altering the pattern pieces to make the back fit a bit better before making another skirt. For now, I'm just happy to have a skirt with no holes in it that isn't too tight or too loose!

  Since taking these photos, I've also sewn a knit maternity shirt... hopefully I'll get some photos of that soon! =) 

Thanks for stopping by,

Tuesday, June 9, 2015

Elastic-Waist Skirt

  Booper really loves fabric. Every time we are in a store that sells it, she asks if she can buy some! We were in Hobby Lobby a few months ago and she begged to buy some to make a skirt. Since she had an actual plan for the fabric (one giant fabric collection per family is more than enough!) I let her pick a quilting cotton and buy a yard of it.

  Since then, it's waited for a time when I wasn't busy with something else and she felt like sewing. A few weeks ago, the timing worked out and we sewed this skirt together! I don't think she's quite ready to guide the fabric and work the foot pedal at the same time (especially since the foot pedal on my machine is very finicky about the proper amount of pressure, and rushes from not sewing at all to lightning speed with the slightest motion) so she sat on my lap to help guide the fabric while I used the pedal.

  We did the same for serging the side seams. She did most of the pinning, and helped pull the elastic through the casing. I let her rest her hand on top of mine while I pressed the seams, but actually guided the iron myself. Even though I really did most of it, she was really happy to have sewn a skirt!

  That is, until she put it on and realized that it wasn't ankle-length! Which is why her head is cropped out in some of the photos... she was grumpy that her skirt was 'too short'. Luckily she's decided that it's fine now, and actually wears the skirt. =)

  She's been asking to buy fabric again too... but this time she wants to buy fleece and make a dress from it. I'm thinking we might wait on that idea until the weather is a bit cooler! ;-)

Thanks for stopping by,

Thursday, June 4, 2015

Three Girls, Three Days, Three Dresses

Last year on Black Friday I bought a few patterns on super-sale. One of those was the Uptown/Downtown Dress pattern from Sew Straight and Gather. I printed it out soon after, but became distracted with other projects and didn't assemble it until last week. And then, with it assembled, what else was there to do but sew it up? Three times!

  This fabric is an interlock knit from Girl Charlee, and is unfortunately no longer available. I actually bought mine when someone in the Girl Charlee Facebook group decided to destash it, so I had just under 3 yards to work with!

  I planned when I bought it to make an Uptown Downtown dress for Booper. Once I had the fabric laid out, I thought there was a small chance I'd be able to squeeze one out for Gaiw too. And once those two were cut I realized there was just enough for a dress for Beckers! I'm kind of wondering if there's enough left in the scraps for a newborn-sized dress, although the pattern doesn't go that small. (Yep, baby #4 is apparently a girl too!)

  I cut a size 5 width for Booper, but lengthened the hem quite a bit. It's about 6 inches longer than the size recommendations in the pattern, which put her in the 5 width and the 7 length.

  For Gaiw, I went with a size 3 width cut the hem at the size 6 length. According to the pattern, a size 3 width and 4 length is correct for her.

 Beckers' dress is a size 2 width and 3 length. She's a bit smaller than the smallest size in the pattern, but the closest size would have been 2 in width and height.

  Based on the fit of the dresses, it looks like the pattern is pretty consistent in its sizing! =) Just shorter than these girls need, since they are constantly growing!

  The pattern does not have any notches, but I do like the nicely finished neckline. It is pretty low though... and definitely too low once it's been worn and stretched out for a day! Next time I'll raise the front neckline by 1" for any size, and these necklines are probably going to get an inset.

 The pattern has very detailed instructions... maybe even a bit too informative and helpful! It felt like a lot of text for what is a pretty basic sew. They'd be great for a beginner though.

  The lining is Girl Charlee swimsuit lining. I think it might be too warm for a full lining, but I really like it for partial linings. It's really slippery, which makes it pretty difficult to cut and sew, but works well to keep the drape of the outer fabric. Since it's a nylon-spandex blend it doesn't press well, so it works better with under-stitching or top-stitching.

  It's probably a good thing there wasn't enough fabric to make myself a matching dress, right? ;-)

  These dresses were a really quick sew! From cutting the pieces to burying the thread ends was only 3 days of sewing... not full days, but days where I squeezed in what I could. Considering that one garment usually takes me the same amount of time, these felt really fast.

  I lettuce-edged the skirt and sleeves instead of hemming them like the pattern suggests. I just really like lettuce-edging! =)

I'm looking forward to making more of these with some of the other options. =)

Thanks for stopping by,