Sunday, February 25, 2018

Wood-Burned Cutting Board and Utensils

  I was planning to make some wood-burned utensils for my Mom's birthday last year, but when my friend Becky posted a few beautiful cutting boards that she'd wood-burned on Instagram, I decided that I needed to make one of those as well! I searched for a good cooking-related quote, and came across this one:

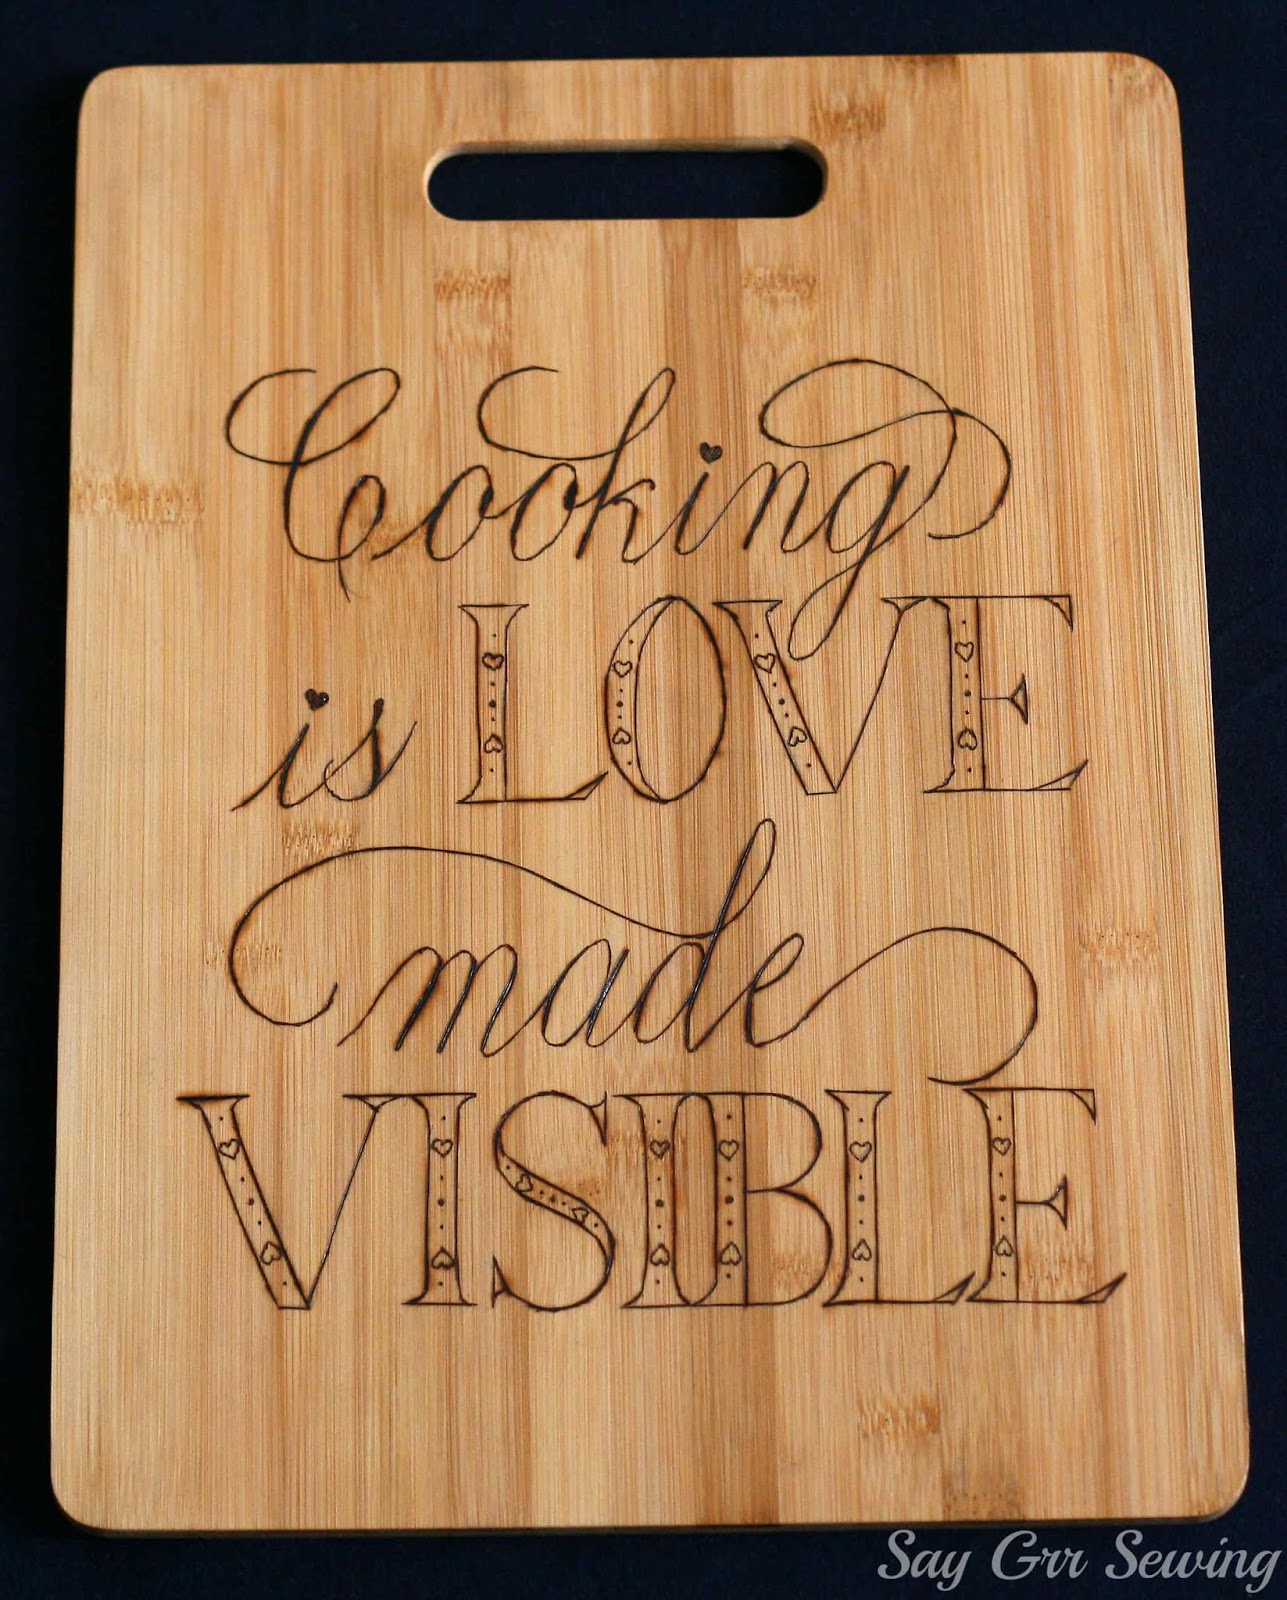
  It's perfect for Mom, because she really does pour a lot of love into her cooking! I drew the quote out on paper first, then rubbed all over the back of the paper with a pencil, then taped the design on the cutting board and re-drew all of my lines, firmly, to transfer the graphite to the cutting board. 

  It probably would have worked better with a softer lead, but it was enough to give me a guide to trace over again with pencil. 

  I couldn't find a wooden cutting board that didn't already have some kind of design on the surface, so I went with this bamboo one. I was nervous about it burning well, but it was actually easier to neatly burn this than the wood things I've tried.

  I had to do the wood-burning all at night, after the kids were in bed... that tool gets incredibly hot! 

  I added little hearts and dots inside the larger letters- I love how that looks!

  It's definitely not polished, but I love how this turned out!

  Then, to go with it, I burned a set of bamboo utensils:

  For these, I just sketched some designs in pencil directly on the utensils, then burned them.

  I did different, but complementary, designs on each one:


  I added little hearts at the ends of the handles:

  The backs of the utensils also have the hearts on the handles, but are otherwise plain:

  Again, I really love these! And I learned a lot while making the cutting board, so these are a tad less rustic.

  Here's the whole set together- I definitely wanted to keep this!

  And here's how I wrapped it:

Thanks for stopping by,

Wednesday, February 21, 2018

Wood Plaque

  Here's something I made for my Dad's birthday last year:

  I found this unfinished wood piece at Walmart and wanted to make something with it for my Dad's office.

  First, I stained the wood by watering down some acrylic paint and brushing it all over, then wiping off as much as I could. I intentionally left the stain slightly uneven for a weathered look. The edges really soaked it up, so I only did one coat on those and double-coated the rest of the plaque.

  I tested out some paints with my pointed pen on a little matching wooden tag, but everything was either too thick to write with, or once I'd thinned it, bled everywhere. So I ended up using a calligraphy ink, even though it wasn't waterproof. I still couldn't make regular down-strokes, because of bleeding, so I just did gentle parallel down-strokes to make them thick enough.

   After sketching my design on plain paper with pencil, I transferred it to the plaque the same way I did for this canvas, then went over it with the ink. I used the pointed pen for all of the script, and a combination of pointed pen and a small brush for the larger letters.

  Once everything was dry, I very, very carefully brushed on a layer of clear acrylic sealer, and once that was dry, a second layer.

    It's pretty imperfect up close, but I love the overall look. My only regret is not sanding the wood piece down before beginning to work on it!

  I had fun wrapping this one too! I have a compass seal, which I thought went nicely with the verse on the plaque, so I used that along with some black cardstock and thread, brown ribbon, copper wax, and gold ink, to get this:

  As you can see from the tag, this one was late. In fact, all but one of the gifts made after May last year were late. I don't think anyone but me minded though!

Thanks for stopping by,

Thursday, February 15, 2018

Teal Tie-Neck Shirt

I saw a knit shirt with an off-center bow at the neckline last summer, and loved it. So, when I had a little time last fall, I decided to make one of my own!

  I used my knit block, but removed some width from the side seams, partly because that block was designed for a cotton knit, and this is rayon, and partly because I'm a little bit smaller than I was when I made the block. 

  I marked my usual neckband width and height in the center of my fabric, then widened from there out to the edges of the fabric for the tie. I sewed the tails of the tie up to the marked points, then clipped to the stitching and turned it right side out. Then I sewed the neckband portion on as usual, being careful to keep the tails out of the way. I love the way it turned out!

  I used a rayon spandex from Sincerely Rylee for this one- it's pilled up quite a bit with wear, but otherwise worked well. I wanted the bow to drape softly, and the rayon is perfect for that.

  I love the color of this fabric too! The closest thread match I could find was slightly more blue than the fabric, but it's close enough not to be noticeable, even with the lettuce-edged sleeves and hem.

  I'm really happy with how this one turned out, and I want to make another at some point!

Thanks for stopping by,

Thursday, February 8, 2018

Stripes and Florals Dress

Foof turned 2 in September. I usually make tiered skirts for my girls' second birthdays, but Foof was much more interested in wearing dresses at that point. She had a hooded dress that she particularly loved, but that was getting a bit short on her, so I decided to go that route!

  I had recently acquired some BOLT knit from Girl Charlee, at what I thought was an amazing price, considering how often I'd heard it compared to Art Gallery knits, and I loved the way the floral and stripes looked together. 

  I was quite disappointed in the quality of the fabric, however. The print felt stiff and rough, the fabric didn't have a lot of recovery, or as much stretch as an AG knit, and for some reason the stitches kept breaking. That almost never happens on the knit garments I sew, so I'm blaming the fabric. The fabrics faded significantly with regular washing, and the print crocked... even when sewing it! You can easily see where the needles went through the fabric because the color pulled away:

  But, I didn't like my other already-available options for a fall dress, so I went ahead with these fabrics. I made a basic bodice, sleeves, a hood, and a circle skirt from the floral, then added details with the stripes, including a self-drafted kangaroo pocket, whose openings I banded with a stripe of the blue.

  I wish I'd made the kangaroo pocket openings just a bit bigger, but Foof loved it!

  Actually, I felt like I should have made the whole dress a little bit bigger... I'd meant for it to have a slightly more relaxed fit. 

  I twin-needled the hem of the ruffle- ruffles on circle skirts are huge, and this one was no exception, even thought it's barely gathered!

  I love the ruffle around the hood! Next time I would widen it the neckline just a bit- maybe 3/8"?

  Foof has worn this dress oodles of times since I made it! I've had to repair it several times due to the aforementioned 'stitches breaking' issue, but she loves it!

  This little girl is certainly adored around here!

  Most of the time she is eager to please, and willing to listen. But there's also the side of her that angrily declares, "You da baddest mama in da whole world!" when she doesn't get her way!

  Foof is a clever little girl, who loves to repeat the large words that she hears, such as 'congregation', and who watches everything her sisters do intently. She loves to mimic them!

  Because she's always copying her sisters, she's surprisingly strong!

  She can climb onto all kinds of things that I wouldn't expect her to be able to... and can usually get back down safely, too!

  Foof loves cuddles, and often asks me if she can snuggle with her big sisters before going to bed.

 She's still very much a mama's girl, and rarely leaves my arms when we aren't home.

  With all of the doting she receives, it's a wonder she's not totally spoiled!

  In addition to making her dress, I made cupcakes. I tried frosting them to look like roses- which was much more difficult than all of those Instagram videos made it look! ;-) I can never seem to nail to balance between 'too soft' and 'not soft enough' with frosting. But I ended up with a few good ones!
Thanks for stopping by,