Friday, June 16, 2017

Stuffed Flannel Cat

  My niece loves cats right now, so something catty was in order for her 3rd birthday in April. I did loads of searching for a stuffed cat pattern, but everything I found was too one-dimensional or cartoon-ish. I finally came across this super-cute pattern, but at 17" long it was almost double the size I wanted. I might buy and make that one at some point anyway, but it wasn't right for my niece.

  Eventually, I gave up and made my own pattern!

 Trying to make this pattern definitely stretched my drafting and 3-dimensional thinking skills! I referenced the book "Stuffed Animals: From Concept to Construction" by Abigail Patner Glassenberg (affiliate link), and it had lots of useful information, but my first version still turned out laughably bad... too wide in the neck, too skinny in the legs and tail, with a very splayed-leg stance, and tiny crooked ears. I couldn't even bring myself to finish it!
Photo from my Instagram. ;-)
  At this point I was pretty sure I would have to resort to a gathered skirt with cat-head shaped patch pockets, but I re-drafted it and tried again, and the second version was much better!

  I was originally planning to hand-sew the little footpads (this cat is only 9" long, so the footpads are about the size of a quarter each) but my hand-stitching isn't as sturdy as I'd like it to be, and this was going to be a gift for a 3-year-old, so I decided to machine-stitch them. I didn't even think of hand-basting before stitching though, and I really wish I had because trying to wrangle these little pieces around with 10 or so pins in each was no easy task! And they didn't end up as even as I would have liked either.

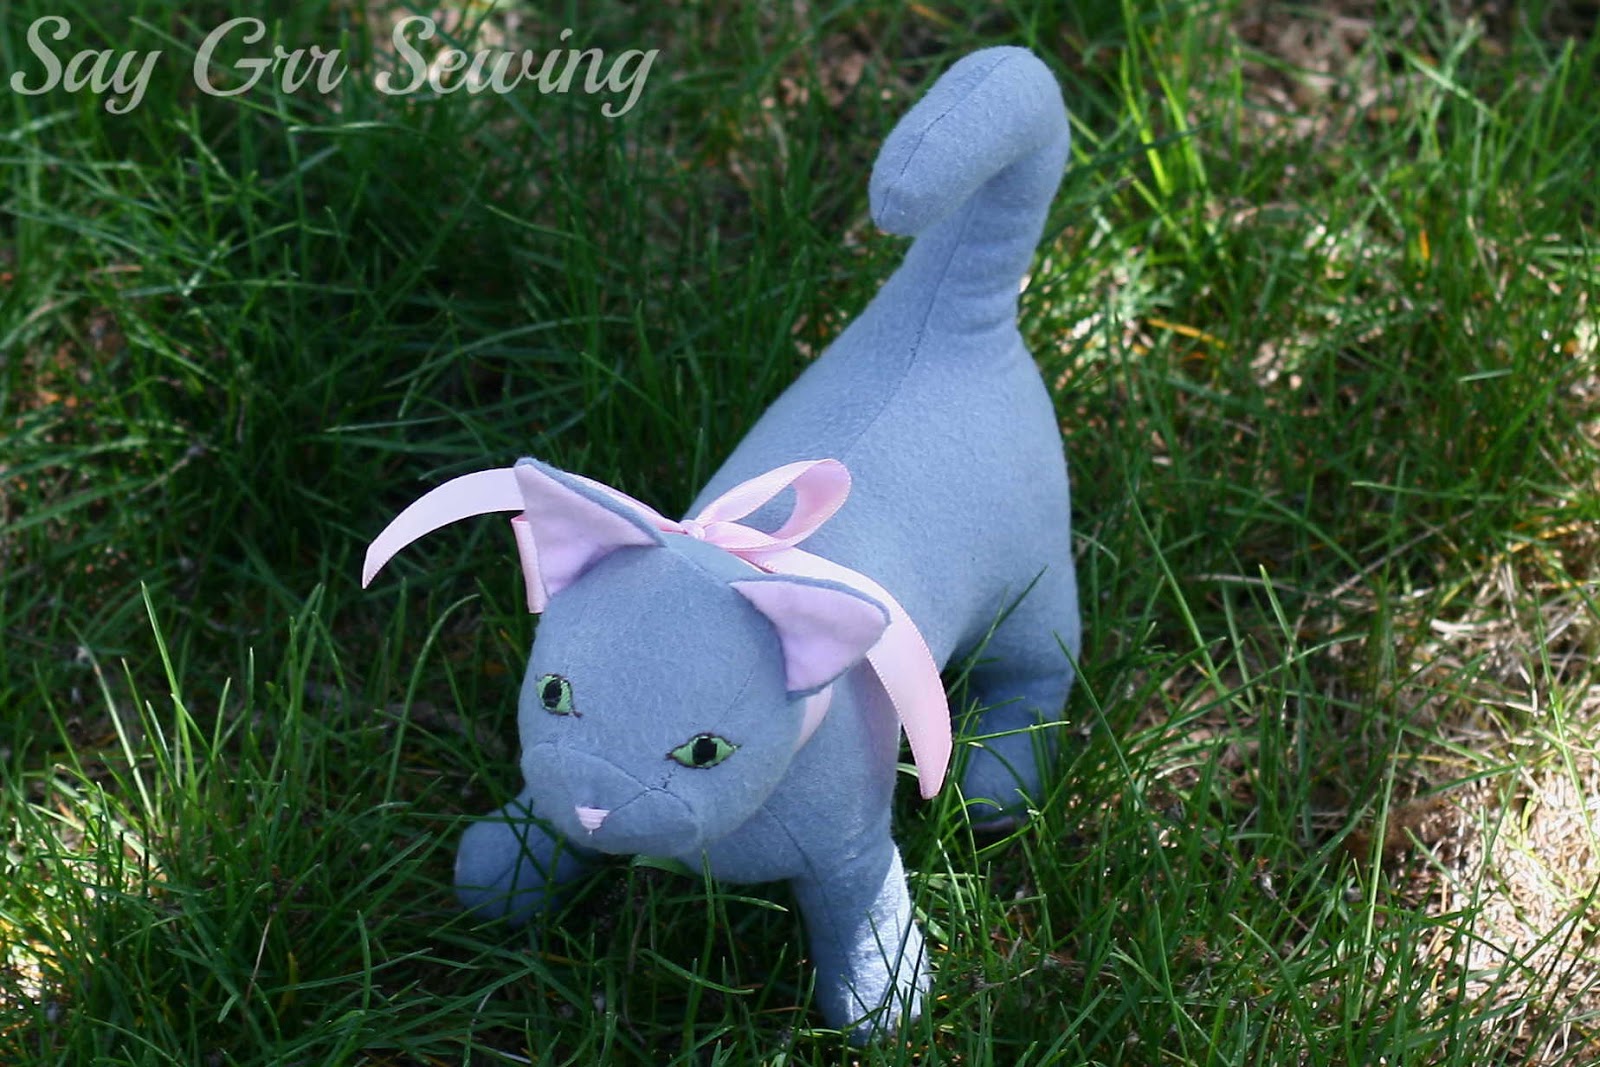
  I ended up modifying the underbody gusset shown in the book (it's also on the author's blog, here) because I wanted the gusset to extend up to the cat's chin/ mouth area. I also went with totally separate pieces for the inner legs, instead of darts, because for some reason that's easier for me to sew. I left a pretty big opening to stuff the cat through, and ladder-stitched it closed.

  I used grey and pink flannel for this... I'm really not sure how well it's going to hold up. It doesn't feel as sturdy as quilting cotton or fleece, although it is pretty cuddly.

  I embroidered the eyes and nose with brown, green, black, and pink embroidery floss. I really wish I'd canted the eyes more, and it would have been a lot easier to embroider them before sewing the entire cat, but overall I'm pretty happy with the face. The cheeks and nose were another really fiddly, difficult part to sew!

  The underbody gusset extends to the base of the tail in the back:

  She also has a head gusset, with a dart across the top and extending into the side face for inserting the ears. I think just a bit wider on the head gusset would have been better.

  I'm really happy with the way this turned out!

  I think the pattern could still use some tweaking but for only two drafts I don't think it's bad at all. =)

  My cat-obsessed little girls begged for one of their own, but since they already have 4 or 5 stuffed cats I haven't sewn one up yet... although it would give me a chance to try some more tweaks!

  Thanks for stopping by,

Friday, June 9, 2017

Marshmallow Shooters

  This isn't what I was originally planning to make for my brother-in-law's birthday in March. Unfortunately, my first plan ended up totally not working (after I'd spent several days on it...), and since I was already making one of these for his younger brother's birthday a week later, I decided they could just use them together!

  I've seen a lot of different versions of marshmallow shooters, but I mostly followed the directions for this one, which is just PVC pipe and fittings. I added a length of pipe to the top fitting for the mouthpiece, because it was a bit awkward to access without it, and I painted all of the fittings with Rustoleum Universal Metallic spray paint in Dark Stainless Steel before assembling everything.

  I wrapped the pipes with black and camouflage patterned Duck tape.

  I divided a bag of marshmallows between two plastic sandwich bags, wrapped the tops with some of the camouflage patterned tape, and stapled on a quick tag made with some black cardstock and silver embossing powder for the ammunition:

  These were a hit... my husband (who cut all of the pipes for me) had to test them out before he let me gift them and didn't want to give them up! They have a surprisingly long range, and are pretty accurate for shooting what basically amounts to tiny pillows. ;-)

 They were better than my first plan, for sure! =)

Thanks for stopping by,

Tuesday, June 6, 2017

Arches Skirt

  For my sister's birthday in March, I decided to sew up the Decades of Style 1940's Arches skirt that I'd picked up on Black Friday last year. I didn't have a fabric that would be suitable, so after some searching I ordered some twill from Style Maker Fabrics

  I love the style lines on the front of this skirt! I'm hoping to make one of these for myself at some point:

  The back is just a simple, darted a-line with an invisible zipper:
 
  This fabric is pretty heavy, so I was worried about sewing those darts but they worked all right!

  I had bought some skirt hooks to sew in the waistband above the invisible zipper, but they were quite a bit too wide for the narrow waistband, so I ended up using a sew-in snap:

  The front arches are sewn with a lapped seam, and I really wasn't sure how to finish them... I considered a lining, but this fabric is thick enough that I didn't want to add even a lightweight lining, so I ended up doing a sort of facing for the front only:

  I converted the front of the skirt to a darted a-line shape using a tip from this sew-along and cropped it to just cover the tops of the pleats, then basted it to the front before sewing the side seams and waistband, but after sewing the lapped seams and pleats.

  I don't have a lot of lightweight lining sort of fabrics, so I used this brown, and serged the rest of the interior seams with brown to match. I realized later that the lining fabric was slightly discolored, which was disappointing, but fortunately it's not visible on the outside! I had used a blue wash-out marker to mark everything, and washed it out before taking photos, which is why the skirt is a bit rumpled-looking! 

  I was pretty pleased with the pattern- I would definitely be willing to buy another from this company! And I'm happy to report that the skirt fit my sister!

Thanks for stopping by,