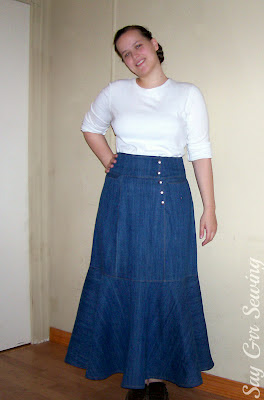
This is a 6-paneled skirt with a circular ruffle or flounce. I changed the panels this time so it is more fitted than my Pleats and Panels skirt, so I also extended the opening below the waistband. And this time it has pockets! I think this is one of two skirts I own with pockets. I usually forget to add them to the skirts I make.
Want to learn how to make one? Let's start with measurements.
You need to measure your waist ("A", 34"), 4 inches below your waist (B, 38.25)
widest part of your hips/thighs, ("C", 45")
distance from the low waist measurement to the hip measurement, ("B-C", 4")
distance from low waist to knee (B-D, 17"),
distance from knee to ankle (D-E, 18").
Now to make a pattern:
Start by drawing a straight line for B across your paper,
measuring down B-C and making another, parallel line, then measuring from B down for B-D and marking a line for D parallel to B. You should have something like this, I also marked the midpoints of the lines:
Mark your 1/6th of each of your B, C, and D measurements on each line (D is C+12 for walking ease), centering them on the lines, I marked 6 3/8, 7 1/2, and 9 1/2 inches, like so:
Mark a line using a straightedge between B and C:
 |
| (We are looking at it from the side now) |
Repeat on the other side, you should have something like this:
Add seam allowances on all sides, I used 1/2" for each side, but later I had to cut the vertical ones down to 1/4" because I was short on fabric.
On to the waistband. Lets start with the primary front waistband. Make parallel lines 4 inches apart, marking the midpoint. On the lower line, B, mark 1/3 of your B measurement, centering it on the line. For me, this was 12 3/4" Mark the same measurements on your top line, A, then divide A by 3 (~ 11 3/8") and subtract it from B. (1 3/8") Mark in from the first mark on your top right this amount. I erased the first mark so I wouldn't accidentally use it:
Draw lines between your marks:
Use something with perpendicular edges (I used a box of freezer paper, if you have a proper dressmaking square go for it) and position it so one straight edge is along the angled edge on your right, and it's perpendicular edge runs down into B. You want it to hit B 2-3 inches in from the right.
Mark this edge, I used a red line to show you. Also lengthen the first angled edge upward. On the top left corner, mark 1" in and 1" down and draw a curved line between them:
Measure above A the same distance that your new line is above B, line the box up so one edge hits that mark and slants into A, and mark again:
You should get something like this... curve the new angled lines gently into A and B:
Now the secondary piece. Two parallel lines, 4 inches apart, midpoints marked, center 1/6th of B on both lines, then in from the top left the same amount you marked in from the top right on your primary waistband. I marked in 1 3/8" and erased the first mark.
Draw your straight and angled line:
And curve the edges the same way you did for your primary waistband piece, marking up from A and B the same distance you did the first time:
On the right of this piece, add an inch for overlap, then add seam allowances to all sides:
Make your back waistband the same way as the first, using 1/4 of B for your starting measurement. Don't add a seam allowance to the straight side of the back waistband:
 |
| (There are seam allowances added on the top, bottom and right sides. I just erased the inner lines) |
Now take D-E (18") and add the radius (9 1/16") to find your ruffle length (27 1/16) I also added a 1" hem allowance to this measurement, so 28 1/16. Here is the other way to mark a circle, you could use this for the first one too. Tie a ribbon or string (nothing stretchy) to a marker:
Measure the distance of your ruffle length from the marker along your ribbon, and put a pin in this mark:
Pin the ribbon to the mark you made on the edge of your paper earlier- I put a blanket underneath so I would have something to pin to:
Holding the pin with one finger, stretch the marker out with the other hand -holding it perpendicular to the surface- and draw in a circle:
You'll have something like this when you are done:
Cut this in half from the mark straight up, or just begin at a corner instead of a straight edge and you will get what I used. I also added a 1/2 inch seam allowance inside the first curve:
By now this is what you have:
You will want to cut 6 of the panel pieces, two of each of the front waistband pieces (make sure they are mirror images) and two of the back waistband pieces on a fold. (12 pieces total) To cut the ruffle piece, fold your fabric in quarters and lay your pattern piece on top:
So that one straight edge is on a double layer fold:
And the other straight edge is on two single layer folds:
Pin well and cut ONLY on the curved edges. When you open this piece out you will have this:
You just need a few more pieces! Cut a rectangular piece that is B-C plus 1" tall by 3" wide and one that is B-C plus 1" tall by 1.5" wide ( I cut both 2 inches wide and regretted it.) These are your placket pieces; if you use a zipper below the waistband instead of snaps you won't need them.
Then the pocket pieces. Measure the width of your hand and add an inch for ease, then another inch for seam allowance. I made my pieces 6 inches wide and 3 inches tall and cut four of them, two will be the pocket facings and two will be the pocket backings:
And finally, the pocket linings. Measure the length of your hand, subtract the height the main pocket piece, multiply by two, and add seam allowances. Make these the same width as your main pocket pieces, and cut two. Mine were 6" wide and 14" tall
Come back tomorrow to see how all these pieces come together! But before you go, here are a few more photos to help you want to make this skirt. =)
 |
| Pockets! |
 |
| I love twirl as much as I did when I was a little girl. =) |
 |
| Inside out |
 |
| Back view |
EDIT: Part 2 is HERE
Thanks for stopping by!
Linking up here:


I love this skirt. It looks very lady-like. Good job on the instructions too!
ReplyDelete-TB
Thank you!
DeleteI saw this while surfing different link ups (I forgot which one). This is so pretty. Very modest too. I'll have to try this out.
ReplyDeleteThanks for sharing,
Nikell
Thank you! I'm glad you like it. If you do give it a try, I'd love to see how it turns out. Also, if you get stuck anywhere that I didn't explain clearly enough, please let me know and I'll try to help you out. =)
DeleteI really like this. I will have to give it a try. Thank you for sharing.
ReplyDeleteThank you! I still wear mine a lot, although it's getting rather ragged. I'd love to see yours once it's finished. =) You are welcome!
Delete