My youngest sister's birthday was early in January, and since I follow her Pinterest boards, I knew that she wanted a mid- or full- length dress from a large-scale floral. After making this dress last year, I bought a few more yards of the same print for myself, but it was just perfect for my sister, so I turned it into a dress for her instead!
I used the same pattern as last time too, the Lady Skater dress from Kitschy Coo. I lengthened the bodice by 1.5" and added a lot of length to the hem, to make it mid-length for my tall sister. I used the 3/4 length sleeve, but hemmed it instead of banding it, and raised the neckline. I also added pockets again! I had a really difficult time top-stitching the pockets this time, so the final result is a little wobbly, but I didn't want to risk stretching it out by re-doing it.
I sewed the neckband in the round instead of the flat, and added a tag. The main reason I like adding tags to gifts is that it helps differentiate the back of the garment from the front! ;-)
She loved the dress, so I'm quite happy about this one!
One of my sister-in-love's had a birthday in January too. She thought my hooded raglan was pretty cute, so I made a similar one for her. I used the Hey June Lane Raglan pattern, and I remembered to size up for hers, so it would fit even though the fabric wasn't particularly stretchy! She's pregnant, but since her belly was still pretty small at the time I decided not to make any maternity modifications, in hopes that she'll be able to wear it after the baby is born too.
I used pink for the accent color on this one, and went with plain cuffs and a hem-band.
I also lined the hood- the pattern has an un-lined hood but I really prefer the look of a lined one. The pink rayon French terry is a lot stretchier and has more drape than the floral polyester French terry, so I used a wider seam allowance along the center seam, and ended up trimming some excess fabric from the neckline edge of the lining so it would match the outer. I stitched in the ditch between the lining and outer to make the drawstring casing... that turned out to be really difficult with the stretch and wobble of the fabric, so I think I'd try something different next time!
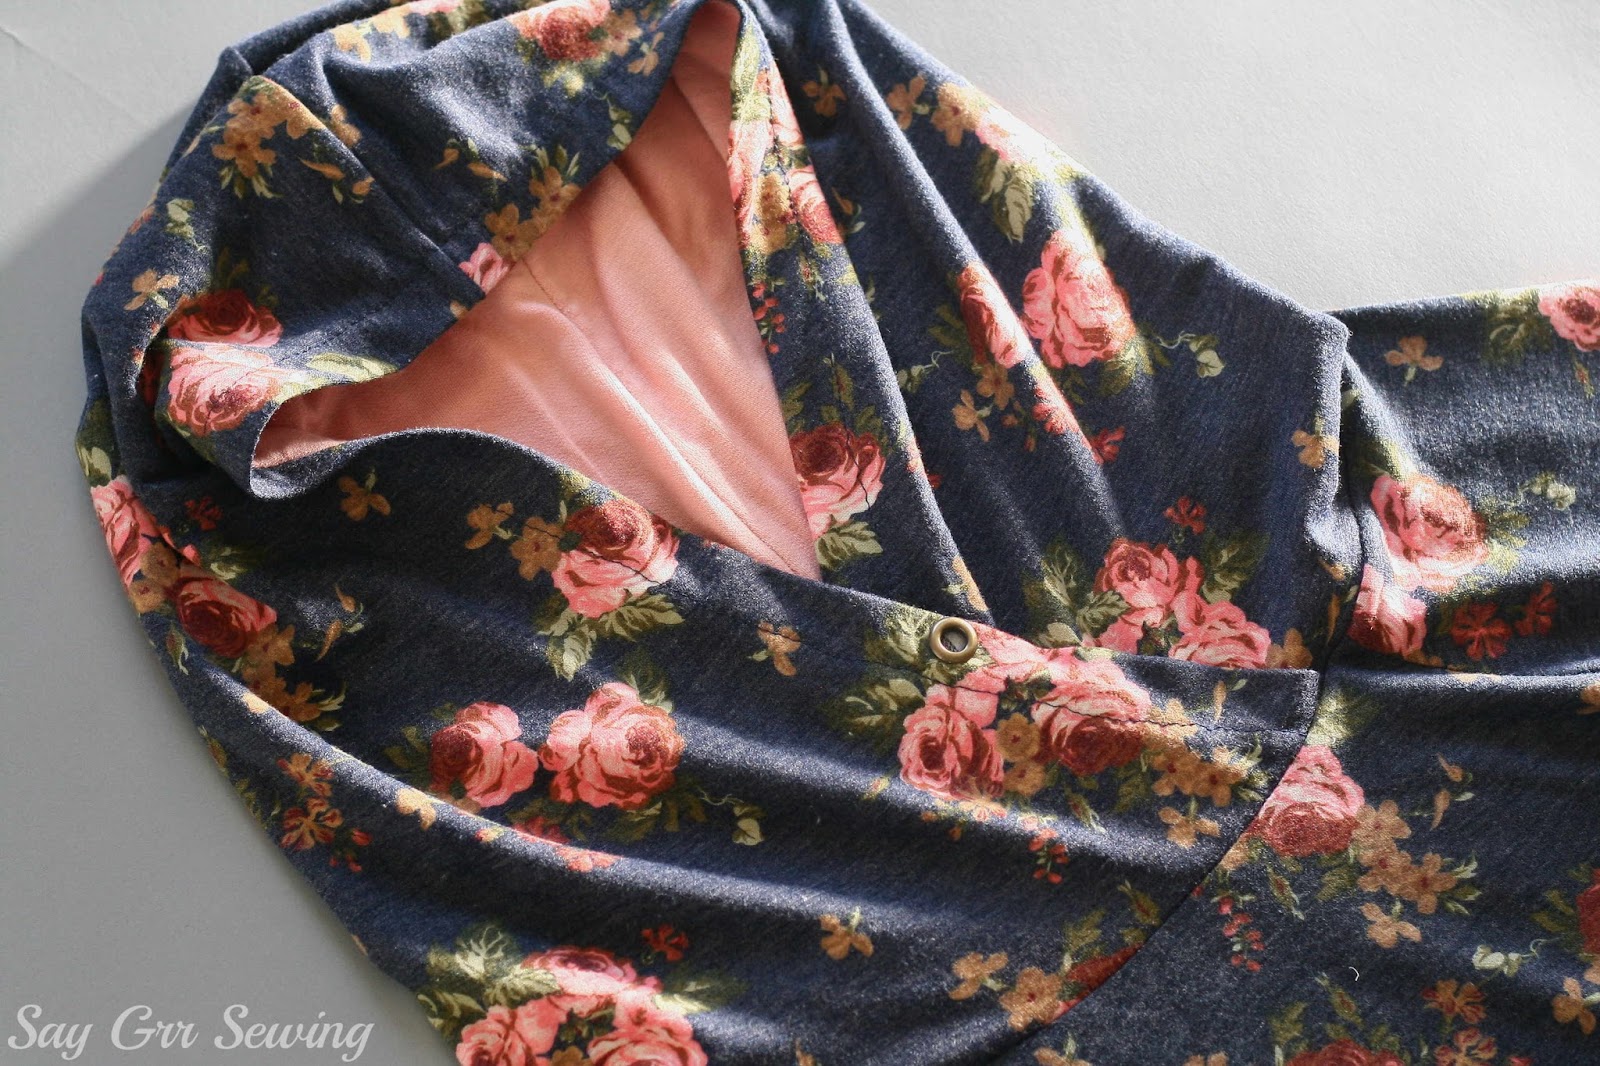
I added a matching pink drawstring from the pink French terry after taking these photos.
I'm happy to report that this one fit, and was appreciated as well! I am always delighted when the gifts I make are used and loved!
Thanks for stopping by,
Friday, March 31, 2017
Thursday, March 23, 2017
Circuit Sheet Wallet and CNA Painting
I decided to make birthday gifts for everyone again this year! I'm doing a mix of crafting and sewing this year, just for the sake of variety, and here are two of the gifts I crafted in January.
I came across this interesting wallet tutorial a while back, and decided to make one for my father-in-law's birthday- it suits his line of work.
I mostly followed the tutorial, but added a couple more pockets on the inside:
I also added extra tape wherever I felt some reinforcement would be helpful.
It was pretty fun, but my taping skills could use some work! I think I would leave a slightly wider gap on the exterior pieces than on the interior pieces when taping the middle 'hinge' next time, to allow for the thickness of the pieces when folding.
The wallet itself seemed like a pretty small gift, so I added in this card-sized multi-tool, bought from Pick Your Plum last year.
My brother's fiance also had a birthday in January. I was originally planning to make her a skirt, but she never got back to me with her measurements. She became a CNA around the same time, so I ended up writing a quote in calligraphy with a bit of watercolor painting near the top. I'm not sure how readable this is.... it says, 'It is not how much you do, but how much love you put in the doing'
I added bits of gold watercolor to a bunch of the letters and the stamens of the flowers for an interesting sparkle effect.
But, as usual, the sparkle didn't show up well in photos! I've really enjoyed learning a little bit of painting and calligraphy this past year... I think this is the first time it's showed up here, but I share a lot more of it on Instagram.
I've got at least 5 other gifts photographed and waiting to be posted here, so hopefully I'll be back soon!
Thanks for stopping by,
Monday, March 6, 2017
Another Batch of Raglans
I've learned something. I should definitely not say that I'll be back with a specific post, because it might take me over a month to get photos of some of the items for that post. That's why you haven't heard from me since January!
Anyway, back in... oh, September? I made some modifications to the Lane Raglan pattern and sewed one up. After changing the shape of the armscye and pinching out bits here and there to reduce the wrinkling, I added a bunch of width at the center front and gathered it to the neckband, with some elastic thread shirring a little below my waist.
The result is kind of a different silhouette for me... more drapey and feminine, instead of the fitted styles I usually wear. I kind of like it though!
I used a pretty, but poor quality, rayon blend jersey from Sincerely Rylee... which made it even more girly! All of my modifications gave me a slightly better fit around the armscye, but I totally forgot to take care of the fabric pooling at my lower back! (And forgot for subsequent versions too.)
I really like this one belted.
I made it with the straight hem, but I wish I'd stuck to the curved hem because it's a bit shorter in the center front and center back on me this way. I lettuce-edged all of the hems on this shirt.
This one has been worn quite a bit!
Then, in November, I made a hooded sweater using my modified pattern!
I used the lower neckline so the hood would fit, and added the thumbhole cuffs because the construction looked interesting.
The way they are put together is pretty clever... if you don't have the pattern Adrianna posted a tutorial of her method here. They are a tad uncomfortable though... I should have made the sleeves 1/2" longer for these.
Also, I used a pretty French Terry for this shirt (Nala, from Sincerely Rylee) but forgot to size up to account for the lack of stretch! So it's too tight, particularly in the sleeves. As a result of that, this sweater has only been worn for photos, which is disappointing because I really like the fabric, and it was on the expensive side for me. I'm keeping it around in case I magically shrink or something. ;-)
I dislike the hood that's included in the pattern. It isn't trued, and in spite of the huge amount of fabric the pattern piece takes up, it feels too small (although part of that might be the mass of hair on the back of my head...).
In addition to which, there are no notches and no set amount to overlap the front, which means the neckline could end up pretty different on different versions. I modified the hood by adding a lining.
I added the grommets, but never put the drawstrings in for this one:
And finally, I made another plain raglan from more low quality rayon blend jersey, this time from Girl Charlee. This one fit really well, and I really liked it in spite of the thin fabric. Unfortunately I managed to splash the front with bleach a couple of weeks ago, before getting photos.
At least the back didn't get bleached! ;-)
And that's the last of the regular clothing I made myself last year!
Thanks for stopping by,
Anyway, back in... oh, September? I made some modifications to the Lane Raglan pattern and sewed one up. After changing the shape of the armscye and pinching out bits here and there to reduce the wrinkling, I added a bunch of width at the center front and gathered it to the neckband, with some elastic thread shirring a little below my waist.
The result is kind of a different silhouette for me... more drapey and feminine, instead of the fitted styles I usually wear. I kind of like it though!
I used a pretty, but poor quality, rayon blend jersey from Sincerely Rylee... which made it even more girly! All of my modifications gave me a slightly better fit around the armscye, but I totally forgot to take care of the fabric pooling at my lower back! (And forgot for subsequent versions too.)
I really like this one belted.
I made it with the straight hem, but I wish I'd stuck to the curved hem because it's a bit shorter in the center front and center back on me this way. I lettuce-edged all of the hems on this shirt.
This one has been worn quite a bit!
Then, in November, I made a hooded sweater using my modified pattern!
I used the lower neckline so the hood would fit, and added the thumbhole cuffs because the construction looked interesting.
The way they are put together is pretty clever... if you don't have the pattern Adrianna posted a tutorial of her method here. They are a tad uncomfortable though... I should have made the sleeves 1/2" longer for these.
Also, I used a pretty French Terry for this shirt (Nala, from Sincerely Rylee) but forgot to size up to account for the lack of stretch! So it's too tight, particularly in the sleeves. As a result of that, this sweater has only been worn for photos, which is disappointing because I really like the fabric, and it was on the expensive side for me. I'm keeping it around in case I magically shrink or something. ;-)
I dislike the hood that's included in the pattern. It isn't trued, and in spite of the huge amount of fabric the pattern piece takes up, it feels too small (although part of that might be the mass of hair on the back of my head...).
In addition to which, there are no notches and no set amount to overlap the front, which means the neckline could end up pretty different on different versions. I modified the hood by adding a lining.
I added the grommets, but never put the drawstrings in for this one:
And finally, I made another plain raglan from more low quality rayon blend jersey, this time from Girl Charlee. This one fit really well, and I really liked it in spite of the thin fabric. Unfortunately I managed to splash the front with bleach a couple of weeks ago, before getting photos.
At least the back didn't get bleached! ;-)
And that's the last of the regular clothing I made myself last year!
Thanks for stopping by,
Tuesday, January 31, 2017
French Terry Shirt and Dress
Before our Thanksgiving plans last year were cancelled by an untimely virus, I made some clothes for my older two daughters to wear that day. To start with, I made Booper an Uptown Downtown dress in French terry from Sincerely Rylee.
Although I've sewn the Uptown Downtown dress before (here and here), this was my first time using it since it's been updated.
I had high hopes for the update, but it looks like the main change was making the instructions include all of the different options that can be made from the add-on pack. Unfortunately, while the pattern itself was changed some, there are odd things going on like the shoulder seam sitting well behind the top of the shoulder, and the seams still aren't completely trued. I did think the layout of the instructions was interesting, and a little easier to use than the long-form of the original version. The new version has tabs for the different sections, such as pockets and the different neckline finishes. The instructions still use photos in some areas and illustrations in others.
The main thing that bothered me, however, was the trimless pages. If your printer is like mine and prints in a slightly different spot on each page (the actual printed area is exactly the same size, just the margins change) it leads to a lot of inaccuracies and frustrations when assembling the pattern. I'd much rather spend the time cutting the edges off of the pages!
I made the cowl-neck, long sleeved version this time, and included the pockets! I also did a twin-needle hem for the sleeves and skirt, for a change. =)
Since I was using a French terry without much stretch, I went up a size from what Booper's measurements put her in. I'm glad I did, as it would have been too tight otherwise, particularly in the sleeves. I also lengthened the dress to below Booper's knees.
I used a thinner, stretchier rayon-blend French terry for the cowl, and I love the way it drapes! It also hasn't pilled up quite as much as the polyester blend the rest of the dress is made of.
Even if I wasn't enamored with the pattern update, Booper loves this dress... it currently receives the most frequent wearing of any item she owns!
To make full use of the pattern once I'd gone through the rigmarole of assembly, I cropped it to hip-length and made a shirt for Gaiw, a size up from her measurements:
I probably would have made her a dress too, but that French terry was on the pricier side, so I didn't buy much of it!
Gaiw's shirt also has a cowl-neck, and twin-needled hems.
She absolutely loves matching with Booper, so she was pretty happy with this shirt!
However, the skirts she has that work with this shirt are either too big, like the one in these photos, or really, really worn out. (See that white blob to the right of Gaiw in the background of this picture? We have feral bunnies living in our yard.)
So, this past week I made Gaiw a tiered skirt from some linen-blend fabric (this, but in the color 'moss') that I bought in Imagine Gnat's Black Friday sale.
Being a linen blend, it does wrinkle up a lot (I gave the skirt a very thorough pressing only about fifteen minutes prior to taking these photos) but it seems like it doesn't wrinkle quite as much as a 100% linen fabric would.
I've made tiered skirts using a ruffler foot before, but mine hasn't been cooperating lately, so I just used basting threads for the gathering. I went for a ratio of 1.75:1 for the tiers this time... I usually use at least 2:1 or higher, but I didn't want this one to be so full.
I was in a bit of a hurry, and somehow I managed to complete the entire skirt, including measurements, calculations, and cutting, in a single morning. I clipped the final threads and was a little surprised to be finished!
I considered making a flat-front waistband, but as I mentioned, I was in a rush, and Gaiw refuses to tuck her shirts in anyway, so I just made it elastic all around.
The insides are all serged, and the hem is a simple double-fold.
I suspect this skirt will get a lot of wear... it's not as colorful and bright as this little girl likes, but it certainly has enough twirl!
I'll be back at some point with some shirts I made for myself last year! =)
Thanks for stopping by,
Although I've sewn the Uptown Downtown dress before (here and here), this was my first time using it since it's been updated.
I had high hopes for the update, but it looks like the main change was making the instructions include all of the different options that can be made from the add-on pack. Unfortunately, while the pattern itself was changed some, there are odd things going on like the shoulder seam sitting well behind the top of the shoulder, and the seams still aren't completely trued. I did think the layout of the instructions was interesting, and a little easier to use than the long-form of the original version. The new version has tabs for the different sections, such as pockets and the different neckline finishes. The instructions still use photos in some areas and illustrations in others.
The main thing that bothered me, however, was the trimless pages. If your printer is like mine and prints in a slightly different spot on each page (the actual printed area is exactly the same size, just the margins change) it leads to a lot of inaccuracies and frustrations when assembling the pattern. I'd much rather spend the time cutting the edges off of the pages!
I made the cowl-neck, long sleeved version this time, and included the pockets! I also did a twin-needle hem for the sleeves and skirt, for a change. =)
Since I was using a French terry without much stretch, I went up a size from what Booper's measurements put her in. I'm glad I did, as it would have been too tight otherwise, particularly in the sleeves. I also lengthened the dress to below Booper's knees.
I used a thinner, stretchier rayon-blend French terry for the cowl, and I love the way it drapes! It also hasn't pilled up quite as much as the polyester blend the rest of the dress is made of.
Even if I wasn't enamored with the pattern update, Booper loves this dress... it currently receives the most frequent wearing of any item she owns!
To make full use of the pattern once I'd gone through the rigmarole of assembly, I cropped it to hip-length and made a shirt for Gaiw, a size up from her measurements:
I probably would have made her a dress too, but that French terry was on the pricier side, so I didn't buy much of it!
Gaiw's shirt also has a cowl-neck, and twin-needled hems.
She absolutely loves matching with Booper, so she was pretty happy with this shirt!
However, the skirts she has that work with this shirt are either too big, like the one in these photos, or really, really worn out. (See that white blob to the right of Gaiw in the background of this picture? We have feral bunnies living in our yard.)
So, this past week I made Gaiw a tiered skirt from some linen-blend fabric (this, but in the color 'moss') that I bought in Imagine Gnat's Black Friday sale.
Being a linen blend, it does wrinkle up a lot (I gave the skirt a very thorough pressing only about fifteen minutes prior to taking these photos) but it seems like it doesn't wrinkle quite as much as a 100% linen fabric would.
I've made tiered skirts using a ruffler foot before, but mine hasn't been cooperating lately, so I just used basting threads for the gathering. I went for a ratio of 1.75:1 for the tiers this time... I usually use at least 2:1 or higher, but I didn't want this one to be so full.
I was in a bit of a hurry, and somehow I managed to complete the entire skirt, including measurements, calculations, and cutting, in a single morning. I clipped the final threads and was a little surprised to be finished!
I considered making a flat-front waistband, but as I mentioned, I was in a rush, and Gaiw refuses to tuck her shirts in anyway, so I just made it elastic all around.
The insides are all serged, and the hem is a simple double-fold.
I suspect this skirt will get a lot of wear... it's not as colorful and bright as this little girl likes, but it certainly has enough twirl!
I'll be back at some point with some shirts I made for myself last year! =)
Thanks for stopping by,


