Friday, April 25, 2014

Perfect Peplum Pullover

 This is my new favorite shirt.

   I drafted this using my basic tee block, but adding some at the bustline so it isn't as tight as my last shirt. I was actually hoping to use the same style as that for this shirt, but I was a half-yard short on fabric, so I went with a half-circle peplum instead. This shirt fits perfectly... not tight, but not saggy either. It looks quite a bit more form-fitting in the photos than it actually is.

  The fabric is this Prussian Blue knit from Girl Charlee, and it is hands-down the best knit I've ever worked with. It's thick, soft, super-stretchy, and also my absolute favorite color. =)

  I love this knit so much that after I finished this shirt I went back and ordered 6 more yards of it. The only difficulty I had was that it's a jersey knit, and rolls a little, but even that was negligible compared to other jerseys I've worked with, and easily remedied with starch.

  I love the sleeves too... I should have cut the sleeve 1 inch shorter before adding the flounce, but that flounce makes me happy. It makes me want to throw my arms around in all kinds of weird directions.

  I wore this once before finishing the hems, since I didn't have matching thread, but those flounces really needed to be finished! They rolled up in all directions and looked like I was wearing tricorn hats on my arms. I lettuce-edged them as well as the hem of the peplum. The thread I used doesn't quite match, as it's more of a true navy, but it's not noticeable.

  I like this one even better than my first peplum shirt (which has sadly been reduced to household-only status due to the myriad of tiny holes that appeared in it).

I'm excited to make more things from this knit! =) Although I also really don't want to use it up because it's so perfect.

Thanks for stopping by!

Wednesday, April 23, 2014

Primary Puzzle Ball

I started this puzzle ball a few days before Christmas... I was hoping to finish it by Christmas for my nephews, but it just didn't happen.

  I'm happy to have it finished now!

  My sister-in-law's baby girl was born about 2 weeks ago, and I'm planning on bringing this for the little older brothers when I go to meet her... they don't live far, but I've had a yucky cold for a couple weeks that I really don't want to bring over there.

  I used the same tutorial as the first time, but used a dinner plate for my initial trace so it's quite a bit bigger... about 7" in diameter.

  I accidentally overstuffed the pieces this time... I'm still relatively new to this whole stuffing business! From some angles the ball looks kind of squished.

  I used a tablecloth someone gave me for the red, parts of a half-finished dress that the same sister-in-law gave me for the yellow, and leftover yardage from a dress I made Booper when she was 1 for the blue. I would love to see how it looks with all of the primary colors on the triangles and grey or white on the ends.

  Except for the blue corduroy, the fabrics were on the thinner side and felt like they would fray right out of the seams, so I interfaced everything before sewing it... it's pretty sturdy now! I hope the little guys like it! =)

Thanks for stopping by,

Thursday, April 17, 2014

Fuschia Dotted Knit Tee

  Before I made that little knit dress for Beckers, I made a shirt for myself from the same fabric.

  I used the same pattern as the grey shirt I made a few months ago, but slimmed down the waist so I didn't have to gather the front. I also did a circle for the hemline instead of a square.

  In the pattern, there are still a couple things that need fixing... I need to widen the pattern a bit at the bustline, since I accidentally took that in when I took the waist in, and I need to lower the neckline so the neckband doesn't come up so high on the neck, especially in the back.

  As for the fabric...it may be cute for a baby dress but it just doesn't work on me. The chances of me ever wearing this shirt (other than for photos, obviously) are about zero. I DON'T wear bright colors, and I don't do patterns, particularly not dots. I don't know what I was thinking when I made this! To my credit, I thought this was a much deeper color when I bought it, and my sewing area is way too dark at night, which is when I made this.

  Anyway, since I'm not likely to ever wear it, I'd like to know if anyone who reads this is around my size and would want it? If not it's probably going to end up at the thrift store. Bust is 42", waist is 34", but it would work better on a bust 1-3 inches smaller. All you gotta do is ask! =)

 I think this pattern would work really well as a maternity top, too. (No, I'm not pregnant.)

  I'm glad I made it just for the pattern-adjusting I was able to do, even if I don't like the results in this particular fabric.

  And this knit, even though the pattern is too much for me, is seriously nice... so soft and stretchy!

  I made another shirt after this one that I like MUCH better. I still need to finish the hems, but I need some matching thread first. I'll share it after it's done. =)

Thanks for stopping by,

Monday, April 14, 2014

Baby Dress And A Final Flip

If you've been reading along you know that the last two little girl dresses I made were flips of the Heidi and Finn Colorblock Dress Pattern, for Flip this Pattern at Frances Suzanne. Well, I have one final flip of this pattern, made for my littlest daughter.

  I made this last week during Kid's Clothes Week, and it is a much simpler flip than my first two. I completely ignored the outer pattern pieces, and only used the lining pieces. I removed the seam allowance from the back lining and cut it on the fold, once again without the built in cap sleeves. I added slightly gathered sleeves banded with ribbing, and bound the neckline with ribbing as well.

  At least, that's what I did originally. I've never worked with rib knit before, and it stretched out a lot more than I expected and left the neckline ripply and awful. I blamed it at first on my coverstitch machine, but when I re-did the neckline with my sewing machine and a twin needle, it rippled the same way. Finally I just did a regular neckband instead of a bound neckline. I cut off some of the original neckline so I would have room for the band.

  The binding on the sleeves also stretched out, and since Beckers is wearing 12 months in height, but is still smaller around the chest, the whole dress was too big. I fixed that by just taking both sides in, sleeves included, by about 1" each.

  I also made bloomers out of some coordinating knit. That pattern also needs some adjusting, but at least they aren't too small! =D

  The legs on these are drawn in with elastic thread... I knew they wouldn't pull in enough, so I stretched the thread when I wound it onto the bobbin, and they are just about right.

  I used my coverstitch machine for all of the main seams in these... it does great, but it seems like the presser foot pressure is stuck on the same setting, which is too much pressure and stretches knit out.

  It isn't noticeable after steaming the knit back into shape but I'm still going to send it back and see if I can get it repaired, as I think it will be a lot more versatile with that pressure setting working.

   The best part of this outfit is how comfortable it is for my (not so) little baby, who is not feeling well this week. =(

  The dotted knit is this one, which I expected to be a lighter and less red a color than it is, but which feels amazing... really soft and stretchy. And the floral knit is this one. It's a bit more drapey than I'd imagined but otherwise is what I expected. You'll see more of the dotted knit sometime this week.

  Thanks for stopping by!

Friday, April 11, 2014

Inserting Un-Lined Sleeves In A Lined Bodice Tutorial

  Here's how I sew my lined bodices and unlined sleeves together, with no handstitching. =)

  Start with the shoulder seams sewn on both the lining and outer pieces:

   Prepare the sleeves by gathering if needed, then pin or baste them right sides together with the outer layer, leaving about 1.5 inches free at both sides of the underarm portion of the sleeve:

  Pin the lining piece on top, right sides together. Pin the arm seam, leaving 1.5 inches free at each side of the underarm, and pin around the neckline and back seam. It will look a little lumpy because the bulk of the sleeves inside, just be careful not to catch the sleeves in the neckline or back. Roll them up a little if needed.

  Sew the arm seams, around the neckline, and down the back. For this dress, I only sewed 3/4 of the way down the back seam, but for a dress with a button placket down the whole bodice back, sew all the way down. Make sure you leave that 1.5 inches at each side of the underarm seams! =)

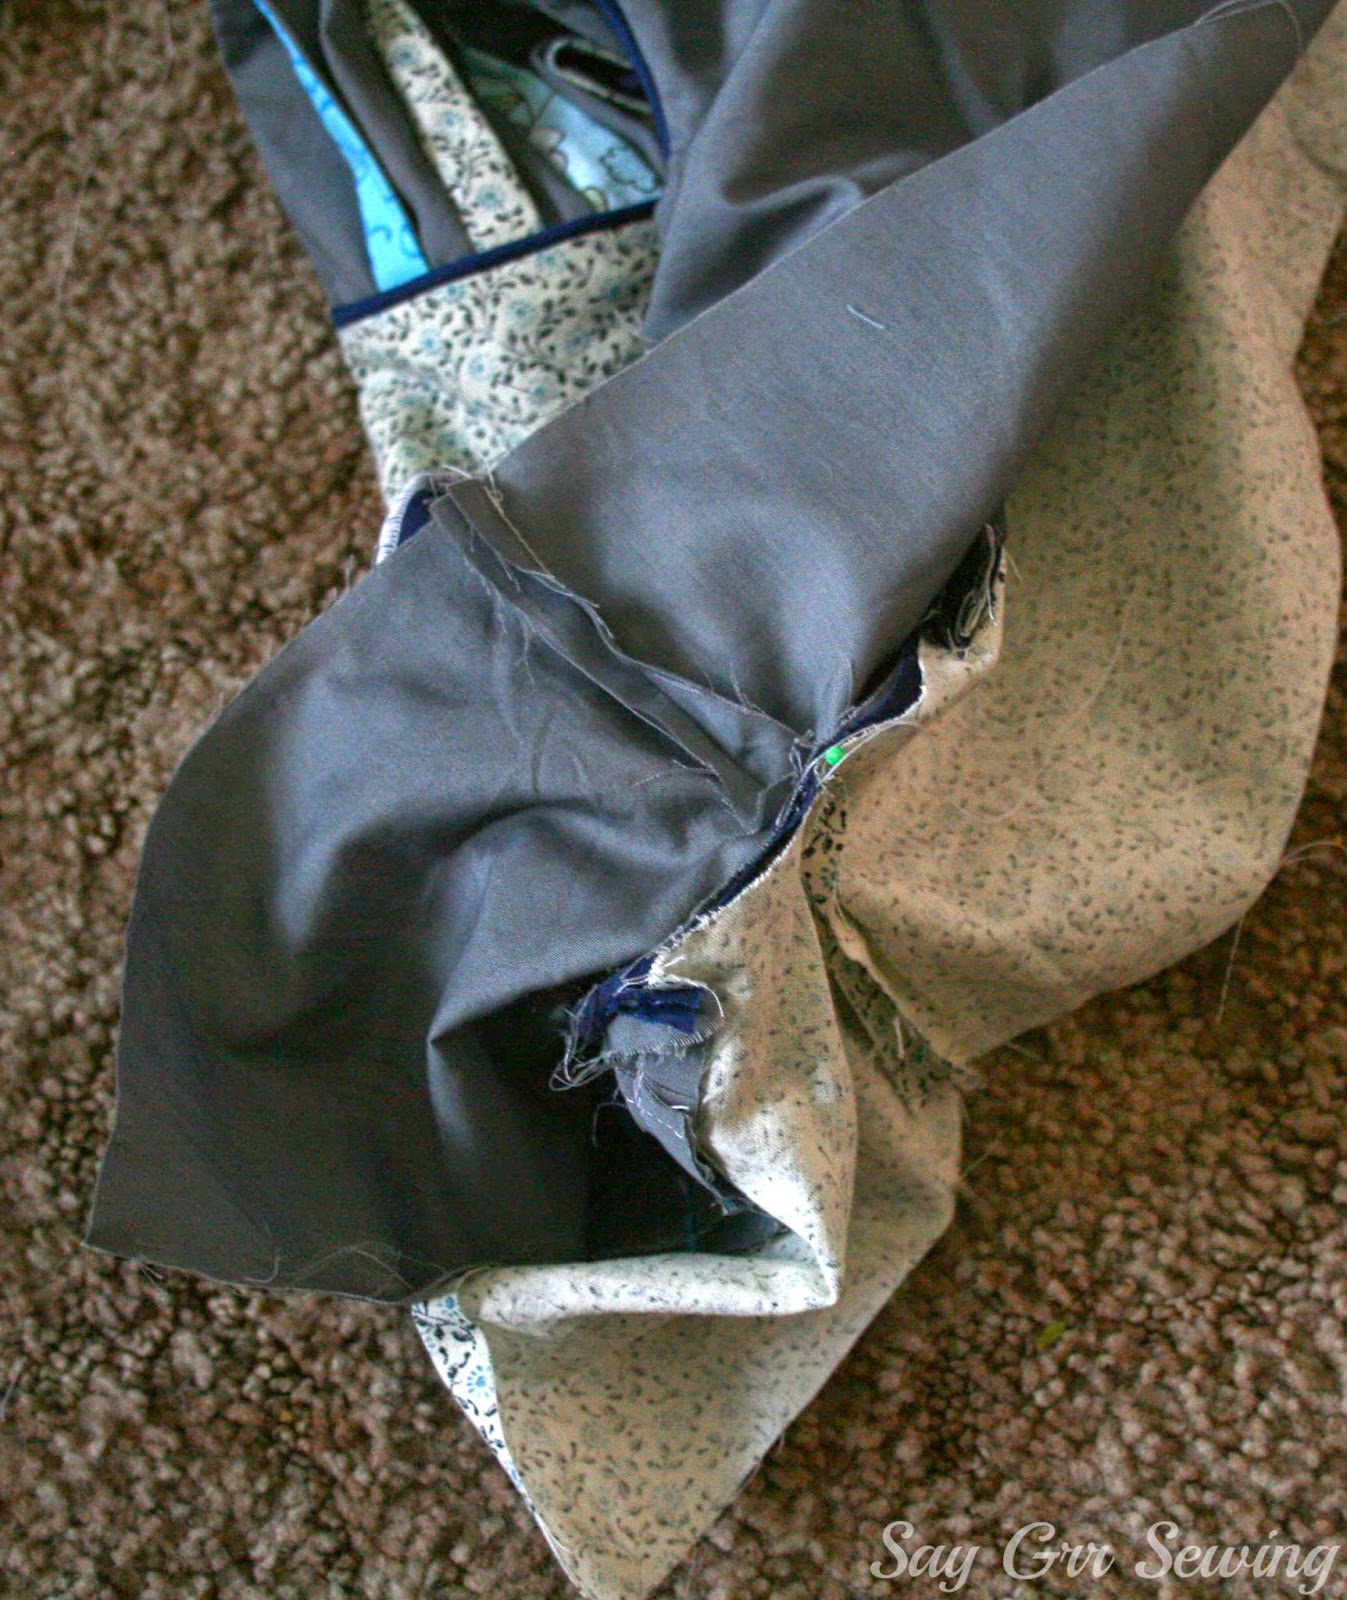
  Clip, notch, trim, and grade your seams as needed, then reach through the shoulder of the front bodice, grab the back bodice piece, and pull it through. Partially through:

  And all the way through:

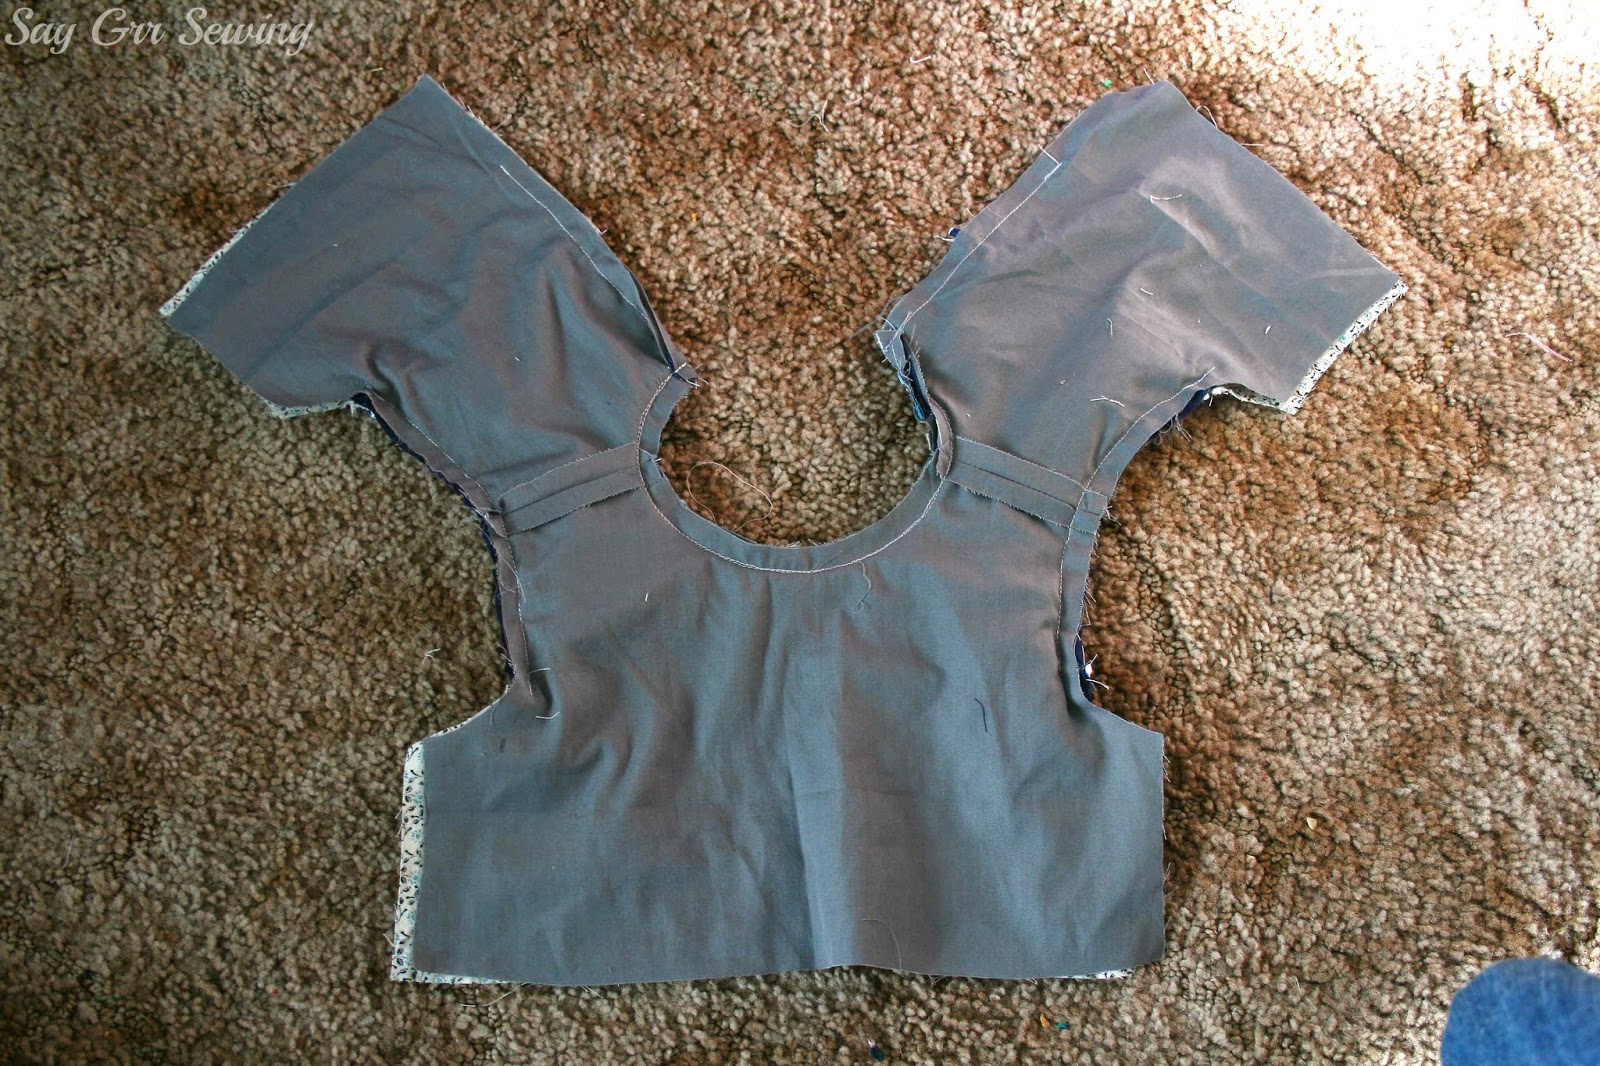
  Repeat for the other side of the back, and you should have something like this:

  Press all of the seams you just sewed, then sew the sleeve into a tube, right sides together. I did a French seam for mine, but if you do a regular seam you'll want to finish the edges. Match outer to outer and lining to lining and sew all four side seams right sides together. You'll have something almost finished, with a hole at the underarm. Press all of the side and sleeve seams.

  Fold the lining and outer up from that hole so they are right sides together, match the seams of lining, outer, and sleeve, and pin.

  Sew the opening closed, beginning and ending where you've already stitched for the rest of the arm. Trim, clip, and grade as needed, then fold everything back down and press. You will have this on the outside... nice and smooth.

  And the inside should look like this:

  Then all you have to do is repeat for the other sleeve, and you can go on to sew the rest of the dress!

  Let me know if anything is confusing and I'll try to clear it up.  And if you sew up a dress using this method, I'd love to see it! =)

Thanks for stopping by!

Thursday, April 10, 2014

Navy Dress With A Twist

 Multiple twists, actually. =)

  This is another flip of the Heidi and Finn Colorblocked Dress Pattern.

  I added seams and twisted pieces to the top colorblock section:

  I also cut off the built-in cap sleeve, and added puffed sleeves instead.

  I cut the middle colorblock shorter so it would end at the waist, and cut the lining to match, then I added a circle skirt underneath, on which I machine embroidered hundreds of eyelets. They aren't true eyelets, as I didn't cut the middles out. I also added eyelets on the sleeves.

 I didn't clip the threads close on the inside because I was afraid that if I did all my hours of work would unravel in the wash... I may go back and fray-check then clip them.

  I did my lining trick (tutorial soon!) to finish the sleeves and hand-sewed the waist seam. Once again, I had to wash to remove marks and I didn't press the lining well enough afterward... it isn't actually puckery!
  I planned for thread-loops on the back, but when it came time to sew them I realized I didn't have any thread that looked right, so there are temporary hook-and-loops to keep it closed until I can buy matching thread.

  I had a really hard time finding buttons that worked too! I pretty much checked all of my buttons and didn't like any of them, but I finally remembered that I had some small cover buttons, and used those with the navy fabric.

  The skirt and sleeves are finished with a rolled serger hem, for contrast, and I piped around the neckline and between the top and middle colorblock sections.

  I used elastic thread to gather in the sleeves... I'm actually surprised at how well that worked.

  The sleeves and grey fabrics are sheet leftovers, and the rest are scraps I had waiting to be used.

  This dress took me a reeeaaaalllly long time! Over 12 hours, possibly closer to 15.

  Gaiw was SO EXCITED to be getting a dress! She kept saying, "You ah makin a dwess for ME, mama!" with giant grins and sparkling eyes. =)

  And I don't have much else to say but I have a LOT of photos, so here goes... enjoy! =)


 I'm linking up at
Flip This Pattern 
and


Thanks for stopping by!