Monday, December 31, 2012

Christmas Gifts: Everything Else I Made

  So! It turns out that I did take a few quick pictures of the outfits I made for the daughters, late on Christmas Eve. =) I still don't have any of them wearing the outfits, since they got QUITE dirty, and it turns out I made a few mistakes.
  See that lovely velvet ribbon? I should have heat-sealed the edges on it all before I sewed it in... All of the ribbons on Booper's outfit frayed out of the seams by the end of the day. For some reason Gaiw's ribbons are still fine... most likely she just isn't as hard on her clothing yet. I also should have made Booper's vest just a bit longer, and the elastic in Gaiw's skirt a little looser. I'm really happy with how they turned out though, especially for a last-minute plan. I did decorative stitching around the hem of the skirts (That took forever! At least 25 minutes to stitch around the hem, going at full speed... and my machine can sew 850 stitches per minute!)

  The bows on the front of the skirts are attached to clips, so I can move them around if I want to, or take them off when I'm washing the outfits. I also did decorative stitching on the lower back of the vests, to close up the last little bit and to make the back more interesting. The skirts are a flat-front circle skirt with a separate waistband, and ribbon stitched into the flat front.


  The vests were originally going to be jackets, but I was just barely shy of the amount of fabric needed for the sleeves, so I just left them out. This tutorial was really helpful in figuring out how to line the vests with no raw edges and as little top-stitching as possible. The fabric is from Joann's... it was rather difficult to work with, since it was very loosely woven and it made the plaid harder to match up. It wasn't the kind of plaid I originally pictured in my head, but since I couldn't find anything even close to what I was picturing, this worked. And this plaid looked a lot better made into outfits than it did on the bolt. =)

  Even with the mistakes I made, I'm was pleasantly surprised at how well these turned out, as well as how quickly I managed to finish them. They garnered quite a few compliments when we went to visit family the day after Christmas! =)

  Something that didn't turn out so quickly was this:
  These are no-tangle zip-up ear-buds. I first saw this idea here, and I thought it was genius. However, I had to sew every little bit by hand, and the only black thread I had was really poor quality, super-tangly stuff.. Also, my zipper wasn't quite as long as I wanted, so I had to sew bias binding around half of the wires.
  This was probably the second-most difficult gift I made this year. If I were to make something like this again, I would make sure to get a super-long zipper, and I would probably choose a lighter-weight one too... polyester instead of metal.
  I still think it is a really cool idea though, even if my execution was less-than perfect.

  I mentioned that there was more to the headband gift, and that I had another small leather thing to show:
  The rest of the gift for my sister was some more hair things, two clips and two sets of cute button hairpins. The flower clip is the other little leather thing... I cut shapes and pinched them together with glue until I got them to look the way I wanted, added a circle in the center, and topped it off with seed beads. The hair bow is from some of the bias tape I made earlier this year. =)
  These were all hot-glued together, which was not super fun but was the best way I could think of  to attach them. I really love how sliding them onto pieces of printed card-stock made them look so much more professional. =)

  I made two lace watches, one for my sister, and one for my sister-in-love. I was lucky enough to pick the s-i-l's name for the gift exchange, since I had already bought the materials to make her gift. This is the sister-in-love's:

  And this one was for my sister:

  I originally bought two different colors of lace, but I loved this blue lace so much I made both watches with it. I really love both of the watches.

  I put the watches on little holders before packaging them, like this:

  I think these were my favorites of the gifts I gave this year. So pretty, simple, and feminine. =)

  I have a couple sewing-related gifts I received as well, and I am super-excited to share them with you in the next few days!

Thanks for stopping by, and be safe and have fun ringing in the New Year!


Saturday, December 29, 2012

Christmas Gifts: The Leather Stuff

 I hope you all had a lovely Christmas! I did, and I managed to finish the gifts for my daughters just in time, and found something to buy for my husband that I knew he would love. I don't have photos of the gifts I made for the daughters yet, but since the gifts for my family arrived (only 2 days late! I'm improving here...) I thought I'd show you what they were. First up are the things I made from leather. (I bought the leather here, and was really impressed with the quality)

  For my mother, a leather leaf bowl:
  This one is much larger than the first one I made, and came out SO much better! I had a little bit of a hard time parting with it. =) I hot glued the darts together before stitching this time... by the way, I really hate hot gluing things. It sticks in all the wrong spots, won't stick where you want it to, burns your fingers, and gets messy glue strings everywhere. It did work decently for this though, and held the darts long enough that it wasn't ridiculously difficult trying to sew them this time. My machine went through the one layer of leather beautifully for this.

  See, the back is much prettier this time too:

  And it is big enough to actually use, as a candy dish or probably a good many other things:

  The next thing I made was a little leather box for one of my brothers:
  This was the most difficult thing I made this year... my machine went through one layer of leather beautifully, but two was just too much. I finished it by using the hand-wheel to push the needle through, although looking back that probably put a lot of strain on my machine, and I really should have hand-sewed it. The initial on top is sewn through one layer of leather, then glued onto the lid.


  I am really happy with how it turned out, even if it was far more difficult than I had anticipated.

  As part of the gift for my youngest sister, I put together a leather headband:
  This one is glued together, but NOT with hot glue. I didn't feel like hot glue would hold together well enough on a headband, so I used E-6000 glue and clipped it strategically overnight so it would stay together until it dried. I don't think it's coming apart anytime soon. =)

  Here is Booper modeling it for the photos:
  This headband was inspired by Disney's Lauren headbands, although my leather was too thick for a sweet layered bow like she did. I still love it. =)

  I may have to make another one for my little person:

  I also made two belts.... these were kind of a last minute thing. I was in the middle of making leather wallets with some thinner leather I bought, but they flopped terribly, partly because the piece of leather I was working with was just too small. So I went for belts!

  I did a line of stitching all the way around the belt, just after cutting it out and before doing anything else. Then I punched the holes and attached the buckles. I really wanted a more unique buckle, but I couldn't find anything I loved in the time constraints I was in. In fact, it was either the buckle I used, a much smaller square one, or a really ugly western-styled one. I'm pleased with how the belts turned out anyway.

  I did a little inscribing on the leather, next to the buckle where it would be hidden most of the time.
  I used a (super-cheapo) wood-burning tool to do it. The belts are different sizes and I didn't want them getting mixed up, since they otherwise look identical.

  Besides, I like the personalized touch. =)

And there you have it, the leather gifts I made this year! Although actually there is one little leather gift that I'll show you when I share the rest of the gifts I made.

Thanks for stopping by!

Sunday, December 23, 2012

More Christmas Preparations

  I haven't sent my family's gifts off yet.... I got confused and thought Christmas was on Wednesday, and missed the post office closing on Friday by 5 minutes... oops. But at least they are all finished and wrapped, which is light years better than I did last year. Here's a peek of the last few presents:

  Interested in the wrapping? Here's the lineup:

   First up, for one of my sisters:
  This one turned out to be the simplest of all the wrapping... I started off with some white satin ribbon, then tied on an ornament tag, and topped it off with a bow. The bow is made from paper, and I stitched a snowflake design on it with my sewing machine, using an older needle and red thread.

  This one is my favorite by far:
   I made a little double-layer box for this one, taped on some saddle-stitched brown ribbon, tied a sprig of greenery and a sprig of berries together and taped the ends with washi tape, and added a tag made with my sewing machine and packaging paper, along with some faux calligraphy. (I have real calligraphy pens somewhere, I'm just not sure where at the moment.)  I attached the tag and sprigs to the box with some brown embroidery thread.

   I love this one too! I'm afraid it's going to get smashed in shipping, since I only did a single layer box, but it's cute anyway! I taped a strip of washi tape around the box, then tied a polka-dot ribbon in a bow just beneath it. Next I sewed some Christmas-themed buttons onto a little tag and added a different kind of washi tape (which was peeling off in the photo...) and tied the tag to the bow with embroidery thread.

  This one just has a big, beautiful bow, a machine-stitched tag, and a double-layer box. Simple, but elegant.

  I taped grey satin ribbon around this one, with a layer of brown satin on top. Then I wrapped red grosgrain ribbon around in the opposite direction, weaving it under the brown ribbon in the front.  On top of the ribbons, I tied a pine-cone and a sprig of berries with brown embroidery thread, and wrote the name with faux calligraphy.

  This one has washi tape, a machine-embroidered paper 'ribbon', and a salt dough ornament, which is tied on with a strip of thin leather. It's a little more rustic than the others, but I think it fits the personality of it's recipient.

  I made a double-layered box with a separate lid for this one, and tied on some sparkly ric-rac. The tag is white card-stock with washi tape on the ends, tucked underneath the bow. I love the way this box came out.

  I also made some treats for my family, and did some fun packaging on those, but I haven't taken photos just yet. =)

  The last two I've wrapped are actually not from me... they are a gift from my mother to my daughters, and I had the fun of wrapping them.
  The one on the left has gold bias tape, some of the bias tape I made, and some sparkly gold ric-rac. The ric-rac and gold bias tape are from my Grandmother. =) And on the right, I used white satin ribbon and sparkly red ric-rac, along with a machine-stitched tag.

  I'll bet you are wondering where the gifts from me to my daughters and husband are. The truth is, I haven't finished them yet. =( I run into this problem every year! I try to finish the gifts to send, end up spending too long on them, and not having enough time to make the gifts for my favorite people. Maybe I'll go with something simpler than the dresses I originally planned for the daughters.
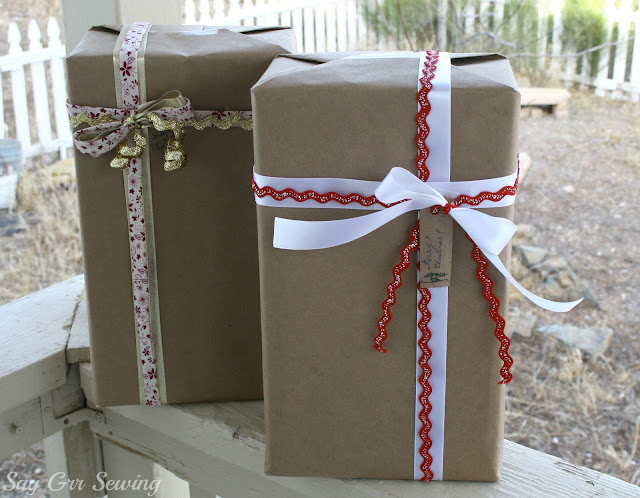
  So there you have it! Maybe you can get a few ideas from my wrapping, if yours isn't already finished. And since I probably won't post again until after Christmas, Merry Christmas! I hope you have a lovely blessed one, and have some quiet moments to remember the meaning behind it all.

Thanks for stopping by,

Wednesday, December 12, 2012

Preparing for Christmas

  Things have been a little quiet around here lately. I've been quite busy creating, but since everything I'm making is a gift for someone, and every one of those people read this blog occasionally, I can't actually share everything yet. So far, I have finished gifts for 5 people... only 8 more gifts on my list. Luckily, I'm partway done with 2 more, and I can leave 2 off completely if I run out of time. I'm not going to show any full pictures lest I spoil the surprise, but here is a peek of what I've made so far:

  I've only wrapped one gift so far... this one is for a gift exchange, so the name is blurred. =) I used a paper bow printable from Ellinee.com , a cinnamon-scented dough ornament, a little washi tape, satin ribbon, and a box I made from brown packaging paper for this gift. I love wrapping gifts, although they don't always turn out like I'd hoped. On this one, the ornament is bigger than I was aiming for, but still cute! If I like how the wrapping turns out on the rest of the gifts, I'll share those here too. =)

So if I'm completely missing in the next couple weeks, you know what I'm doing... preparing for Christmas!
Thanks for stopping by,

Saturday, December 8, 2012

Orange Chicken Recipe

  If you know me well, you know that I love orange chicken. It's one of the foods I'm always interested in eating. =)

  Since I love it so much, it stands to reason that I would develop my own recipe. My recipe is a combination of several from various places on the internet, with many alterations of my own. Now I can honestly say that my homemade orange chicken is best I've ever tasted. Yes, it's even better than Panda Express. =) And it isn't difficult to make either, it just takes some time.

The other thing I love about making my own orange chicken is that I can freeze portions of it to reheat later, when I don't feel like making dinner. And it tastes just as delicious reheated. While the chicken is thawing, I start by making the sauce, the important part:
 Water, orange juice concentrate (you can substitute fresh orange juice for the first two ingredients, but the flavor won't be quite as strong), brown sugar, and soy sauce.

  Then add a little:
  Garlic, ginger, red pepper flakes, and orange zest. You can use freshly grated, but in this recipe,

 Dried works just as well. =)
  Whisk all those together, and start them boiling. While they heat, mix up some cornstarch and water.

  Now is also a good time to chop up some green onions.
 Once your sauce is boiling, pour in the cornstarch mixture and whisk it up really well.

  Keep whisking over low heat until your sauce is nice and thick:
  Add the green onions and mix well. If you follow my recipe, you'll end up with about a quart of sauce. This sauce also makes a great salad dressing, and if you aren't into fried chicken, can be mixed with shredded chicken or beef for a lighter meal.

Now, on to the chicken! Cut it into small pieces, less than an inch each. In a separate bowl, mix together some flour, pepper, and salt:
  Crack a couple eggs too, and beat them well.

  Mix the chicken pieces into the eggs, then sprinkle a handful of pieces on top of the flour mixture:
  Shake the bowl around until the chicken is covered, and repeat until it is all coated in flour. Start heating your oil while you are sprinkling and shaking.

Once the chicken is coated and the oil is hot (about 350 degrees Fahrenheit), lift out some chicken pieces with a slotted spoon, shake slightly to get rid of any loose flour, and drop in the hot oil. If the oil is the right temperature, they will boil like crazy.
  Keep adding chicken until the pan is decently full, but not crowded. While it is cooking, line a tray (or a cookie sheet) with paper towels. You will probably need to fry several batches.

When the chicken starts to get golden, lift it out with a different slotted spoon and set it on the paper towels to drain, then mix it up with some of that amazing orange sauce.
  And serve! This time I served it with a simple salad and brown rice, but of course it is even better with fried rice and egg rolls. =)

   Are you hungry yet? I am!

  Make this, just once, and just try to tell me you don't love it.

   Here is the entire recipe:

  
Thanks for stopping by!