

Start with the shoulder seams sewn on both the lining and outer pieces:

Prepare the sleeves by gathering if needed, then pin or baste them right sides together with the outer layer, leaving about 1.5 inches free at both sides of the underarm portion of the sleeve:

Pin the lining piece on top, right sides together. Pin the arm seam, leaving 1.5 inches free at each side of the underarm, and pin around the neckline and back seam. It will look a little lumpy because the bulk of the sleeves inside, just be careful not to catch the sleeves in the neckline or back. Roll them up a little if needed.

Sew the arm seams, around the neckline, and down the back. For this dress, I only sewed 3/4 of the way down the back seam, but for a dress with a button placket down the whole bodice back, sew all the way down. Make sure you leave that 1.5 inches at each side of the underarm seams! =)
Clip, notch, trim, and grade your seams as needed, then reach through the shoulder of the front bodice, grab the back bodice piece, and pull it through. Partially through:

And all the way through:

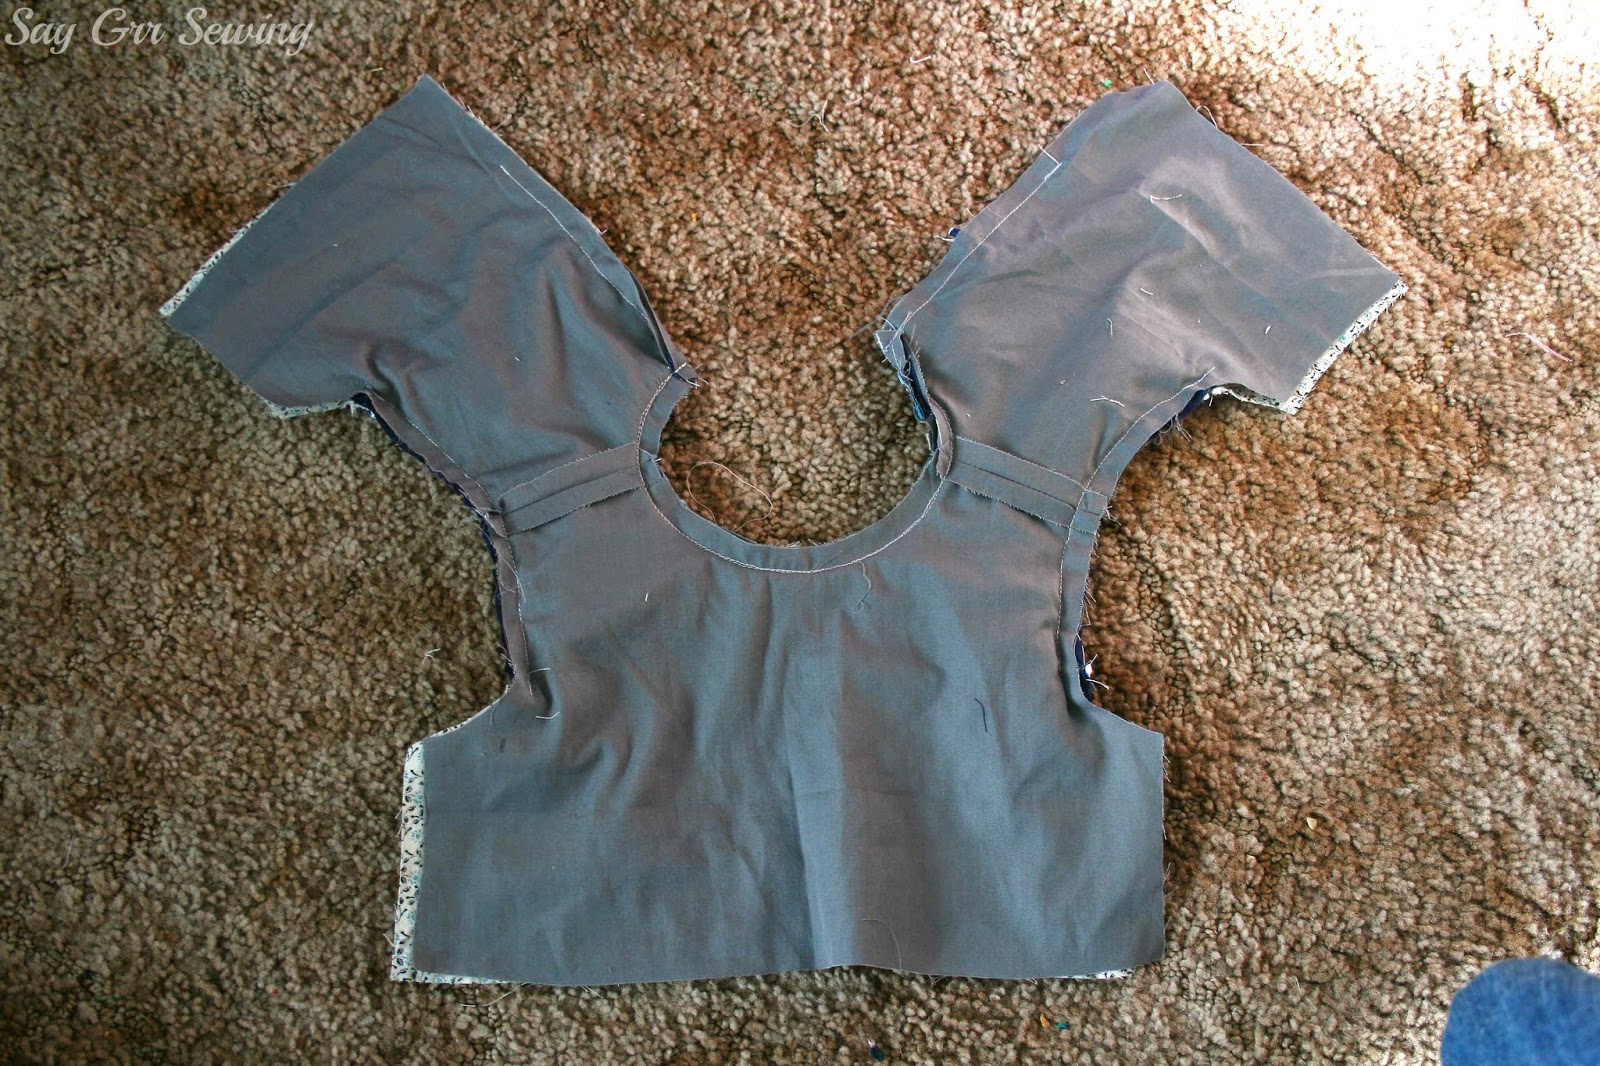
Repeat for the other side of the back, and you should have something like this:

Press all of the seams you just sewed, then sew the sleeve into a tube, right sides together. I did a French seam for mine, but if you do a regular seam you'll want to finish the edges. Match outer to outer and lining to lining and sew all four side seams right sides together. You'll have something almost finished, with a hole at the underarm. Press all of the side and sleeve seams.

Fold the lining and outer up from that hole so they are right sides together, match the seams of lining, outer, and sleeve, and pin.
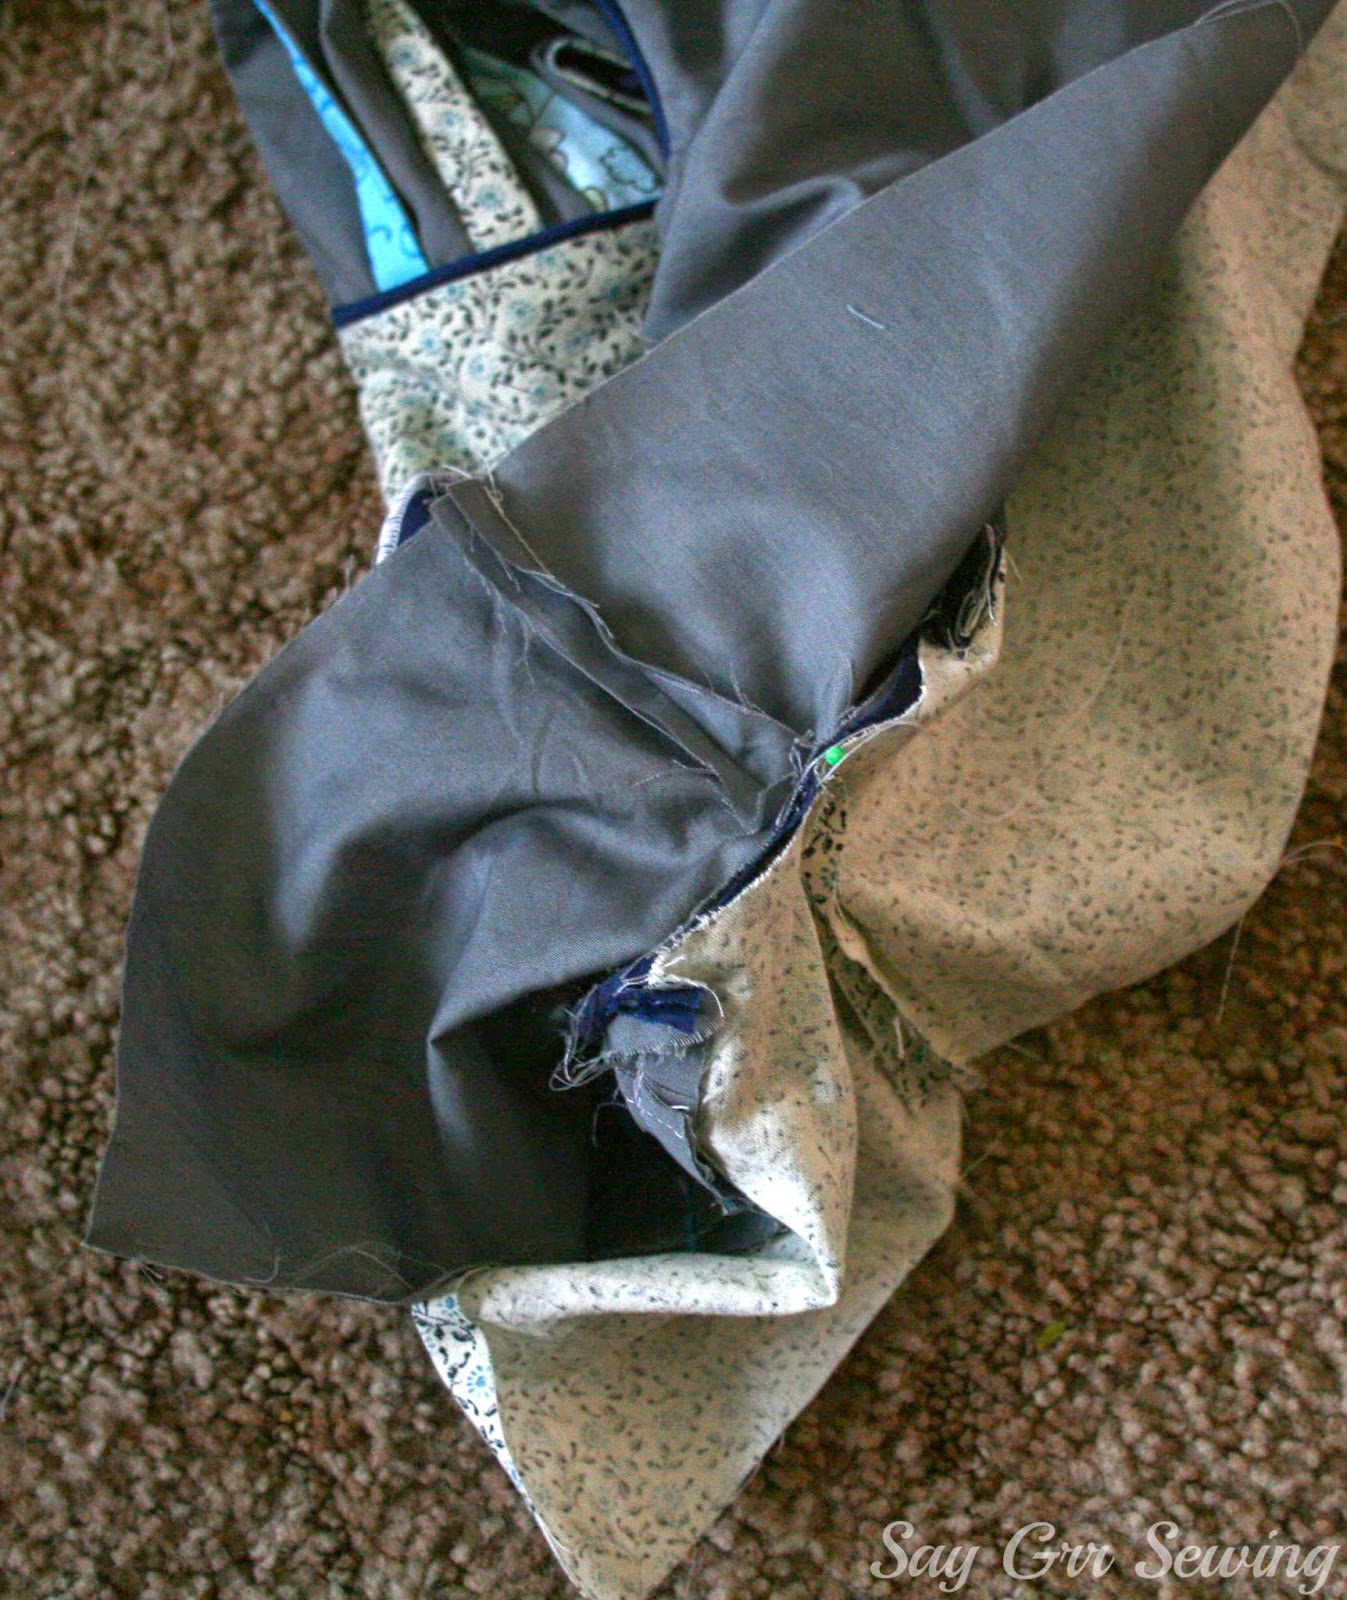
Sew the opening closed, beginning and ending where you've already stitched for the rest of the arm. Trim, clip, and grade as needed, then fold everything back down and press. You will have this on the outside... nice and smooth.

And the inside should look like this:

Then all you have to do is repeat for the other sleeve, and you can go on to sew the rest of the dress!

Let me know if anything is confusing and I'll try to clear it up. And if you sew up a dress using this method, I'd love to see it! =)
Thanks for stopping by!

This. Is. Brilliant! Thanks for the tutorial. Love it!
ReplyDeleteThank you! I don't get to be brilliant often. =) You are welcome, and I'd love to hear how it works for you if you use it. =)
DeleteFINALLY!!!! I have been searching ALL DAY for a tutorial to explain how this could be done. I can now breathe a sigh of relief that someone actually new I would need this very tutorial. Thank You 1000 times!! Now I can finish my dress.
ReplyDeleteAwesome! I'm so glad it was helpful! Thanks for commenting! =)
DeleteAlthough this is effective and produces a clean finish, I would not use the technique again. I found the stitching around the armscye to be extremely difficult and nerve-wracking! The lining is so easily caught. I also think there is less flexibility in the sleeve for the wearer. I will hand-stitch a lining around the arm in the future. Thank you anyway!
ReplyDeleteThanks for the feedback, Carrie! The stitching around the armscye is a bit fiddly at times, so I see where you are coming from. If you prefer hand-stitching, that's great. This is just a nice alternative for folks who aren't comfortable hand-stitching, or need something a bit faster. I haven't noticed any difference in the sleeve flexibility... I'll have to test an outfit with one sleeve done this way, and one with the lining hand-stitched down and see if there's any difference.
DeleteThank you so much for this tutorial, it's awesome!!!! So glad that I found it. (bookmarked It)
ReplyDeleteThank you! I hope it works well for you! =)
DeleteThanks for posting this tutorial, I am slightly confused at the part where the hole at the under arm seam is sewn.... but I haven't actually gotten to this step in my sewing yet. Hopefully everything will fall into place when I actually begin to sew this part.
ReplyDeleteYou are welcome! If you get to that step in the sewing and are still having trouble, please let me know and I'll see if I can figure out a better way to explain it. =)
DeleteI’m a little confused by this as well can you please explain it. Also a video would be great.
DeleteThe answer for my problem! I loved! You are amazing!
ReplyDeleteYay! I'm glad it was what you needed. Thank you! =)
DeleteThis worked perfectly for me! I was a little nervous to add a puffed sleeve to a sleeveless dress pattern, but it turned out very well. Thanks for the help.
ReplyDeleteYou are welcome, I'm so glad to hear that it worked for you! =)
DeleteI use this tutorial on baby dress bodices and they come out perfect every time. I love the outcome! Thank you!
ReplyDeleteYay, I'm happy to hear that it's been helpful to you! Thank you for the comment!
DeleteThis is a great tutorial, I have used it a few times and with good results. Try to avoid hand sewing if possible !
ReplyDeleteThank you! I'm glad to hear that you liked it. =)
Deletethank you so much for taking the time to do this, this is exactly what I needed :) x
ReplyDeleteYou are welcome! I'm glad it was helpful! =)
DeleteToday is my lucky day because I found your very nice tutorial, with pictures too. Look entirely doable! My daughter is adamant about having sleeves to a sleeveless dress I am about to make.... Thanks to your tutorial now I have an idea how to.... All is left is to figure how to put a long zipper on the back (the original pattern doesn't call for a lined dress but I am adding lining). Thanks again for the tutorial:)
ReplyDeleteIt's definitely fiddly, but I really prefer doing sleeves this way! I hope it works for you! =) You are welcome! =)
DeleteWonderful tutorial! I've never tried this method but it's great for those doll clothes. Thanks for sharing!!
ReplyDeleteThank you! To be honest, doll clothes are so little and fiddly that I would probably hand-sew the lining on them... this method works a lot better for me on bigger sizes. =) You are welcome!
DeleteHi, what happens to the center back if it's supposed to be a closed seam? Aren't you going to see the seam when you sew them together? Thanks😊
ReplyDeleteIf the center back is cut on the fold, or is seamless, the opposite shoulder and sleeve will have to be folded into the one that you are sewing (but not caught in the seam- that's a little difficult to explain without pictures!) so you'll be able to pull everything right side out correctly, and that's true if you sew up the center back seam before finishing the neckline and armscyes as well.
DeleteI would probably leave the center back and about an inch of the back neckline on either side of the center back un-sewn until after the sleeves are inserted, then sew the lining right sides together, the main fabric right sides together, and finally finish the neckline. Hope that helps! =)
It did, thanks a bunch!
DeleteI'm happy to hear that! You are welcome!
DeleteFinally. Thankyou thankyou thankyou!
ReplyDeleteYou are very welcome! =)
DeleteBeen searching for how to do this....thank you...thank you
ReplyDeleteYou are welcome! Hope it helps! =)
DeleteThanks so much, your tutorial really helped, especially the pictures
ReplyDeleteTina
You are welcome! I'm glad it was useful!
DeleteI wondering on your opinion here since I think this tutorial can help me. I want to do a front bodice lined, but the sleeves AND the back unlined (it's lace) any idea how I would tackle that. I love this tutorial though, Thank you so much :)
ReplyDeleteOoh, that's an interesting challenge! I might try sewing just the back of the sleeve to the back bodice, either with a French seam, or enclosing the seam allowance in a binding, then sew the front and front lining to the back piece at the shoulders, then enclose the front of the sleeve in the front bodice. I'm not entirely certain about the corner where the shoulder seam and sleeve meet though, that might be too tight to sew neatly. In all honesty, it might work better to just sew the bodice as usual, then sew the sleeve in and bind it to finish the edges. Hope that helps! And thank you!
DeleteThank you! I have a sleeveless pattern I'm adapting to add puffed sleeves. I was contemplating starting to cut it out today when I realized that I might run into issues with how to add sleeves to a lined dress... This is perfect, though I may be back for help! :)
ReplyDeleteYou are welcome! I hope it works well for you! =)
DeleteOmg thank you so much for writing this post 3 years ago. I am making a dress that I'm made several times before but the fabric I bought online is way too transparent for my liking so I decided to line it. I've lined bodices before but never with sleeves and just didn't know how to do it. I've looked everywhere for a tutorial and I'm so happy I found yours. Thank you again.
ReplyDeleteYou are very welcome! I'm glad you found it!
DeleteI’ve used this tutorial in the past and it’s a life saver! Thank you so much for solving all of our issues. I have a question: I’m sewing in 3/4 lace sleeves into my lined bodice. Will long sleeves work and fit when rolling and sewing the linings together?
ReplyDeleteYou are welcome, I'm so glad it's been helpful! I've done long sleeves before, and it can be tough, but it is doable! I've even done it on little baby sizes. Just go a bit more slowly when sewing the seam and keep feeling with your fingers to make sure you don't have any lumps of fabric where they shouldn't be.
DeleteDoes this apply for longer and bigger sleeves as well?
ReplyDeleteYes, it does! The larger the sleeve, the more difficult it is to roll into the space between the armscye and neck, but it does still work!
DeleteI’m a little confused about the process of sewing the hole in the underarm. Can you please explain that?
ReplyDeleteI'm not sure how else to explain it... you want the lining and outer bodice parts to be right-sides together, with the sleeve sandwiched between them, and the seams all stacked on top of each other. You'll sew from the part where you stopped when you initially sewed the sleeve in, across the un-sewn part, and end at the part where you started when you initially sewed the sleeve. I don't know if that's any better, but I hope it helps!
DeleteThank you!!! I have wanted to know this for so long. Now I'm doing a dress I have to know but all the tutorials are different and don't show this way, the way I needed! Thank you !❤
ReplyDeleteYou are welcome! I hope it worked well for you! <3
DeleteThank you! I’ve been looking for a tutorial for this Technique for a week
ReplyDeleteYou are welcome! I'm glad you found it!
DeleteThis is honestly the perfect tutorial for what I need, thank you so much! Also, great job on wording/phrasing/keywords. This was one of my top 5 search results and exactly what I was looking for.
ReplyDeleteI'm so glad to hear that! Thank you! 😊
DeleteDo you have a tutorial for lined cap sleeves in a lined bodice, or would you just do it the same?
ReplyDeleteSorry for the slow response! If the cap sleeves don't meet at the underarm, I'd do it pretty similarly. I would finish the lined hem edge of the sleeve first, then insert it following this tutorial, excluding the parts about sewing the underarm sleeve seam. Hope that helps! =)
DeleteThis tutorial you made continues to be super useful. You explained the process with pictures really well. Glad I don't have to slog through more videos to try to find the instructions I need. They're right here!
ReplyDeleteThank you!! I almost always prefer photo tutorials over videos, too. So glad this one helped you! =)
DeleteThank you for the tutorial!
ReplyDeleteYou are welcome! I'm glad you found it useful! 😊
DeleteI know this is an old post, but I have been referring to this tutorial for years. Thank you so much! It continues to be an excellent help (because I forget how to do it every single time). Brilliant technique!
ReplyDeleteI'm so happy to hear that it's been useful to you for all this time! 😊 Thank you for taking the time to comment!
DeleteDelighted to find this post, must away to my fabric now to put it all to the test !! Thank you.
ReplyDeleteYou are welcome! I hope it serves you well!
DeleteThanks for sharing this tutorial. I have used it several times and refer to it throughout the construction of the bodice. It is VERY helpful!
ReplyDeleteYou are so welcome! I'm so glad it's been helpful! =)
DeleteHi Charity, I am trying to put a gathered cap sleeve into a lined bodice that has the back in one piece. I know I did it 30 years ago for a dress-up princess dress for my daughter, now trying to finish a 30 year old unfinished dress for my granddaughter! And I simply cannot remember or work out how I did it. It seems impossible right now. Any ideas?
ReplyDeleteHi again Charity, I just had a closer look at Google and discovered the burrito method - which worked perfectly! .
ReplyDeleteHi Alex! The burrito method is so useful, isn't it?! I'm glad you found a solution. I hope your granddaughter loves the dress!
Delete