Thursday, November 2, 2017

Raccoon Baby Shirt and Knit Pants

My sweet sister-in-law had a baby boy in July! I had seen this post a few months prior to that and knew immediately what I wanted to make when I was invited to her baby shower. However, when I went back to re-read the post, it turned out that my memory had changed the raccoon significantly from the original, and I ended up preferring the version in my imagination, so I came up with my own template for it. I cut out layers of freezer paper to stencil it on, and used acrylic paint mixed with textile medium to paint it.

  And of course, I made sure to include the tail in the back! I only cut one piece of freezer paper for that, and free-handed the stripes for a furry effect. I love how it turned out!

  I stenciled these on some navy blue knit from Girl Charlee, and used Jalie 3133, version A in size 3 months, to make the bodysuit. I haven't been entirely happy with any of the onesie patterns I've tried, but this is the least offensive of the bunch so far.

 The only change I made was to only partially sew the bindings on the sleeves until after the side seams were sewn up (mostly because I'm a perfectionist, but also because my machines don't like sewing over a big lump of binding like that).

  I like how this pattern has a separate rectangular piece for the snaps, although sewing it to enclose the front was a bit more difficult than a regular binding would have been. I used KAM snaps for the closure.

  I want to try stretching the binding even more around the curve at the bottom next time, as it doesn't lie perfectly flat.

  The way the binding is sewn doesn't leave a good spot for a tag, so I cut the size from a scrap of white vinyl and ironed it on in the back neck area. Of course, it didn't occur to me that I'd have to do that until after the shirt was finished, so it's a tad crooked. Fortunately it's not visible from the outside!

  I'm delighted with how this little shirt turned out!

  To go with it, I made a pair of knit pants using a heavily modified overall pattern.

I used some grey and black checked fabric, from Girl Charlee but no longer available, for the cuffs:

  As well as slipping a bit in at the pockets:

  The waistband is just plain black knit, and the main fabric is solid grey. I was really happy with how the fabrics worked together.

  Next time I'll see if I can find a knit pant pattern instead of modifying an overall pattern, but I think they worked. I never actually got to see them on the baby, so I can't be sure!

  I wrapped this all up with some more of that plaid- it makes a darling bow!

Thanks for stopping by,

Thursday, October 26, 2017

Bow-Back Striped Floral Shirt

  I love this shirt! This is pretty high on the list of favorite things I've ever sewn. It's funny that I like it so much, because the bright pink brings it well out of the color palette I'm usually comfortable wearing- but those details make me so happy!

  I started with my knit shirt block, and divided it at the waist to make a peplum (actually, a bit below my waist, because I like the proportions better that way). I took a small piece out of the back above the waist for fitting purposes, and added that much length to the bottom of the back peplum. If you look closely at the stripes just above the waist seam you can see how it curves up a bit.

  I added ties to the front- this is the only part I don't totally love, as they tend to gape a bit at the top. I still like the concept though- maybe some interfacing would help.

  I moved the shoulder seam forward, and widened the neckline slightly, then bound the front neckline only with a strip of pink knit (from Girl Charlee, also used here). In the back, I added a partial second layer (and third, because I lined the second one for a clean edge, although binding would have been a better choice) and cinched it up to give a bow effect. I really, really love how that bit turned out!

  I sewed it together by capturing the front of the shirt between the back of the shirt and the bow layer- it's a bit bulky, and isn't as smooth as I'd like at the join between the front and back neckline, but it makes up for the lack of stretch in the front neckline. I spent some extra time matching the stripes:

  I was happy to have the tie section in the front though- with the shaping of the front versus the back it was impossible to match the stripes all the way down the side seam, and the ties help hide any un-matched bits.

  For the sleeves, I added a bound keyhole and a knotted cuff. I love how this turned out!

  The striped/floral fabric is from Sincerely Rylee well over a year ago- it was a custom design called Nova and I don't think the shop owner has any plans to run this one again, although I'm hoping I'm wrong!

    The skirt is another re-worked dress... although I really liked this grey dress, I almost never wore it, so I unpicked the skirt and waistband from the bodice and finished the top of the waistband, then re-hemmed the skirt a bit shorter. I'm glad I did, as I've worn it quite frequently in skirt form.

  And I'm really glad I chose a fabric I wouldn't usually try to sew this shirt, because I am so happy with the results!

Thanks for stopping by,

Saturday, October 21, 2017

Soft Pleats Shirt

Apologies for the unintentionally long break between posts- I feel like I've had barely a moment to myself in months! Here's another shirt I made back in May.

  I bought this piece of black modal knit from Sincerely Rylee to try earlier this year, and it's such a lovely fabric- soft, with a heavy, graceful drape (although I've since discovered that not all modal knits are quite as nice as this one). I modified my knit shirt block to add some pleats, off-centered around a small rectangular section, and included a some ties in the sides of the rectangle. This was not the easiest thing I've ever sewn, in spite of lightly interfacing some sections to reduce the stretch! So it's not very clean, but I've yet to successfully seam-rip a knit, so it stays.

  I brought the section below the rectangle to a point. I expected that to be rather difficult to lettuce-edge, but it was much easier than I expected- I just started and stopped at the point, and threaded my tails in extra-carefully. I stretched the fabric much less near the point to keep it a bit more defined, but stretched normally the rest of the way around the hem.

 I also drew in a curved line on my sleeve piece, then flared the lower portion out to a half-circle and added a point to that as well.

  I love how the sleeves feel, although the weight of the knit makes them sit a bit lower on my arms than I'd meant for them to.

  I wish I'd tightened the whole shirt up a bit, or added a draped detail to the back of the shirt. As it is, it feels a little bit sloppy instead of graceful.

  But I do love this knit, and I really like the way the points turned out. Definitely something I'd like to experiment with more!

  The skirt might be a bit familiar- I took this dress, which I only wore a few times, and combined it with the lining from the lace skirt in this post, once that skirt was no longer wearable! Right now this black shirt is the only thing I can wear the skirt with, so it hasn't been worn all that many more times as a skirt than it was as a dress, but I do like it better.

  And that's it!

Thanks for stopping by,


Saturday, September 2, 2017

Coral Eyelet And Not Chambray

Earlier this year I bought some fun eyelet knit from Style Maker Fabrics (at the moment there is a small piece left for sale, here) without any real plans for it, other than thinking I'd use it for myself. It's a polyester nylon spandex blend, which isn't my favorite, but I loved the eyelet enough to give it a shot anyway! Eventually, I decided on a shirt:

  I made a full-circle peplum with the seam situated below my natural waist, and a dip to one side. (I sewed a pretty decent point in it too- I'm disappointed that it was just barely out of the frame in the one photo I got of the dip!)

  I made 3/4 length sleeves and ruched them with elastic:

  And I echoed the dip slightly at the neckline with another bit of ruching:

  I took a small chunk out of the upper back section at the waist seam, then added it back to the lower edge of the peplum, and it really helped reduce the wrinkles back there! I lettuce-edged the sleeves and hem:

  I also sewed a white tank to go underneath, using the last of my white swim lining. But of course I didn't get any photos!

  Then, I spent a couple of days drafting a skirt block, making it a-line, muslin-ing it, and adding a tulip-style flounce and pockets. I wanted to sew it up in chambray, but the only piece I had was too small, so I used a slightly larger piece of lightweight denim, wrong side out. Unfortunately, the denim was still too small for the flounce, so I went with an overlapping ruffle instead, and I'm not entirely happy with it. I like the overlap, but flounces are much more graceful than ruffles!

  I made a mistake when drafting the skirt block though. I drafted it at the wrong time of month and it's too big the rest of the time, and sits quite a bit lower than I'd intended. Not a problem I'd considered! Also, I wish I'd added half as much width for the a-line flare.

  At least it has pockets?

  I used an invisible zipper in the back, and a hook and eye on the waistband:

  I've worn the skirt pretty frequently in spite of its issues, but early on I forgot that the inside is denim, and dark, and washed a load of laundry- including the coral shirt- with it, and it bled on them. So my pretty coral shirt has darker spots all over it now that I just can't seem to get all of the way out. =( I do have a bit more of the coral- maybe I can squeeze a different shirt out of that!

Thanks for stopping by,


Saturday, August 26, 2017
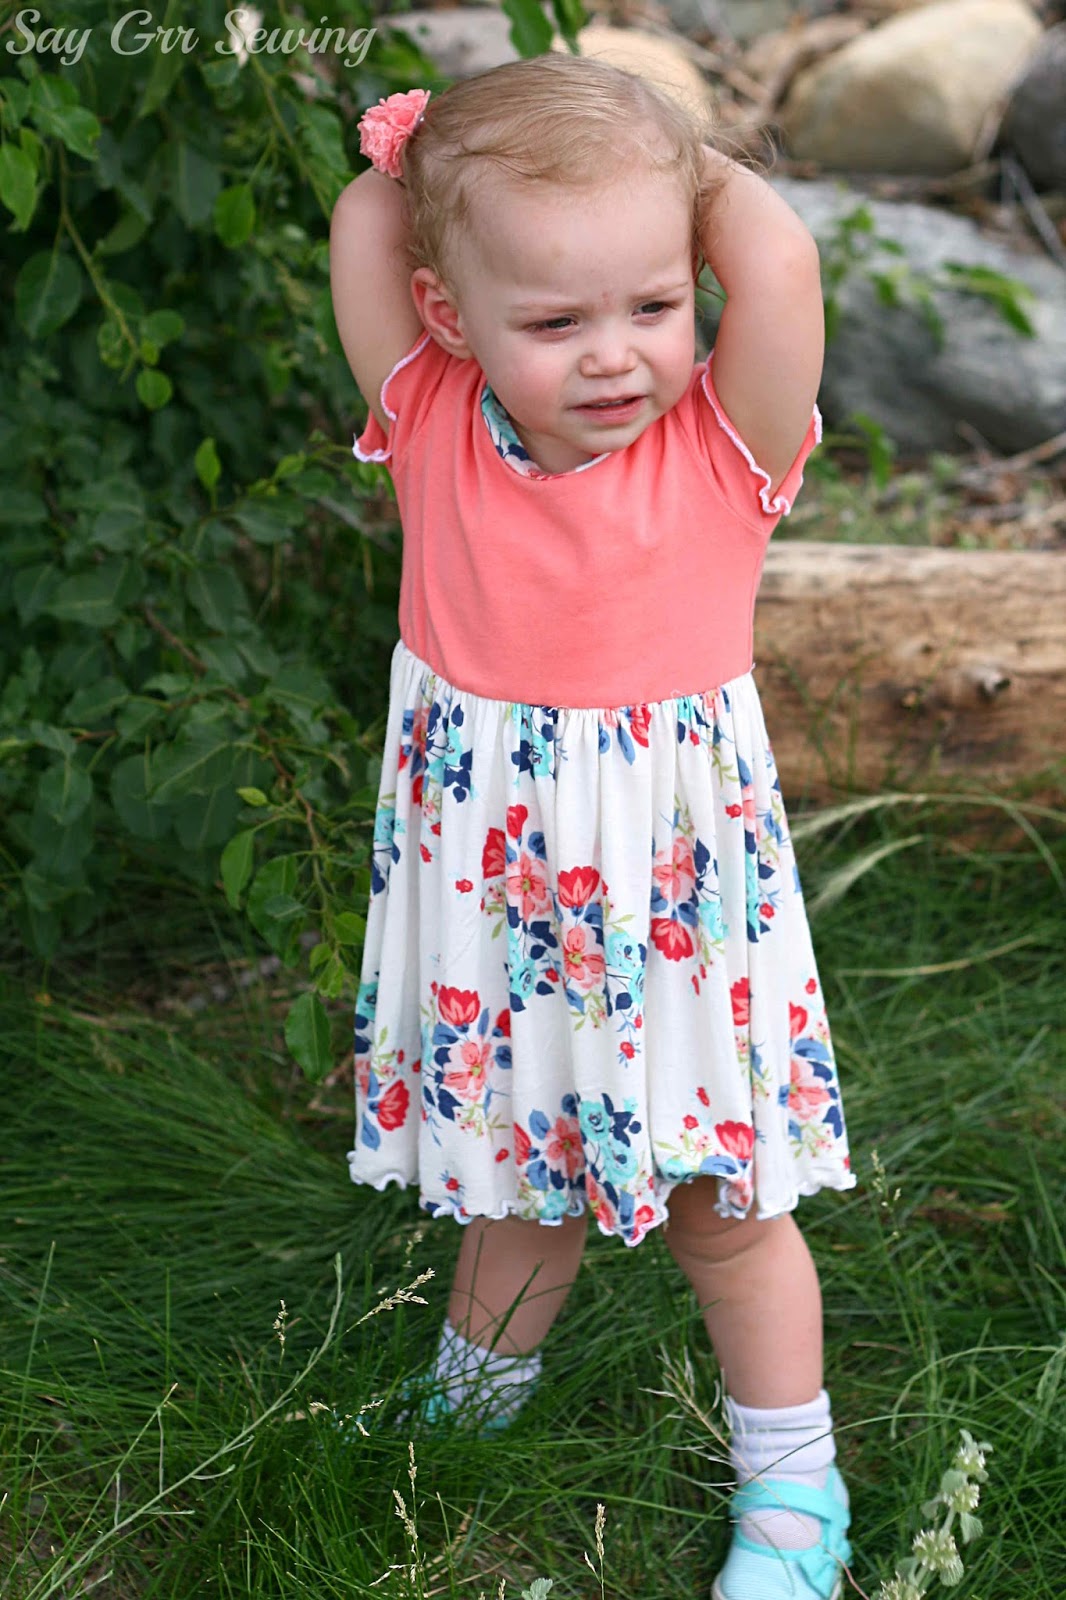
Florals and Solids

Here's another set of clothes I made in the spring- coordinating dresses for these four little girls!

  The floral is a rayon spandex from Sincerely Rylee... I think I bought it last year? 

All of the solids are from Girl Charlee... aqua, coral, peach, and navy. 

  I decided to go for a really simple silhouette on these, with a basic short-sleeved bodice and gathered rectangular skirt. I had some issues with the gathering, but then I usually do on knit! And I'm sure it didn't help that I was trying to stabilize it with clear elastic. I found I had to stretch the elastic the tiniest little bit as I serged it in, or the bodice seam would still wave... but I ended up overstretching it in a few places, which caused puckering.

  I had thought the floral was opaque enough by itself, but once I'd finished all four dresses it was pretty obviously NOT, so I ended up sewing four simple slips from some swim knit lining fabric, which I hemmed with stretch lace, and after a failed attempt at trimming the necklines and armscyes with lace trim, finished with a shell hem like this one using a machine blind stitch. Unfortunately, I don't have any photos of the slips.

  Since this was a pretty basic design, I used Jalie 2805 and cropped it just above the waist, then added the skirt- I had to grade the pattern down for Foof, but the other girls all fit in the size range now. I did notice that while the grading looks perfectly even, the amount of ease goes up and down as the sizes go up. And the edges aren't quite trued, so things form points or dips occasionally. I still think Jalie 2805 is a better option than a lot of Indie patterns, but it could definitely be improved on!

  I hemmed the sleeves and skirt with lettuce edging- I really love the way the lettuce-edging looks in this rayon knit!

  I wasn't sure about the navy at first- it's much less of a cheerful spring color than the others, but I really love how it worked in the end!

  This is the only photo I got of any of the dress backs, but they are just as basic as the fronts!

  These dresses have been worn quite a lot over the summer! I had plans to make more with the same silhouette but I'm quite behind on my sewing list (I still have 5 summer birthday gifts to make!) so that hasn't happened yet.

  I'll be back at some point with this outfit I sewed for myself in May! (Hopefully it will be less than  a month this time.) ;-)

Thanks for stopping by,