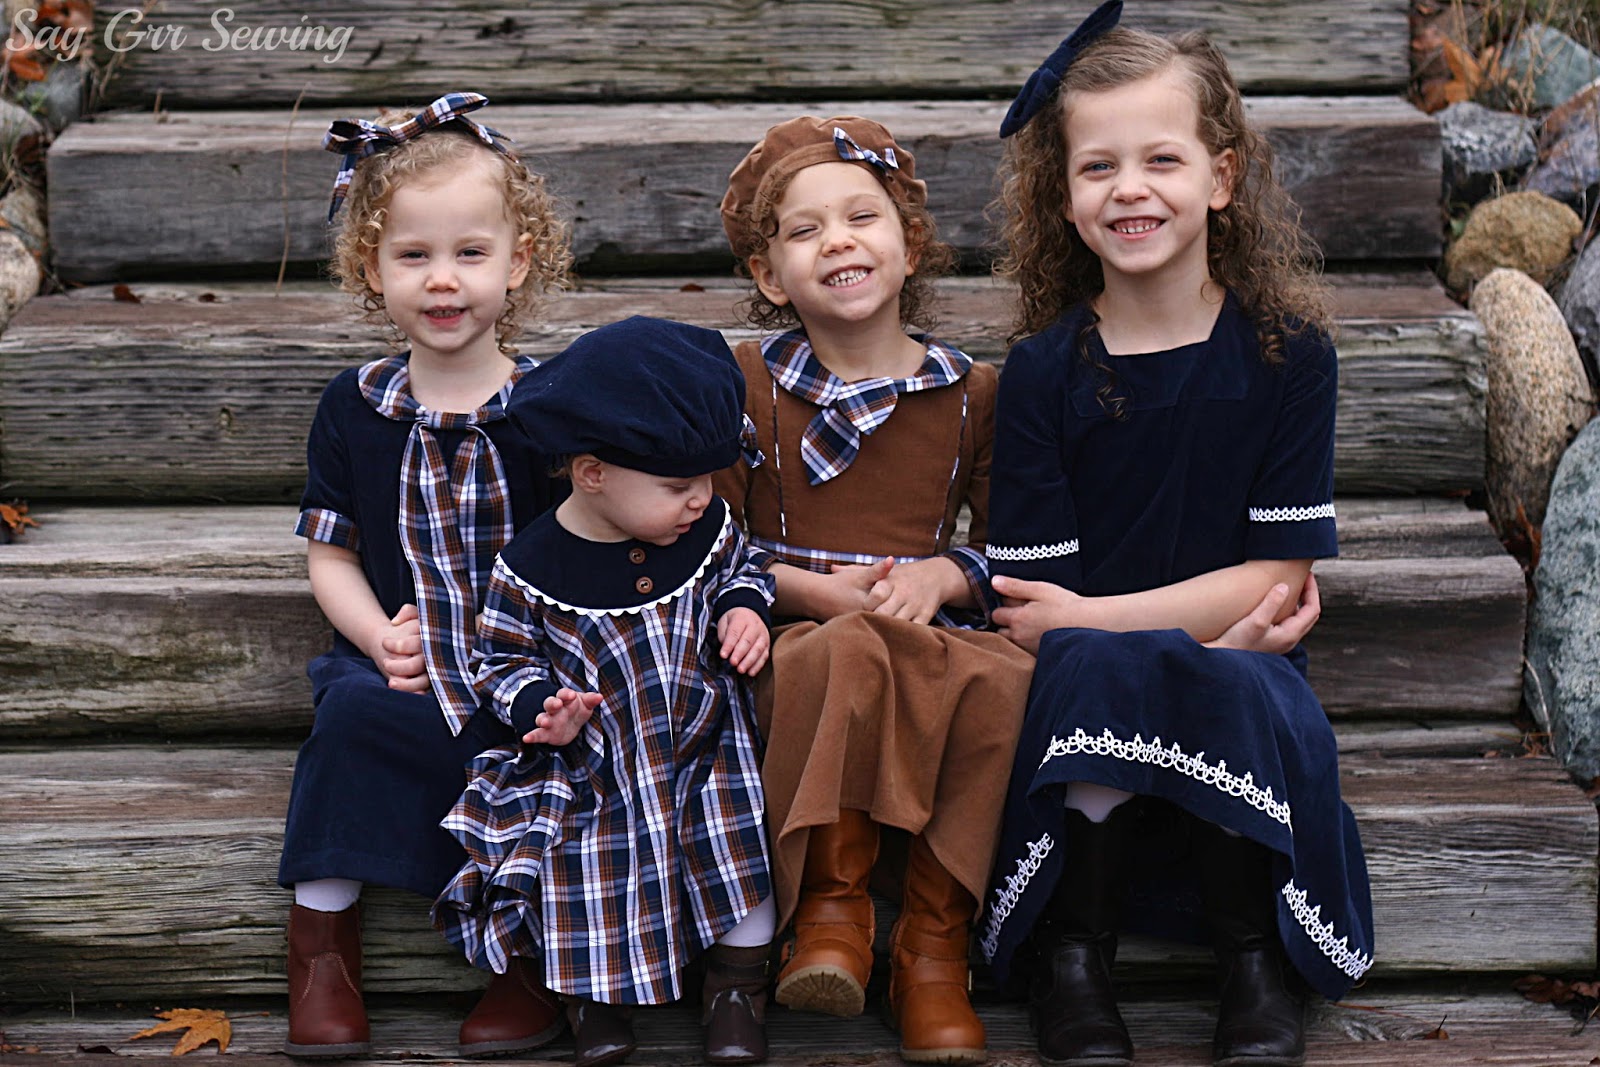
It's been a while and I've got a backlog of things to post, so I'm going to start with some recently sewn things first, and cram all four Christmas dresses into one post!
Years ago I started searching for a blue-and-brown woven plaid to make some Christmas dresses. This year, I finally found a plaid like that, and bought as much as my budget could handle, but couldn't remember what the dresses I'd initially planned to make looked like! So I decided to pair it with some navy and camel 21-wale corduroy, and came up with some slightly vintage-inspired designs.
More backstory.... I started tatting some trim this spring with plans to add it to a grey corduroy skirt. I also tatted a heart, which I was planning to use atop a pocket, and when the sleeve trim didn't work for this dress, I thought maybe I could make a dress instead of a skirt and use all of my trims together, but I just wasn't in love with the idea. However, when I saw the navy corduroy I'd ordered, all of the pieces came together! So the first dress actually doesn't include any plaid at all!
I used the Oliver+S Building Block dress as the base for a drop-waisted dress with elbow-length sleeves, a pleated skirt, and an external neck facing with mitered corners. It closes with an invisible zipper... I used interfacing down the back because the corduroy seemed light enough to need it, but it caused some puckering. I need to buy some better-quality interfacing!
The neck facing would probably have looked better if I'd managed to cut the pieces perfectly on grain, but I still love the effect:
I cut most of the pieces with the nap going up the dress, and the external sleeve facings, waistband, and part of the neck facing have the nap running to the right, for a little added interest. I had to take a few inches of tatting out of the sleeve trim to make them fit, and it took a really long time. It probably would have taken only about one hour more to completely re-tat them! Tatting is very difficult to unpick. The flecks on the sleeves are mist from the cold and drizzly weather we were having when I was photographing these. =)
I liked the effect better with the tatting at the hem upright rather than hanging down, so I sewed it on with two rows of hand-stitching, along the top and bottom of the trim. For some reason that took me a really, really long time, but it was worth it!
I eventually decided that making the heart a pocket was just asking for trouble, so I used it as an applique instead. I used the same pattern to tat the heart as I did the blue one in this post.
I also made a big corduroy bow to go with this dress:
I absolutely love how this dress turned out... it was worth all of the time I poured into tatting the trim and sewing it on!
For Gaiw, I decided to use the camel corduroy with plaid accents.
I also used the Building Block dress pattern as the base for hers, and used techniques from the book for most of the design features. It has piped princess seams that meet up with pockets in the skirt, a sash, banded sleeves, and a tie collar. I used some pretty antique copper spring snaps for the back, but next time I use these I would add extra interfacing, as the fabric has already torn next to one of the snaps.
I spent quite a lot of time figuring out how to make the piping seamless between the princess seams and the pockets, because I wasn't sure about the sash, but in the end I much preferred the dress with the sash, so that time was rather wasted!
I love the piped pockets though:
I top-stitched the sleeve band down on the outside of the sleeve to secure both layers... it's the only top-stitching in this dress so I was concerned that it would look out-of-place but I don't think it's noticeable at all.
I love the tie collar! After I took these photos I tied it in a double-knot and that worked a lot better than the single knot here:
I also made Gaiw a quick elastic-back beret from the corduroy, with a little plaid bow to accent it. It was a little tight on her, but I didn't have time for a remake!
Becker's dress is an a-line dress with a tie-look collar, a big central box pleat, hem facing, petal cuffs, and welt pockets. Hers is the final dress made using the Building Block pattern... I made muslins for all of them but didn't notice on Becker's that I needed to widen the shoulders slightly for her.
Because of that, the sleeves are also slightly shorter than I meant for them to be!
I made a polo-style placket in the back for this one (I'm not sure what the correct way to do that would be... this is just a wide continuously-bound placket stitched down at the bottom and with snaps!) I stitched the placket to the outside first so I could enclose the bias neck facing underneath it. I somehow managed to make it off-center though. =( And this is the only photo I took of it, and it's terribly blurry! I'll probably re-visit this idea again someday though, I think it might work really well on a thinner fabric..... and I should have added 1/2" width to the neckline to accommodate the seam allowances of the placket. I used the same antique copper spring snaps on this dress.
Beckers' collar was cut on the fold, with an additional 'knot' piece, and a wide sash for the tails. It was a bit bulky at the center front, but still worked in this lightweight plaid.
I love the petal cuffs! This is an idea I got from the original version of the Tinny dress, although I drew my own for this dress. Instead of sewing these to the inside of the sleeve then turning them out like the Tinny pattern, I used the bias sleeve facing from the Building Block Dress book, and they worked beautifully!
This was my first time sewing welt pockets, and they also turned out quite nice, although I'm not sure about whether I should have done something more to finish the edges of the slash on the inside of the dress.
Beckers got a big plaid bow to finish off her ensemble:
And finally, Foof! I drafted her dress from scratch... starting with a basic woven block in a size 6 months. (I only used her chest measurement to determine that, because every time I tried to measure her she would roll onto the floor and kick her legs around. She thought she was the funniest girl ever.) I then drew in a yoke and turned the portion below the yoke into a big circle! Her dress has, besides the slightly-oversized yoke, a hem facing, ric-rac trim, and banded sleeves.
I stuck two decorative buttons on the front of the yoke... these remind me of gingerbread! This one was really difficult to sew because of the tight opposing curves!
The back closes with more antique copper spring snaps, and has a continuously bound placket below the yoke. Those snaps are lined up perfectly, honest. It's just the angle! ;-)
I didn't get a detail shot of the cuffs, because she was being a booger and kept running off when I was trying to take photos, but they are also trimmed with white ric-rac. I added two inches in length to the dress when drafting it because Foof usually wears a size 12-18 months garment in height, and she wouldn't cooperate for measurements so I could make sure that would work. I ended up taking it, and the entire beautifully-sewn hem facing, back off and re-hemming. I had to cut another hem facing and re-sew.... the dress would have draped more than I wanted if I'd just hemmed regularly. It was worth the time though, because it suits her perfectly!
I also made her a little hat, which is just a 14" circle (next time I'll try an 11 or 12" circle instead) gathered onto a band with a little bit of elastic in the back, and a plaid bow in the front.
In spite of all of the little problems and all of the mistakes I made, I'm just delighted with this batch of dresses! I love the fabrics, love the trims, love all of the little details that went into these. =)
I also made a sweater for myself using some thick navy knit, and wore it to our Christmas celebration, so I coordinated as well! But since I made it the night after taking these photos, I'm not in them. ;-)
Thanks for stopping by,
Wednesday, December 28, 2016
Sunday, December 25, 2016
Merry Christmas!
So apparently I haven't posted here since the 1st... I've definitely been busy! Here's a little peek of some of the things I've made:
I hope your Christmas is lovely and relaxing!
Thanks for stopping by,
Thursday, December 1, 2016
Birthday Gifts for September, October, and November
I've already shared a handful of the gifts I made in October, but I thought I'd save all of the shirts with vinyl for a single post... and here it is! I used Jalie 2198 for all of these. The black and blue fabrics are from Nick of Time Textiles, and the olive green is from Girl Charlee.
My twin nephews' birthday was in September... and I made coordinating shirts for them! For one, a shirt that says 'double':
And for the other, a shirt that says 'trouble'! I'm so happy that these boys' mama has a great sense of humor and loved the shirts. ;-)
I was initially planning on applique for the words, but I didn't have fabric in a color that I liked with this blue. I ended up using the last of my orange vinyl.
I wanted the stripes on the arms to be thicker too, but I had just barely enough to squeak out this width, and I like the effect anyway! Next time I'll put the stripes a little higher though.
I also added tags to the back of these shirts.
The next birthday was my brother-in-law's. He's pretty awesome. ;-)
This fabric is actually olive green, but my camera picked it up as muddy brown!
I prefer the 12oz knits over this one for t-shirts... this one just doesn't feel sturdy enough to me.
Another brother-in-law's birthday was in early November... he's a photographer, so I put this on the back:
and a simplified version of his logo on the front. I simplified it because the original had lots of tiny pieces that I would have had to weed out! ;-)
I'm really pleased with this one!
I used this free clip art for the camera.
And finally, my vocal middle brother's birthday was also in November! It's a little hard to see in the photos... it reads, 'I am not bound to please thee with my answers -Shakespeare'.
I didn't have enough white vinyl left for this one so I went with black... it's a little easier to read in person because of the sheen of the vinyl, but white would definitely have been better.
The hems turned out fantastic on this one!
I only have one birthday gift left to make this year, for Gaiw. I really enjoyed making birthday gifts instead of Christmas gifts, but I haven't quite decided whether I'll do it again next year. I also somewhat unexpectedly gained a new brother-in-law this year, so I didn't actually end up making gifts for all of the extended relatives!
I'm currently working on a Christmas dress for Booper. I have a coordinating set of dresses planned for the girls', but with how long it's taking me to sew the trim on Booper's I'm really not sure that I'll get them all finished. I need more sewing time! Maybe I can just skip sleeping this month. ;-)
Thanks for stopping by,
My twin nephews' birthday was in September... and I made coordinating shirts for them! For one, a shirt that says 'double':
And for the other, a shirt that says 'trouble'! I'm so happy that these boys' mama has a great sense of humor and loved the shirts. ;-)
I was initially planning on applique for the words, but I didn't have fabric in a color that I liked with this blue. I ended up using the last of my orange vinyl.
I wanted the stripes on the arms to be thicker too, but I had just barely enough to squeak out this width, and I like the effect anyway! Next time I'll put the stripes a little higher though.
I also added tags to the back of these shirts.
The next birthday was my brother-in-law's. He's pretty awesome. ;-)
This fabric is actually olive green, but my camera picked it up as muddy brown!
I prefer the 12oz knits over this one for t-shirts... this one just doesn't feel sturdy enough to me.
Another brother-in-law's birthday was in early November... he's a photographer, so I put this on the back:
and a simplified version of his logo on the front. I simplified it because the original had lots of tiny pieces that I would have had to weed out! ;-)
I'm really pleased with this one!
I used this free clip art for the camera.
And finally, my vocal middle brother's birthday was also in November! It's a little hard to see in the photos... it reads, 'I am not bound to please thee with my answers -Shakespeare'.
I didn't have enough white vinyl left for this one so I went with black... it's a little easier to read in person because of the sheen of the vinyl, but white would definitely have been better.
The hems turned out fantastic on this one!
I only have one birthday gift left to make this year, for Gaiw. I really enjoyed making birthday gifts instead of Christmas gifts, but I haven't quite decided whether I'll do it again next year. I also somewhat unexpectedly gained a new brother-in-law this year, so I didn't actually end up making gifts for all of the extended relatives!
I'm currently working on a Christmas dress for Booper. I have a coordinating set of dresses planned for the girls', but with how long it's taking me to sew the trim on Booper's I'm really not sure that I'll get them all finished. I need more sewing time! Maybe I can just skip sleeping this month. ;-)
Thanks for stopping by,
Thursday, November 17, 2016
Sewaholic Alma Blouse
For my mom's birthday in October, I wasn't quite sure what she would like most, so when I asked for her size, I also asked if she would prefer a shirt, skirt, or dress. She wanted a dress. But from woven fabric, not knit! And then she requested that it be made from brown floral, so I took a trip to Jo-Ann's.
Unfortunately, the only brown florals at Jo-Ann's were either quilting cotton, or shiny. I finally found a medallion-print rayon challis that seemed like it might work, and went to buy it, but sadly there were only 1.5 yards left. I'd already had a yard of brown suiting for the contrast cut at that point, so I just bought two more yards of that, and figured I'd just do my best to make it work for the full-priced dress pattern that I'd also bought!
Then upon request the next day, I sent a photo of the medallion print to mom, who decided she would rather have a jacket. I suggested a blouse, and she agreed, so I bought the Sewaholic Alma blouse pattern to use with it. I made view C with no sash (not enough fabric) and raised the neckline 1" in the front as well as lengthening the bodice 2 inches at the lengthen/shorten line.
The pattern was well-made, and the instructions were good. The armscyes seem pretty low as drafted. It prints over 43 pages for all of the views, but that's including a separate front bodice for the notched neckline version, as well as under and upper collar pieces.
The sleeves are on the long side, and the cuffs were quite loose, but otherwise this fit my mom pretty well! Better than I hoped, for sure! The sleeves have a simple continuous bound placket for the vent... I probably would have found the instructions for that part confusing if I hadn't made this type of placket before.
I under-stitched the facing, although the pattern doesn't call for it, and added a label to the back:
I serged all of the seams for a simple and quick finish. This was my first time using rayon challis, and it really wanted to shift around on me until I lightly starched everything, after which it behaved beautifully for both sewing and pressing.
Next time I'll be a little more specific when I give anyone options for their gift... it'll make things simpler! ;-) But I'm glad I had a chance to sew this pattern, and I may sew it up again for myself at some point... I'm just outside the size range but the pattern has just enough ease that it'll probably work anyway. (And yes, I'll muslin it first!)
Thanks for stopping by,
Unfortunately, the only brown florals at Jo-Ann's were either quilting cotton, or shiny. I finally found a medallion-print rayon challis that seemed like it might work, and went to buy it, but sadly there were only 1.5 yards left. I'd already had a yard of brown suiting for the contrast cut at that point, so I just bought two more yards of that, and figured I'd just do my best to make it work for the full-priced dress pattern that I'd also bought!
Then upon request the next day, I sent a photo of the medallion print to mom, who decided she would rather have a jacket. I suggested a blouse, and she agreed, so I bought the Sewaholic Alma blouse pattern to use with it. I made view C with no sash (not enough fabric) and raised the neckline 1" in the front as well as lengthening the bodice 2 inches at the lengthen/shorten line.
The pattern was well-made, and the instructions were good. The armscyes seem pretty low as drafted. It prints over 43 pages for all of the views, but that's including a separate front bodice for the notched neckline version, as well as under and upper collar pieces.
The sleeves are on the long side, and the cuffs were quite loose, but otherwise this fit my mom pretty well! Better than I hoped, for sure! The sleeves have a simple continuous bound placket for the vent... I probably would have found the instructions for that part confusing if I hadn't made this type of placket before.
I under-stitched the facing, although the pattern doesn't call for it, and added a label to the back:
I serged all of the seams for a simple and quick finish. This was my first time using rayon challis, and it really wanted to shift around on me until I lightly starched everything, after which it behaved beautifully for both sewing and pressing.
Next time I'll be a little more specific when I give anyone options for their gift... it'll make things simpler! ;-) But I'm glad I had a chance to sew this pattern, and I may sew it up again for myself at some point... I'm just outside the size range but the pattern has just enough ease that it'll probably work anyway. (And yes, I'll muslin it first!)
Thanks for stopping by,
Tuesday, November 1, 2016
Eva Dress
Here's another dress I made for another sister-in-love in October!
This is the Eva dress, a free pattern from Your Style Rocks, and one that I've admired since it was first released.
I wanted to make this in dark pink jersey knit, but the only pink jersey I had enough of was a baby pink, and, procrastinator that I am, I didn't have enough time to order anything, so I spent some time in Jo-Ann's searching for something that would work. Of course, they don't have much in the way of nice knits, so I ended up with an overpriced cotton interlock. And honestly, I wish I'd just used the baby pink.
I don't know if it's just the quality of Jo-Ann's interlock, or interlock in general, but it's a struggle every time I use it... it stretches completely out of shape and even with new needles my serger hates it. It also pilled up a bit when I washed it, but since I'd spent quite a bit on it even after a coupon and obviously couldn't bring it back to the store after washing, I was committed to making it work! And I think the dress turned out all right in spite of the fabric! A bit wavier in places than I'd like, even after a good steaming, but hopefully not too awful. ;-)
A gave me her actual measurements in addition to her size, so I used those to figure out which size of the pattern to download. Unfortunately not all of the margins printed (possibly because I was using letter-sized paper instead of A4?) but I think I managed to line everything up right anyway!
While the actual pattern pieces were pretty decent, particularly for a free pattern, the instructions had me puzzled a couple of times, and I'm usually great at working that kind of thing out! I'm still not sure if I hemmed the sleeves the right width!
I decided to machine-sew the pleat in the back for a couple of inches instead of tacking it at the waistline by hand from the outside. My hand-stitching usually isn't secure enough for things like this.
These front pleats are my favorite bit of the whole dress, even if they did end up a bit wavy in this fabric:
I used a twin needle with bulky nylon in the bobbin for all of the top-stitching again.
I haven't heard whether or not this one fit yet. Isn't this style pretty though? I'd like to make it again in a jersey like I'd initially planned... I think the neckline draping would look a lot better in a thinner fabric.
In addition to all of the October birthday gifts (I still have two left to post about, plus a pair from September and one from November) I've been working on a skirt for myself. I finished the construction last week and have been spending every chance I get adding some embroidery to it... I'm really enjoying the process!
Thanks for stopping by,


