Thursday, February 18, 2016

Snowflake Outfit: The Jacket

  And now it's time for my favorite piece of the whole ensemble... the jacket!

  I started this jacket with a hooded sweater pattern- Jalie 3355 to be exact- in one size up from Booper's measurements. And then I started modifying it. I:
1. Cropped it to waist length.
2. Extended the front to create lapels.
3. Added a collar.
4. Lengthened the sleeves so I could leave the ribbed cuffs off.
5. Added a waistband and peplum.
6. Changed the hood to have a center piece and a front band.
7. Drafted facings and a lining.

  Then, because I'm not completely crazy (yet), I made a quick muslin in some green fleece that I had on my shelf, bought last year for a project I ended up missing the deadline for. For the most part, I was happy with my changes, but I re-did the collar several times before I was satisfied!

  The fabric is a white sweatshirt fleece from a flawed bargain lot from Girl Charlee early last year. I was expecting regular knits and was pretty surprised to end up with onion skin, sweatshirt fleece, and baby hacci sweater knit! I should definitely have read the description more carefully! But this fabric at least came in handy. =)

  I cut doubles of my bodice pieces and sleeves for extra warmth and so the quilting would have more depth to it. I layered the pieces wrong-sides together and basted them with quilt basting spray. Then it was quilting time! I used my Silhouette to cut several sizes of a basic snowflake from sticker paper, stuck them to my pieces, and sewed around them. I used my regular foot and just stopped and pivoted a lot, because the vintage machine I'm using throws fits when I try to free-motion. After the snowflakes, I drew random swirly lines all over the pieces in washable marker and quilted those the same way.

  I also cut two peplums, but sewed around the bottom and front edges right sides together before turning, basting, and quilting.

  I left the waistband, hood, collars, and facings un-quilted for a little bit of contrast. I interfaced the upper collar and the waistband with lightweight interfacing. After quilting, I sewed the jacket in what I assume is the normal order. ;-) For the most part it went beautifully! But I had tons of trouble with one of the facings where the collar and lapel meet... I'd line everything up perfectly and pin all over, sew, and remove it from the machine to find that it was an entire centimeter off! Three times! I finally hand-sewed it with a back-stitch, which worked well.

  I did my first-ever bound buttonhole... it looked pretty decent before I washed the whole jacket (which I had to do to get the marker out), but washing it made parts of it crooked and it wouldn't press straight again. =(

  I used swimsuit lining fabric to line the jacket... I'm not sure how well it will hold up but I can replace it if it doesn't last, and it has the slipperiness I was looking for.

  I didn't add ease like you normally would for a jacket lining because this fabric is quite a lot stretchier than the exterior fabric, especially after all that quilting. I actually should have shortened the sleeve lining a little bit more, as it stretches past the hem when Booper puts it on.

  Before lining it though, I added one side of three KAM snaps to the neckline edge of the upper collar, so I'd have something to attach the hood to that would be hidden from the outside,

  The hood is a completely separate piece, with sweatshirt fleece on the outside, swimsuit lining on the inside, and curly white faux-fur (found at Hobby Lobby rather last-minute) as a border.

  I added the other pieces of the three snaps along the bottom edge of the hood, as well as one whole snap hiding in the two corners of the faux fur.

  With the hood from the back:

  And without:

  And the front without the hood:

  I wanted Booper to be able to wear the jacket closed if we ever encounter colder weather, so I added a loop of elastic cord to one lapel when I was sewing the facing in, and sewed a small button under the edge of the collar.

  It looks like this when done up:

  She says it feels too tight when worn this way though, so I'd widen the neckline (and alter the collar to match) if I were to do this again.

  I really, really love how this jacket turned out! I'm pretty happy that I drafted a notched collar, made a bound buttonhole, and bagged a lining- all for the first time! =)

  I'd love to make a properly tailored jacket at some point, but I have a lot of other things in the queue right now, so it won't be soon.

  My favorite part of the jacket though? All that quilting. So worth the hours!

  One more post and then we are done with the snowflake outfit!

Thanks for stopping by,

Tuesday, February 16, 2016

Snowflake Outfit: The Shirt

Today I have lots to say about the shirt I made for this outfit! =)

  I did a brief search for knit for this shirt while I was shopping for the tulle skirt and overskirt fabrics, but I didn't find what I had in mind, so I figured Booper could just wear a plain white shirt that she already had... but the more I thought about it the less I wanted to leave this piece out! I looked online in a few places but still didn't find anything quite right... and finally I remembered my upcycling box, and thought there just might be something that would work there. And there was!

  I was planning on using Jalie 2805 again, but the t-shirt I had in the box, although it was the perfect color, has very little stretch. I ended up cutting Booper's size from the Jalie pattern, but added 1/2" at the side and sleeve seams. Overall that adds 2", which made it wide enough to get on even without the extra stretch! I also lengthened the shirt by 2", and the sleeves by some number I can't recall... probably 1".

  I just barely managed to squeak the pieces out of the shirt... luckily it was an XL! I couldn't use the sleeves of the shirt because they were short. I didn't re-use the hems either, because I knew I wanted to lettuce-edge those:

  I did re-use the neckline ribbing, cutting it down to the proper size, for the neckband.

  And then I got to work with my Silhouette and prepared as many snowflakes as I could fit on a 12" by 12" sheet of white heat transfer vinyl... I considered using silver but I'm glad I didn't. I cut 23 different snowflakes, but ended up leaving two off because the vinyl wasn't quite 12" wide after all and the edges of them got cut off. After I cut these I found even more snowflakes in my Silhouette library that I could have used.... I guess you might say that I like snowflakes! ;-)

  I spent quite a while ironing these on to the shirt pieces before I sewed the shirt together... I used parchment paper atop the backing this time and I feel like it really helped the backing to stay flat, as well as making it easier to move the iron around. I also ironed from the back of the fabric to make sure everything was stuck well. It's already been through the washer and dryer once and it still looks great!

  I am super-happy with how this shirt turned out, in spite of my preference for stretchier fabric!

  Heat transfer vinyl... amazing stuff! =)

  Details on the jacket soon-ish! =)

Thanks for stopping by,

Monday, February 15, 2016

Snowflake Outfit: The Skirts

As I mentioned in the last post, the snowflake over-skirt was the beginning of this whole outfit.

I used a snowflake from one of the inspiration snowflake ballerina posts, scaled up to be a total of 42" across, with a circle for a 20.5" waist in the middle... and I added a small seam allowance inside the circle so I'd have something to sew the waistband to. I printed half of it out across a whole lot of paper, taped the pieces together and cut everything out, then traced it onto my folded felt with a washable marker. Then I used a combination of rotary cutter and scissors to cut the felt.

  I ended up not cutting the smallest pieces, but I wish I had!

  I used glittery waistband elastic from JoAnn's for the waist, and since it was sewed to non-stretchy felt, folded the edges under and added a pretty crystal-look button with a loop.

  Although I like how this turned out, there are a few things I would do differently. First, I'd look for a stiffer fabric... this felt was the stiffest (and most expensive) sold at JoAnn's, and it' is still just too drapey. I chose felt to begin with because I wasn't prepared to spent a lot of time finishing all of the edges on something that will probably only be worn once, but can you imagine this in taffeta with cutwork embroidery?!

  Next, I'd probably add small connections between the openings to help everything hold its shape better, especially in the deep cuts along the edges.


  And finally, I'd make the button-loop out of non-stretch cording, or a thread loop. Or maybe I'd just leave the openings fully open, instead of closed at the top, so I could leave the button and loop off entirely.

  The skirt underneath was originally meant to be a tutu, but I didn't have nearly enough tulle. (Which is because this was all that was left on the bolt at the store.)

  So instead it's a satin skirt, very tightly gathered, with an even more tightly gathered tulle layer atop it, and a satin elastic waistband. All of the gathers made the waistband a bit ripply at the bottom, but I did figure out that using Mary Ellen's Best Press helps even this cheap costume satin to crease nicely!

  The only satin and tulle available were slightly different shades, which really bothered me at first, but now that it's sewn I love the depth that it adds. I used a wide French seam on the satin and just overlapped the tulle edges slightly.

  Even though it's not a full tutu like I first imagined, I really love how this turned out, and think it's perfect without the over-skirt! This is a piece that will probably get worn regularly. I'd still like a fuller skirt for under the snowflake piece though!

  Because the snowflake looked really sad without the volume of a full tutu under it, I ended up slapping together a hoopskirt with the leftover felt. I cut a 3/4 circle skirt (which is all I could fit on the remaining felt), abutted the edges and zig-zagged them together, then sewed some plastic boning in a casing that I had on hand to the bottom. I'm not particularly happy with this though. It turns out that the boning doesn't work well on a curved hem, and wants to twist, so it doesn't stand out as stiffly as it would along a straight hem.

  I left most of the edges raw on this, with a slit at the center back. The waist is enclosed in fold-over-elastic to add stability, and has a button and loop:

  If I were to make a hoopskirt again, first I'd make it out of a better material. The felt was the only white I had on hand that I was willing to sacrifice for a garment that would be worn only for dress-up, but it's heavy and too warm. I'd probably choose a lightweight cotton for something that would see more use. Next, I'd do a closely fitting deep yoke with a full rectangular ruffle to attach the boning to, instead of any curved shape. I'd also cut it two inches shorter than the garment it was meant to be worn under, instead of a half-inch, since it's peeking out in most of the photos. It still helped, and was absolutely necessary to the finished outfit, but the way it buckles in places made it harder to deal with!

  Details on the shirt are coming up next. =)

Thanks for stopping by,


Thursday, February 11, 2016

Snowflake Outfit

  Have you seen the idea floating around to cut a paper snowflake and use it as a skirt on a paper ballerina? I keep seeing and admiring it, but have never actually cut the pieces myself. Sometime around November, I started wondering if the look could be translated to work on a real person! Then the Project Run and Play theme for November was announced... textile manipulation, and it occurred to me that a skirt like that would definitely work for that category. I fleshed out the idea by planning a quilted jacket and a vinyled shirt to go with the skirt, and went so far as to purchase the materials for the skirt. But the link-up party closed unexpectedly early (mere hours after I'd bought the fabric), and I decided to back-burner the project.until the new year.

  A few weeks ago, I pulled the materials back out and got started! First, I made a tulle-and-satin skirt. As usual, I shot myself in the foot by not buying enough tulle, but it still turned out well!

  Then, I used a shirt that's been in my upcycling box for about 6 years that was the perfect color, turned it into a child-sized shirt, and added vinyl snowflakes:

  I love how these two pieces turned out!

  Then it was time to work on the jacket! This one was the most time-consuming part of the whole project, but I absolutely love it!

  I spent hours quilting it, and it turned out even better than I'd imagined. =)

  And when worn, it has a sweet, vintage vibe that I adore!

  Then it was time for the piece that started the whole outfit, the snowflake layer of the skirt!

 However, the stiffest white felt sold at Joann's turned out to be too fluid to hold the shape I wanted. So I added a felt hoop-skirt... it's not perfect, but it helps.

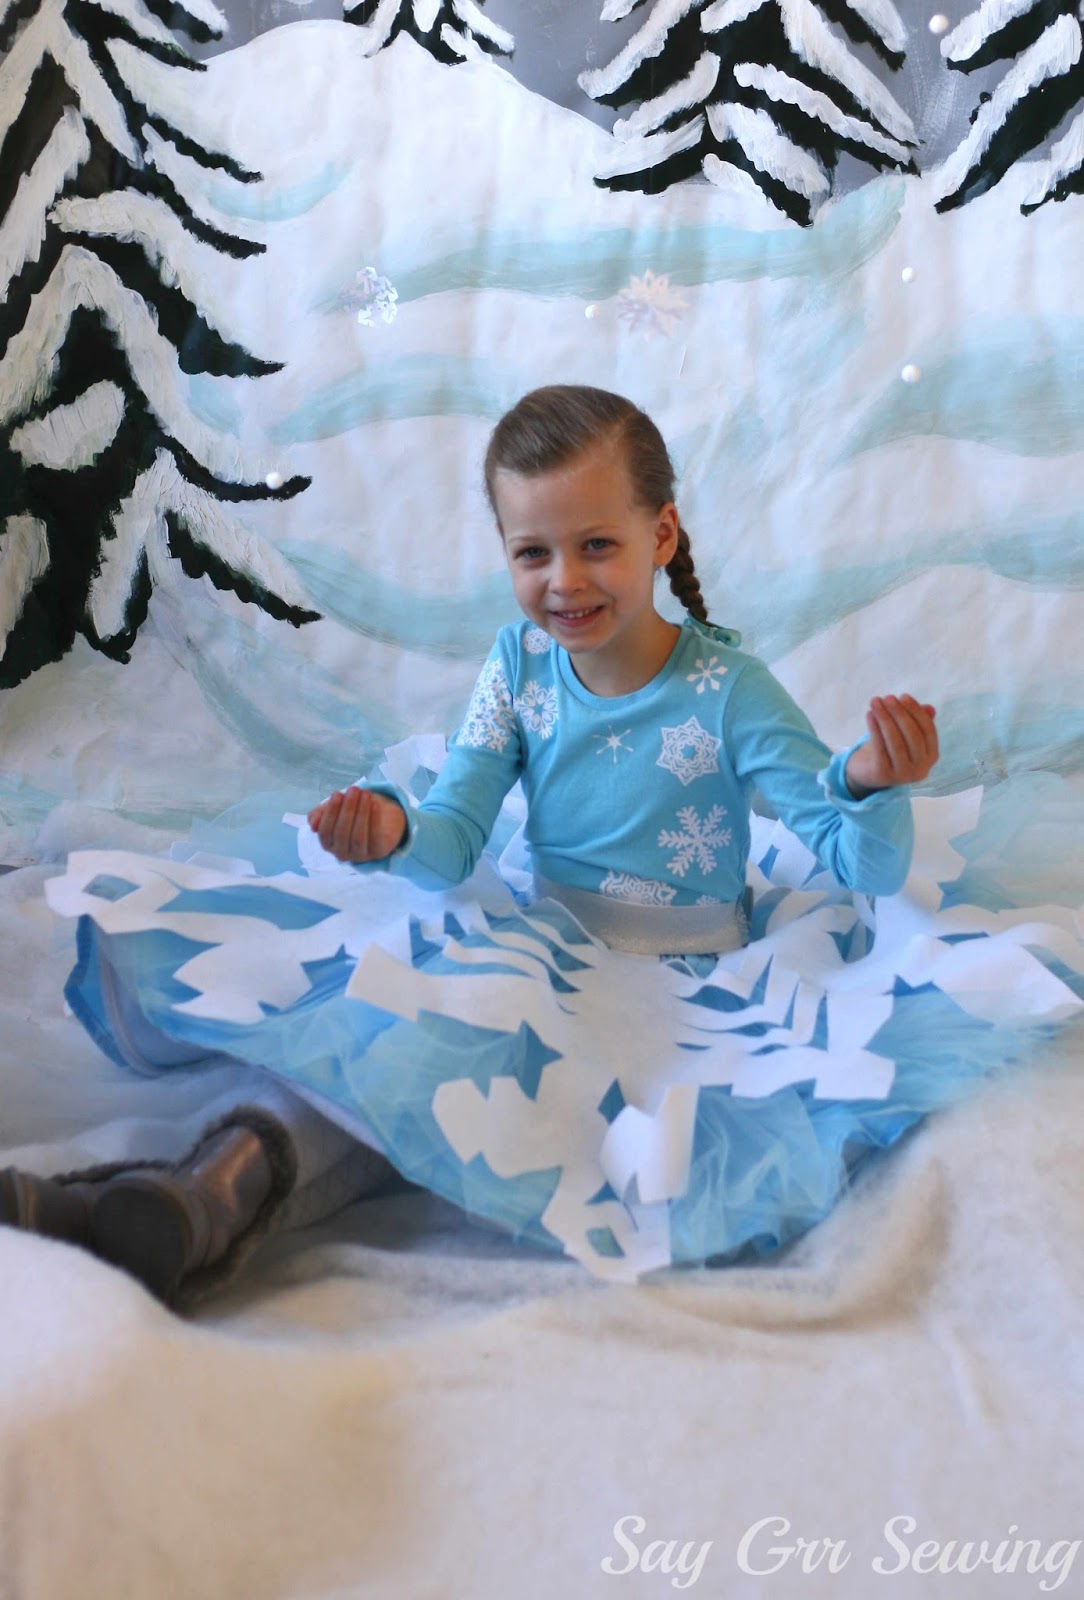
  Here's Booper wearing all three skirts:

  And then, to top it off, I added a felt beret with a tulle pom-pom:

  I would like this a little bit better with narrower elastic, but this glittery stuff does add to the snowy feeling of the outfit!

  And finally, because I'd decided not to add pockets to the jacket lest it spoil the design lines, I made a fully-lined faux-fur muff:

  Which makes everything look even more vintage-y!

  Well, but then I needed some fun photos to go along with this fun outfit, so I used a whole lot of paint on some background paper that had just arrived in the mail to create a winter scene. (Background paper wasn't the best choice for painting on. Next time I'd probably try canvas with a layer of gesso on it.)

  And then I put some cushions on the floor and covered them with white fabric, then batting, to create 'snow drifts'. The batting was too sheer to use by itself, but with the second layer underneath it worked quite well!

  And finally, I strung white pom-poms on some invisible thread (which isn't always quite invisible) along with a few paper snowflakes, and hung them overhead. =) That last bit turned out to be the most difficult part! I suspect my ceiling is made of rock.....

  I love it! It's a whole lot more outfit than is typical for me, but most of the pieces are totally wearable for everyday.

  And now... the current theme at Project Run and Play is "Inspired by Cosplay". This outfit began because of paper snowflakes, but it was definitely influenced by the elaborate costumes I've seen in a few places lately. So, although it's not recreation of any character, it is definitely inspired by cosplay!

  I'll be back before too long to share the details of each piece, the fabrics and patterns I used, and what I wish I'd done differently. =)

  But for now, here are a few more photos of my sweet snowflake:


Thanks for stopping by,