

If you happen to be around my size you may be able to skip the whole drafting part and download my free single-sized pattern here. It fits approximately Bust 39-42" Waist 33-35" and 5'7-8" height. My pattern includes 1/4" seam allowances. Make sure scaling is set to 'none' when you print, and print the first page first so you can make sure the 1" square prints at 1". =)
Otherwise, there are 3 places you can start from:
Otherwise, there are 3 places you can start from:
- If you have a basic crew-neck t-shirt pattern that fits you well, I'd recommend that as a starting point.
- No pattern, but you have a crew-neck t-shirt that fits well? Trace a pattern from it -one way to do this is detailed here.
- Don't have either of the above and are willing to put in more time? Draft your own shirt pattern! Learn how here... after drafting, I recommend making a mock-up of the shirt and fixing any problems before following the rest of this tutorial.
This is what I started with- a front, a back, and an elbow-length sleeve:


2. Next, measure from the base of your
neck at the shoulder down your back to the string. This is B, shown below left. Measure
from base of your neck at the shoulder again to a point 2” from
the center point of your body on the string, on the side opposite the
shoulder. This is C, shown below right.


ETA: The sewing instructions can be found here. =)


Now that you have your starting point
worked out, you'll need to take a few measurements.
1. First, tie a
string around you where you want the waistline of the dress to land, shown below left.
I went for an empire line for mine, but it's definitely easier to nurse if the waistline is at your natural waist. With the string still in place, measure
from the base of your neck at the shoulder over your bust point to
the string. This is A, shown below right.


3. Measure from the base of your neck at
the shoulder to your bust apex. This is D, shown below left. Measure from one apex to
the other. This is E, shown below right.

4. Measure from the string down to where
you want your hem to end. I went for ankle-length. This is F, shown below left. Finally, measure
your 'waist' where the string is. This is G, shown below right.

5. Now it's time to start changing your
pattern! On your pattern, parallel to the front fold, measure from
the shoulder at the neckline the distance of D from step 3, and mark a line perpendicular to it, shown below left. Measure from the front
fold on the line you just made and mark half of E from step 3 to establish your bust point on the pattern, shown below right in red.

6. On your pattern, parallel to the front
fold, measure from the shoulder at the neckline and mark A from step 1 to find
the waist, shown below left. On your back piece, measure and mark B from step 2 from the shoulder at the neckline, parallel to the
fold on the back piece, shown below right

7. Draw a slightly curved line from A to B
through the side seam of your pattern. Extend this
line to be perpendicular to the fold in the back and front, shown below.

8. Trim your pattern pieces at the line.

9. Set the back piece aside for now, and
trace the full front, marking the center fold, shown below left. Mark the bust point too, even though it's not shown in the next few illustrations. Mark 2”
(or however much you used to create measurement C in step 2) from the center line along the waist seam-line, shown below right in red.

10. From the opposite shoulder, draw a line
to the point you just marked, shown below left. Cut along the line and throw away the
smaller piece to get a piece similar to the one shown below right.

11. From the shoulder point, measure C from step 2 along the diagonal and mark. Draw a line perpendicular to the diagonal
line at the mark, ending it in the waist line, shown below left. Smooth the line into a gentle curve and trim the pointed piece
off, shown below right. For clarity, I've erased the line that marked the center fold of the bodice and replaced it with a red dot. If you are making a gathered or pleated bodice, continue with step 12. If you'd prefer a smooth bodice like the floral dress above, your crossover is finished and you can skip to step 16!

12. For pleated or gathered crossover pieces, draw a line perpendicular to the waist
through the bust point to the shoulder. Measure 1.5” to each side
of the bust point and mark. Make sure that the mark on the left is at least 2" away from the fold line, or 3" if you are adding a neckline ruffle, otherwise you will end up with a lot of bulk. If needed, shift all three lines toward the side seam. From each mark, draw a line to the waist
parallel to the first line, shown below left. Cut along the line closest to the center
front, leaving a tiny 'hinge' of paper at the top. Pivot the outer piece until
there is a 1.5” opening at the cut and tape the pieces down, shown below right.


13. Cut the next line, leaving a tiny 'hinge'. Pivot to create a 1.5” opening, tape
down, shown below left. Cut the final line, pivot to a 1.5” opening, tape down. shown below right. For the gathered version, continue with step 14. For the pleated version, skip to step 15.

14. Gathered version: Trace the entire piece, marking the outer edges of the outer two cuts. Mark the fold line (red dot) and draw a smooth line at the waist, shown below. The gathered crossover is done and you can continue to step 16!


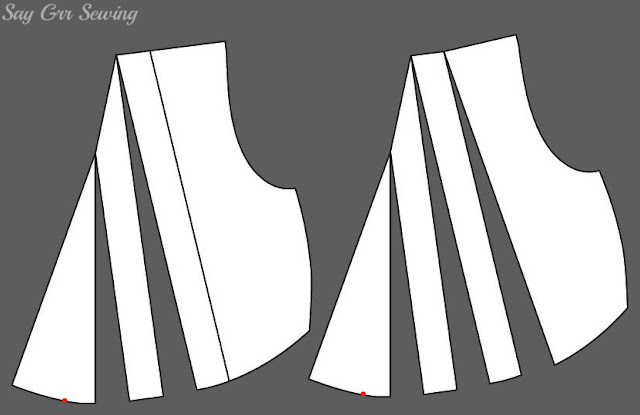
15. Pleated version: Trace the entire piece, marking both sides of each cut at the waistline, as well as marking the fold line (a red dot here), shown below left. Don't trim off the paper below the waist just yet. Bring the first and second marks together, and fold the excess paper in the back toward the side seam. Repeat with the third and fourth marks, then with the fifth and sixth marks. While folded, cut off the excess paper along the traced line, then unfold, for a finished pleated crossover similar to the below right illustration.

16. On to the nursing underlay! Trace your front bodice again... no need for a full piece this time. Mark the bust point, shown below left. Widen the neckline of the nursing front
by 1”-2”. From the bust point, mark 1-2” toward the side seam-
shown below right with a black dot. The farther toward the side seam you mark, the smaller the chance of accidental exposure... but the more difficult it will be to nurse.

17. Draw a line perpendicular to the waist seam through the black dot, curving to end in the armscye approximately 1” above the top of the side seam, shown below left. Cut along the line, throw away the smaller piece, and you have your nursing front, similar to the one shown below right.

18. Next we have a half-circle skirt. Subtract 2” from measurement F in step 4 to get F1. Subtract 2" from G to get G1. (This is to keep the skirt from dragging the bodice down. If your fabric is very stretchy you may want to subtract even more, but keep in mind that this is a pullover-style dress and you will have to get your shoulders, arms, and bust through this measurement!) Divide
G1 by 3.14 to get G2. Add F1 to G2 to get F2. In the corner of your very large sheet of paper, draw a quarter-circle whose radius is
G2, shown below left. Draw a quarter-circle around that whose radius is F2, shown below right. (Here's a hint for this one... you can use a ruler and make marks out from the corner using your radius measurement and connect them, or you can make a compass with string as shown here.)

19. Cut along both curved lines. Tada, skirt! For the waistband, divide G1 from step 18 by 2 to get G3. Make a
rectangle that is 2” tall by G3... the smaller rectangle shown below. If you are adding a ruffle to the neckline, measure the diagonal of your crossover
piece. Measure the back neckline, add the two together, and multiply
by two to get the total length of the neckline. This is H. Draw a
rectangle that is 2” tall by H. This is the larger rectangle shown below.

20. If you are adding cuffs or flounces to your sleeves, measure across the bottom edge of one sleeve to get I, shown below:

21. For notched cuffs, draw a rectangle that is 2" tall by I, shown below.

22. For a flounce, divide I by 3.14, then multiply by 2 to get I1. Add 3" to get I2. In the corner of a piece of paper, draw a quarter-circle whose radius is I1, then a quarter-circle around it whose radius is I2. Cut along both lines to get a flounce similar to the one shown below.

23. Finally, we need to add seam allowances! Add
them to the following locations:
- 2 long sides and 1 short side of the waistband. The side without a seam allowance will be placed on a fold.
- All sides of the skirt.
- All sides of back piece except the long straight center fold. The side without a seam allowance will be placed on a fold.
- All sides of the nursing front except the long straight center fold. The side without a seam allowance will be placed on a fold.
- All sides of the sleeve.
- All sides of the ruffle.
- All sides of the front crossover piece.
- Both curved sides of the sleeve flounce. The two straight sides will both be placed on a fold.
- Two short sides and one long side of the sleeve cuff. The side without a seam allowance will be placed on a fold.
ETA: The sewing instructions can be found here. =)
Thanks for stopping by,
No comments:
Post a Comment