Pages

Friday, July 31, 2015

Tulip Skirt

  If you've been reading this blog since last year, you may recall me whipping up a couple of quick skirts for Skirting the Issue. This year, I managed to make three skirts! Here's the first:

  I wanted to make it a bit more interesting than a basic gathered skirt, and I've been meaning to try paper piecing for a while now, so I sewed up the right-most tulip from this pattern first.

  I was initially planning on using a paler background color, but I didn't have anything I loved that was also large enough for a skirt, so I ended up using this brilliant blue, a pink fat quarter that I've had for years, and leftover Kona Spring Green from this dress. It turned out really fun and happy!

  After piecing the tulip (which was really fun, by the way! I will definitely be doing more paper piecing in the future) I trimmed it down to 1/4" from the ends of the leaves one the sides and added a strip of the background blue to the top to make it tall enough. I didn't want the back to fray, so I enclosed the main skirt pieces between the tulip piece and a matching strip of blue before turning it all right side out and sewing the back seam with a French seam.

  The hem band was sewn right-sides together with the main skirt, after which I folded the ends under, folded it to just past the stitching line, and closed it up with the same stitching that holds the ribbon down. The waistband is just a typical casing with 1-inch elastic threaded through it.

  I love how this turned out! Such a fun skirt for any little girl! I'll be back to share the other two skirts I made soon. =)

Thanks for stopping by,

Saturday, July 25, 2015

Quick Tiered Dress

  Gaiw is desperately in need of clothing- preferably dresses, because then she only needs to find one clean item instead of two. To begin to remedy the situation, I made a relatively quick and simple tiered dress.

  I started with a basic bodice shape (I just grabbed the simplest bodice that I already had printed, so I used this pattern, without all the additional features, in a size 2- based on Gaiw's chest measurement) and added a skirt with two tiers and some simple gathered sleeves.

  I was initially planning for a three-tier skirt, but there just wasn't enough fabric for that... this is the same fabric I made this skirt from a year and a half ago.

  I left the bodice un-lined, for a change, and serged the interior. The neckline is finished with bias tape- it probably would have turned out a bit better if I'd used self-fabric for the binding, but there wasn't enough left.

  There's a snap placket in the back, which uses the same binding:

  And the sleeves and hem are finished with a serged rolled hem.

  I was almost finished and thought it needed something extra, so I stitched on some of this cute green ribbon that I've had for a few years. That quick step really made it look better!

  Of course the back is done up with heart-shaped KAM snaps. ;-) Green, to match the ribbon!

  I'd prefer the tiers to be a bit fuller, but again, there wasn't that much fabric left! Gaiw thinks it is still sufficiently twirly. =)

  This dress sewed up pretty quickly!

  The lower portions of the sleeves are gathered using elastic thread, but the tiers and tops of the sleeves were gathered in the usual baste-and-pull method, which is what took the majority of the sewing time. =) I also spent quite a bit of time trying to steam the neckline bias into a curve before sewing it on- it really didn't want to cooperate!

  I'll definitely be using this concept again, but I'll probably make a few small changes.

  I'll lengthen the bodice an inch, make the skirt three tiers, and widen the shoulders by at least 1/2"- it isn't noticeable in these photos, but the shoulders are definitely too small.

  Wouldn't this be adorable in a solid fabric with a tiny floral trim accenting each tier?

  And that's it for this dress! I've also been working on a little quilt, and I have another new nephew (born a mere three days ago!) who obviously needs a handmade outfit. ;-)

Thanks for stopping by,

Monday, July 13, 2015

Floral And Coral

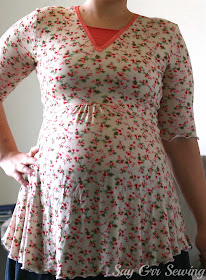
  This shirt is based off a concept I came up with a year and a half ago, but re-drafted (the original draft went missing). This is my third version, and though the pattern still needs a great deal of work, I'm pretty happy with the results! You can see the first iteration here, and the second here. =)

  It does have some issues- I sized down too much at the waist while drafting, and the back really wants to ride up now. Additionally, I'm still not happy with the armscye of my base pattern- the front is getting close to what I want, but the back is really not great. I think, but am not sure, that I need to greatly deepen the curve in the back armscye and lower both the front and back.

  The fabric was bought a couple of months ago in the same Facebook group as my last few garments... it's a very thin, drapey rayon blend, and was rather see-through! Besides which, I only had two yards. To make up for that I cut the skirt of this blouse as a half-circle rather than a full circle. I also added some length and 3" worth of gathers to the center front.
  I under-lined the bodice with some plain white knit (which probably contributed to this being tighter than I'd intended) to prevent show-through, but left the skirt portion and sleeves un-lined to keep it light enough for summer. I had to starch all of the edges thoroughly to make it sew-able!

  I wanted to do something different to the neckline than my usual crew-neck, so I cut this one as a v-neck with a sewn-in underlay. I trimmed the neckline with some pretty lacy elastic (bought here sometime last year) and just hemmed the underlay with a twin needle- it tunneled pretty badly, but I decided to leave it.

  I had loads of trouble stitching the neckline though! My machine was skipping more stitches than it was sewing! I finally made it work by lowering the tension to 0 and using a brand new stretch needle. I also tucked some of the elastic in the waist seam, and I love how it looks.

  I initially applied the elastic around the entire neckline, but for some reason it was rolling under and chafing badly in the back, so after wearing this shirt for a day I un-picked it from the back and just did a very narrow single-fold hem there.

  As usual, the hem and sleeves are lettuce-edged. I didn't have any off-white or coral thread, but the fabric does have pure white spots in it, so I went with that and I think it worked. =) Someone wanted to join me for this photo:

  I adore the print and colors of this shirt, even though it's pretty different from what I usually wear. I'm really happy that it doesn't wash me out like I expected either! I want to make another version or two of this shirt and try to work out some of the drafting errors, but we'll see what happens with that! =)

Thanks for stopping by,


P.S. Did you notice my lovely hair-clip? It was a gift from my friend Taylor, who sells lots of pretty versions here. I love that just the single clip will hold my hair up all day- I usually use a ridiculous amount of regular pins or about 7 spiral pins and have to fiddle with it all of the time. And isn't it pretty? =)

Sunday, July 5, 2015

Men's Jalie Tee

  About a month ago this blog post at the Shaffer Sisters reminded me that I own Jalie pattern #2918. I went rummaging through my knits, pulled out a few that I thought might possibly work, and took them to my husband for inspection. Only one of my picks fit his criterion for thickness as well as matching the 40% vertical and horizontal stretch requirements of the pattern- so I made a shirt from it! This is the same fabric I used for this cardigan- and it's really lovely. I wish I could find more like this!

  I chose a size up from his measurements, since he prefers his shirts to fit loosely, and it fits as expected! I might cut the armscye and shoulders in his actual size when I make it again- but it definitely fits him better than the ones he's been wearing. I also added two inches in length.

  This is view A of the pattern, and it's a pretty basic sew, so there's not much to say about this one. I did use wonder-tape (affiliate link) inside the bottom hem up before sewing it with a twin needle, and it worked beautifully. There's still a bit of tunneling that could be fixed by loosening the bobbin tension, but last time I did that it took over an hour of trial and error to get it back to normal when I was done.


  I was really itching to add some vinyl to this shirt, but what Joshua really needs are plain, basic clothes, so I contented myself with digital decorating. =) Like this:

  And also this:

  One more? =)

  And that's about it! He's happy, I'm happy. I'll definitely sew more of these once I get more suitable fabric.

Thanks for stopping by,