I have now successfully completed additions to two out of three bridesmaids dresses! As you probably know if you've read my blog for a while, I'm pretty modest in the way that I dress... I prefer high necklines, long skirts, and long sleeves. My sisters dress the same way, and will also be bridesmaids in my brothers upcoming wedding. So obviously we couldn't keep the dresses like this, cute though they might be:
Happily, my future-sister-in-law is the farthest thing you can imagine from a bridezilla, and was perfectly fine with us making a few changes. I didn't have to alter the sleeves, since I'm also making boleros, but I did need to change the length and neckline. I knew I wouldn't be able to find a satin that matched well, so I went for a different texture and used lined lace.
Here's what it looks like with the changes:
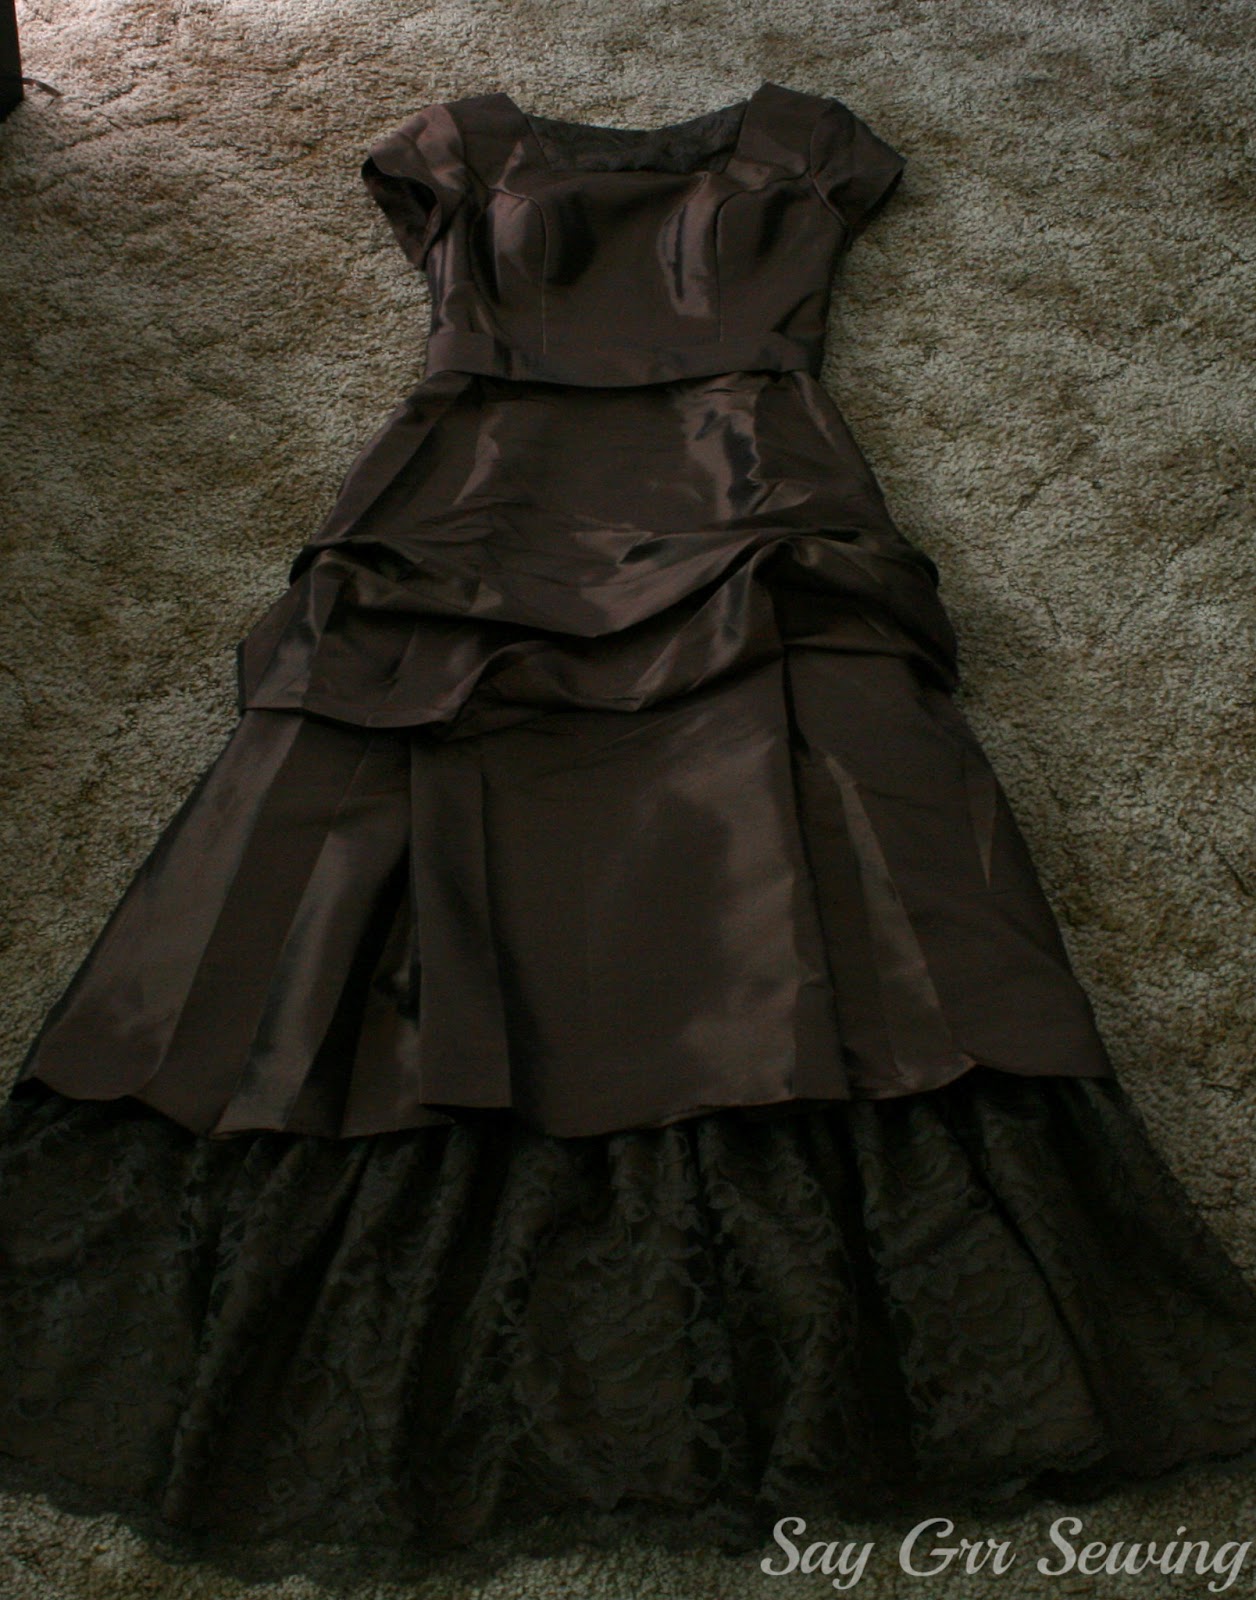
To be honest, I don't really love the look of the length addition, but it does serve its purpose. The color matches a lot more closely than it appears from the photo. I'm kind of proud of the neckline addition though:
I cut two pieces of the lining and one of the lace in the shape of the neckline opening, with seam allowances. Then I sewed them together and flipped them right side out. I wasn't sure how exactly I was going to attach it to the neckline until the last minute, but I ended up doing it similarly to how I would hand-sew hexagons for a quilt. I lined up one short side, right sides together with the neckline, and whip-stitched it together with tiny little stitches. Then I finagled and folded the pieces until I could line the longer sides up, right sides together, and whip-stitched those together. And finally I did the same thing for the last short side.
It even looks decent on the inside, and there are no raw edges! And I was really happy with my hand-stitching this time, except for the parts where one of the daughters suddenly jumped on me. I was also pleasantly surprised by how quickly it went. I was expecting each neckline to take at least an hour, but I finished each in under 30 minutes:
I used French seams for the side seams of the length addition, and a narrow rolled-hem (those are hard even with the rolled-hem presser foot!) on the lining. Then I gathered both layers together and sewed them upside-down to the lining of the dress, flipped them back down, and topstitched. It looks like this if you lift up the outer layer of the dress:
Most of the time all the stitching will be hidden by the outer layer, like this:
So the additions may not be perfect, but I think they came out well. =)
Left to do on the wedding sewing list: Alter my dress and make these same additions, finish my bolero and make two more, and sew a flower-girl dress. I'm getting things done, slowly but surely! =)
Thanks for stopping by!
Friday, May 3, 2013
Sunday, April 28, 2013
Wedding Sewing
My older brother is getting married to a very good friend of mine in June... and I will be a bridesmaid (bridesmatron?). But before then, I have a lot of sewing to do. I'm sewing boleros for three of the bridesmaids, as well as adding length and a neckline modesty panel to dresses for the same three bridesmaids. In addition, I have to do extensive alterations to my dress (I will be almost 8 months pregnant!) and sew a flower girl dress for Booper.
Here's what I've finished so far:
It looks uncomplicated, and the pattern really is pretty simple, but you know I went and complicated everything up. First, I added a lace overlay, which required basting every lace piece to the corresponding underlining pieces. Second, I decided against using a lining, since I was already quite a bit over budget in the fabric department. Skipping the lining meant that I needed to use some other sort of seam finish on every seam, and since these are for a wedding and I really want them to look nice, I sewed every seam as a French seam:
And finally, since I'm not using the lining I have to finish the outer edges of the bolero very differently than the pattern suggests. I am thinking bias strips as a facing... I haven't sewn this part yet. I'll need to sew them on the inside by hand to avoid topstitching, which I think wouldn't really look good with the lace. I also need to hand-sew the sleeve hems. So, a lot of work, and this is only the first of three!
Booper's dress will be fun though. I don't have the design fully planned yet, but I know I want tulip sleeves, a square neckline, and pick-ups throughout the skirt. I'm using white satin overlaid with hunter green lace for most of the dress, and hunter green satin for the sash. For this, I bought lining.
Isn't that pretty?
Initially I couldn't find green lace in any of the fabric stores around here, so I ordered it from Joann's online... and let me just say that was a mistake. I ordered the color on the left, and the light green on the right was what I was sent:
They aren't even close to the same color! And while both are pretty, I really needed dark green to match the wedding colors. I had given up on the lace overlay and went to Joann's in person to look for dark green satin, and was surprised and delighted to find just 3 yards of the hunter green in store... so it all worked out, except that I have to either find something to make with 3 yards of bright green lace or pay the extra to ship it back. Any suggestions?
I'll share photos of the dress alterations when I'm finished, as well as a modeled photo of the bolero. And you know I won't be able to resist showing you the flower girl dress... I'm excited about it. =)
And now I must be off to sew... I have only 7 weeks to finish everything, and I'm not nearly fast enough at sewing yet!
Thanks for stopping by,
Here's what I've finished so far:
It looks uncomplicated, and the pattern really is pretty simple, but you know I went and complicated everything up. First, I added a lace overlay, which required basting every lace piece to the corresponding underlining pieces. Second, I decided against using a lining, since I was already quite a bit over budget in the fabric department. Skipping the lining meant that I needed to use some other sort of seam finish on every seam, and since these are for a wedding and I really want them to look nice, I sewed every seam as a French seam:
And finally, since I'm not using the lining I have to finish the outer edges of the bolero very differently than the pattern suggests. I am thinking bias strips as a facing... I haven't sewn this part yet. I'll need to sew them on the inside by hand to avoid topstitching, which I think wouldn't really look good with the lace. I also need to hand-sew the sleeve hems. So, a lot of work, and this is only the first of three!
Booper's dress will be fun though. I don't have the design fully planned yet, but I know I want tulip sleeves, a square neckline, and pick-ups throughout the skirt. I'm using white satin overlaid with hunter green lace for most of the dress, and hunter green satin for the sash. For this, I bought lining.
Isn't that pretty?
Initially I couldn't find green lace in any of the fabric stores around here, so I ordered it from Joann's online... and let me just say that was a mistake. I ordered the color on the left, and the light green on the right was what I was sent:
They aren't even close to the same color! And while both are pretty, I really needed dark green to match the wedding colors. I had given up on the lace overlay and went to Joann's in person to look for dark green satin, and was surprised and delighted to find just 3 yards of the hunter green in store... so it all worked out, except that I have to either find something to make with 3 yards of bright green lace or pay the extra to ship it back. Any suggestions?
I'll share photos of the dress alterations when I'm finished, as well as a modeled photo of the bolero. And you know I won't be able to resist showing you the flower girl dress... I'm excited about it. =)
And now I must be off to sew... I have only 7 weeks to finish everything, and I'm not nearly fast enough at sewing yet!
Thanks for stopping by,
Friday, April 19, 2013
Negroni Shirt- Finished!
I did it! I finished the shirt for my husband. Here's what it looks like:
Doesn't look like much for how long I spent working on it, does it? But I assure you that it has a lot of details to it.
Details which, unfortunately, I could NOT get a decent photo of. I tried 3 separate times. Here is a blurry cuff-and-placket photo though. Please ignore all the lint... that is what happens when I leave something on my sewing table for several weeks. =)
I loved the placket instructions, but I hated the way the cuffs were sewn on to the shirt... the instructions have you sew one side to the sleeve at 1/4", then edgestitch the other side down...but since you baste that edge down at 3/8" when assembling the cuffs, it's impossible to sew it down neatly, without either pulling the seam of the cuff to the front, or having your former stitching show. I picked them out and sewed them my own way, and I like the results a lot better this way.
I'm also not fond of the facing. I put so much effort into flat-felled seams and lined back yokes, that it's not really great to have this right at the front:
It doesn't show unless you lift it, but I still don't like knowing it is there. I think I would have preferred a traditional button placket over a faced one, a regular button-hole at the collar instead of a loop, and a stand collar instead of convertible. Those are really more style preference, but overall I won't be using the pattern again as-is. I may alter it and make another later though, along with some sizing changes... the sleeves are too long for even my long-armed husband, and the waist too slim, although the fit everywhere else is very good.
I'll see if I can convince Joshua to let me take a photo of him wearing this when he gets home... he hasn't seen it since before I finished the cuffs.
Edited to add: Despite his dislike of being photographed, Joshua did let me take this one... just because he loves me. =) It would appear that those pounds gained last week were lost this week, and the waist now fits. =) Sleeves are still too long though.
I'm just glad it is finished. I do think it came out well, the pattern just wasn't as amazing as I hoped it would be. =) And amazingly, the buttonholes were much less of a fight than I was expecting, although they are a tiny bit too short and you have to fight to get the buttons through. =)
And now to sew 3 lace boleros, add to 3 bridesmaids dresses, and come up with a flower girl dress, all of which MUST be finished by mid-June. Think I can do it?
Thanks for stopping by,
PS: Linking up at The Train To Crazy
Doesn't look like much for how long I spent working on it, does it? But I assure you that it has a lot of details to it.
Details which, unfortunately, I could NOT get a decent photo of. I tried 3 separate times. Here is a blurry cuff-and-placket photo though. Please ignore all the lint... that is what happens when I leave something on my sewing table for several weeks. =)
I loved the placket instructions, but I hated the way the cuffs were sewn on to the shirt... the instructions have you sew one side to the sleeve at 1/4", then edgestitch the other side down...but since you baste that edge down at 3/8" when assembling the cuffs, it's impossible to sew it down neatly, without either pulling the seam of the cuff to the front, or having your former stitching show. I picked them out and sewed them my own way, and I like the results a lot better this way.
I'm also not fond of the facing. I put so much effort into flat-felled seams and lined back yokes, that it's not really great to have this right at the front:
It doesn't show unless you lift it, but I still don't like knowing it is there. I think I would have preferred a traditional button placket over a faced one, a regular button-hole at the collar instead of a loop, and a stand collar instead of convertible. Those are really more style preference, but overall I won't be using the pattern again as-is. I may alter it and make another later though, along with some sizing changes... the sleeves are too long for even my long-armed husband, and the waist too slim, although the fit everywhere else is very good.
I'll see if I can convince Joshua to let me take a photo of him wearing this when he gets home... he hasn't seen it since before I finished the cuffs.
Edited to add: Despite his dislike of being photographed, Joshua did let me take this one... just because he loves me. =) It would appear that those pounds gained last week were lost this week, and the waist now fits. =) Sleeves are still too long though.
| Any grime is due to this being a minute-he-walked-in-the-door photo. =) |
And now to sew 3 lace boleros, add to 3 bridesmaids dresses, and come up with a flower girl dress, all of which MUST be finished by mid-June. Think I can do it?
Thanks for stopping by,
PS: Linking up at The Train To Crazy
Monday, April 15, 2013
Husband Shirt Update
No, it isn't finished. =) But I have made quite a bit of progress on the button-up I've been working on for Joshua. I not only finished marking everything but have most of the shirt sewn together. To finish, I need to sew the cuffs, hem, buttonholes and buttons. And considering how scary this shirt is, that's a lot of progress!
The buttonholes are the part I'm looking forward to the least, since my buttonhole lever still isn't working the way it is supposed to. It's supposed to be entirely automatic but I'm having to do parts manually... I think I'm missing a spring or something. Once I have the time and money, I'll get it looked at, but for now I'll just be extra careful with every buttonhole to make sure it doesn't make giant knots on my fabric.
Another thing... this shirt is too small. It isn't my fault though! Some weight has been gained in the ridiculous amount of time that I've been working on it, and the waist measurement is now several inches larger than it was when I cut the fabric. Fortunately for the shirt, my husband is working on dropping those pounds again, so there is still a possibility of it being worn eventually.
There are several things about this pattern (the Negroni, from Collette Patterns) that I'm not impressed with, but I do appreciate the clear sleeve placket instructions and the use of flat-felled seams. It's a little extra work, but it makes things look so much nicer when finished.
There is a distinct possibility that I will finish the shirt this week... we'll see how things go! And once that is finished, I have a flower-girl dress to get started on, 3 lace boleros to make, and 3 bridesmaid dresses to add to, one of which I also have to alter. I also have high hopes for a shirt for myself, and if I get the perfect arrangement of spare time, a maternity skirt. I wish I was faster at sewing! =)
Thanks for stopping by,
The buttonholes are the part I'm looking forward to the least, since my buttonhole lever still isn't working the way it is supposed to. It's supposed to be entirely automatic but I'm having to do parts manually... I think I'm missing a spring or something. Once I have the time and money, I'll get it looked at, but for now I'll just be extra careful with every buttonhole to make sure it doesn't make giant knots on my fabric.
Another thing... this shirt is too small. It isn't my fault though! Some weight has been gained in the ridiculous amount of time that I've been working on it, and the waist measurement is now several inches larger than it was when I cut the fabric. Fortunately for the shirt, my husband is working on dropping those pounds again, so there is still a possibility of it being worn eventually.
There are several things about this pattern (the Negroni, from Collette Patterns) that I'm not impressed with, but I do appreciate the clear sleeve placket instructions and the use of flat-felled seams. It's a little extra work, but it makes things look so much nicer when finished.
There is a distinct possibility that I will finish the shirt this week... we'll see how things go! And once that is finished, I have a flower-girl dress to get started on, 3 lace boleros to make, and 3 bridesmaid dresses to add to, one of which I also have to alter. I also have high hopes for a shirt for myself, and if I get the perfect arrangement of spare time, a maternity skirt. I wish I was faster at sewing! =)
Thanks for stopping by,
Thursday, April 4, 2013
Quick Dress-To-Shirt Refashion
So I have still been procrastinating on that shirt for my husband... it still scares me. I did get the interfacing cut out, but I still haven't marked everything properly.
I did finish refashioning this dress though:
Here's what it looks like now:
No more waddling due to too-tight dresses! =) It was a pretty simple fix on the length, in spite of having to hem a lining separately. I wanted the front to be a little longer, so I marked where I wanted the dress to hit on the side seams, then laid it out and cut it like this:
This photo is after cutting... the pin is the mark for side seam length. I don't remember this dress being labeled as maternity when I bought it, but you can tell from the photo that it definitely is! The ruffle wasn't finished, so I cut a curved line to about 1 inch above the hem cut, to allow room for hemming the shirt. I just used a twin needle to hem, although I did use quite a few pins because this fabric is pretty shifty.
I also changed the neckline a little... I'm not fond of showing my undergarments while walking around town. I used the piece I cut from the bottom of the shirt to mimic the shape of the original neckline and hand-sewed it in place. It didn't come out as well as I had hoped it would, but at least I'm not showing things I don't want to show!
Now you may remember that I said this fit beautifully other than the hips, and you may be noticing that it looks a little tight. The truth is, it is a tiny bit tight now. I gained a few pounds in the past two weeks... normal during pregnancy, but obviously not in the right spot if it is making the sleeves tighter! ;-)
I think the extra weight probably has more to do with some cranberry-cheesecake bars I made this week than it does with tiny little baby Beckers. (Yes, she already has a nickname.) =)
Doesn't that look delicious? It's the best cranberry sauce I have ever tasted. =) I'd offer to share the recipe, but I don't want your clothes to end up tight too. ;-)
So I may not have finished the biggest project on my list, but I did complete something this week!
Thanks for stopping by,
I did finish refashioning this dress though:
Here's what it looks like now:
No more waddling due to too-tight dresses! =) It was a pretty simple fix on the length, in spite of having to hem a lining separately. I wanted the front to be a little longer, so I marked where I wanted the dress to hit on the side seams, then laid it out and cut it like this:
This photo is after cutting... the pin is the mark for side seam length. I don't remember this dress being labeled as maternity when I bought it, but you can tell from the photo that it definitely is! The ruffle wasn't finished, so I cut a curved line to about 1 inch above the hem cut, to allow room for hemming the shirt. I just used a twin needle to hem, although I did use quite a few pins because this fabric is pretty shifty.
I also changed the neckline a little... I'm not fond of showing my undergarments while walking around town. I used the piece I cut from the bottom of the shirt to mimic the shape of the original neckline and hand-sewed it in place. It didn't come out as well as I had hoped it would, but at least I'm not showing things I don't want to show!
Now you may remember that I said this fit beautifully other than the hips, and you may be noticing that it looks a little tight. The truth is, it is a tiny bit tight now. I gained a few pounds in the past two weeks... normal during pregnancy, but obviously not in the right spot if it is making the sleeves tighter! ;-)
I think the extra weight probably has more to do with some cranberry-cheesecake bars I made this week than it does with tiny little baby Beckers. (Yes, she already has a nickname.) =)
Doesn't that look delicious? It's the best cranberry sauce I have ever tasted. =) I'd offer to share the recipe, but I don't want your clothes to end up tight too. ;-)
So I may not have finished the biggest project on my list, but I did complete something this week!
Thanks for stopping by,
Monday, March 25, 2013
Procrastinating
I mentioned in my last post that I was working on a shirt for my husband. Since then, I really haven't done much on it... I finished multiple washes of the fabric last week, but I've been too scared to cut this out. A woven shirt in and of itself is a big deal to me, and making a proper button-up is more than a little intimidating. I finally cut it out last night:
Well, excepting the interfacing... and most of the pieces still need to be marked properly. We'll see how long I procrastinate on those parts. By the way, cutting out fabric on a scratchy carpet while pregnant can lead to rub burn on knees, shins, elbows, and forearms.
Other sewing stuff: I have this beautiful dress that I bought on sale online, no returns accepted. I knew it would be short, so I was planning on wearing it as a long tunic. However, it is ridiculously tight on the hips... waddling tight. The rest of it fits beautifully. I am planning on shortening it into a shirt. The neckline also hits a lot lower than I expected, so we'll see what I can do there. Care to see?
Also, I am beyond excited not to be sewing at the dining table anymore... we found a folding table for sale a few days ago, and this is the setup I have so far:
It's right in the middle of the living room, so I'm going to have to make an effort to keep it clean, but look at how much room I have! Enough for my sewing machine AND serger to be set up at the same time! And all of my fabric and other supplies fit neatly beneath the table, so I don't have to go rummage through the garage every time I need to find something. Also, see the thread rack? $23 at Walmart, and completely worth it, in spite of being slightly flimsy. I currently have all of my spools and all of my bobbins on it with quite a lot of empty pegs. The tablecloth is just a length of pretty grey fabric (The same fabric I used for Booper's hat), and is temporary, since I want to use it for a skirt eventually.
One more thing. =) I bought a gift for a wedding shower but didn't have any wrapping paper for it... so I used freezer paper (not the shiny side), gold craft paint, and a silkscreen to make this:
I love the way it turned out, and I am really happy that I got the chance to re-use the silkscreens after my Navy and Lace shirt.
And that is what I have been up to, besides all the cooking going on while I procrastinate on sewing.
Thanks for stopping by!
Well, excepting the interfacing... and most of the pieces still need to be marked properly. We'll see how long I procrastinate on those parts. By the way, cutting out fabric on a scratchy carpet while pregnant can lead to rub burn on knees, shins, elbows, and forearms.
Other sewing stuff: I have this beautiful dress that I bought on sale online, no returns accepted. I knew it would be short, so I was planning on wearing it as a long tunic. However, it is ridiculously tight on the hips... waddling tight. The rest of it fits beautifully. I am planning on shortening it into a shirt. The neckline also hits a lot lower than I expected, so we'll see what I can do there. Care to see?
Also, I am beyond excited not to be sewing at the dining table anymore... we found a folding table for sale a few days ago, and this is the setup I have so far:
It's right in the middle of the living room, so I'm going to have to make an effort to keep it clean, but look at how much room I have! Enough for my sewing machine AND serger to be set up at the same time! And all of my fabric and other supplies fit neatly beneath the table, so I don't have to go rummage through the garage every time I need to find something. Also, see the thread rack? $23 at Walmart, and completely worth it, in spite of being slightly flimsy. I currently have all of my spools and all of my bobbins on it with quite a lot of empty pegs. The tablecloth is just a length of pretty grey fabric (The same fabric I used for Booper's hat), and is temporary, since I want to use it for a skirt eventually.
One more thing. =) I bought a gift for a wedding shower but didn't have any wrapping paper for it... so I used freezer paper (not the shiny side), gold craft paint, and a silkscreen to make this:
I love the way it turned out, and I am really happy that I got the chance to re-use the silkscreens after my Navy and Lace shirt.
And that is what I have been up to, besides all the cooking going on while I procrastinate on sewing.
Thanks for stopping by!
Friday, March 15, 2013
Cowl-Neck Shirt
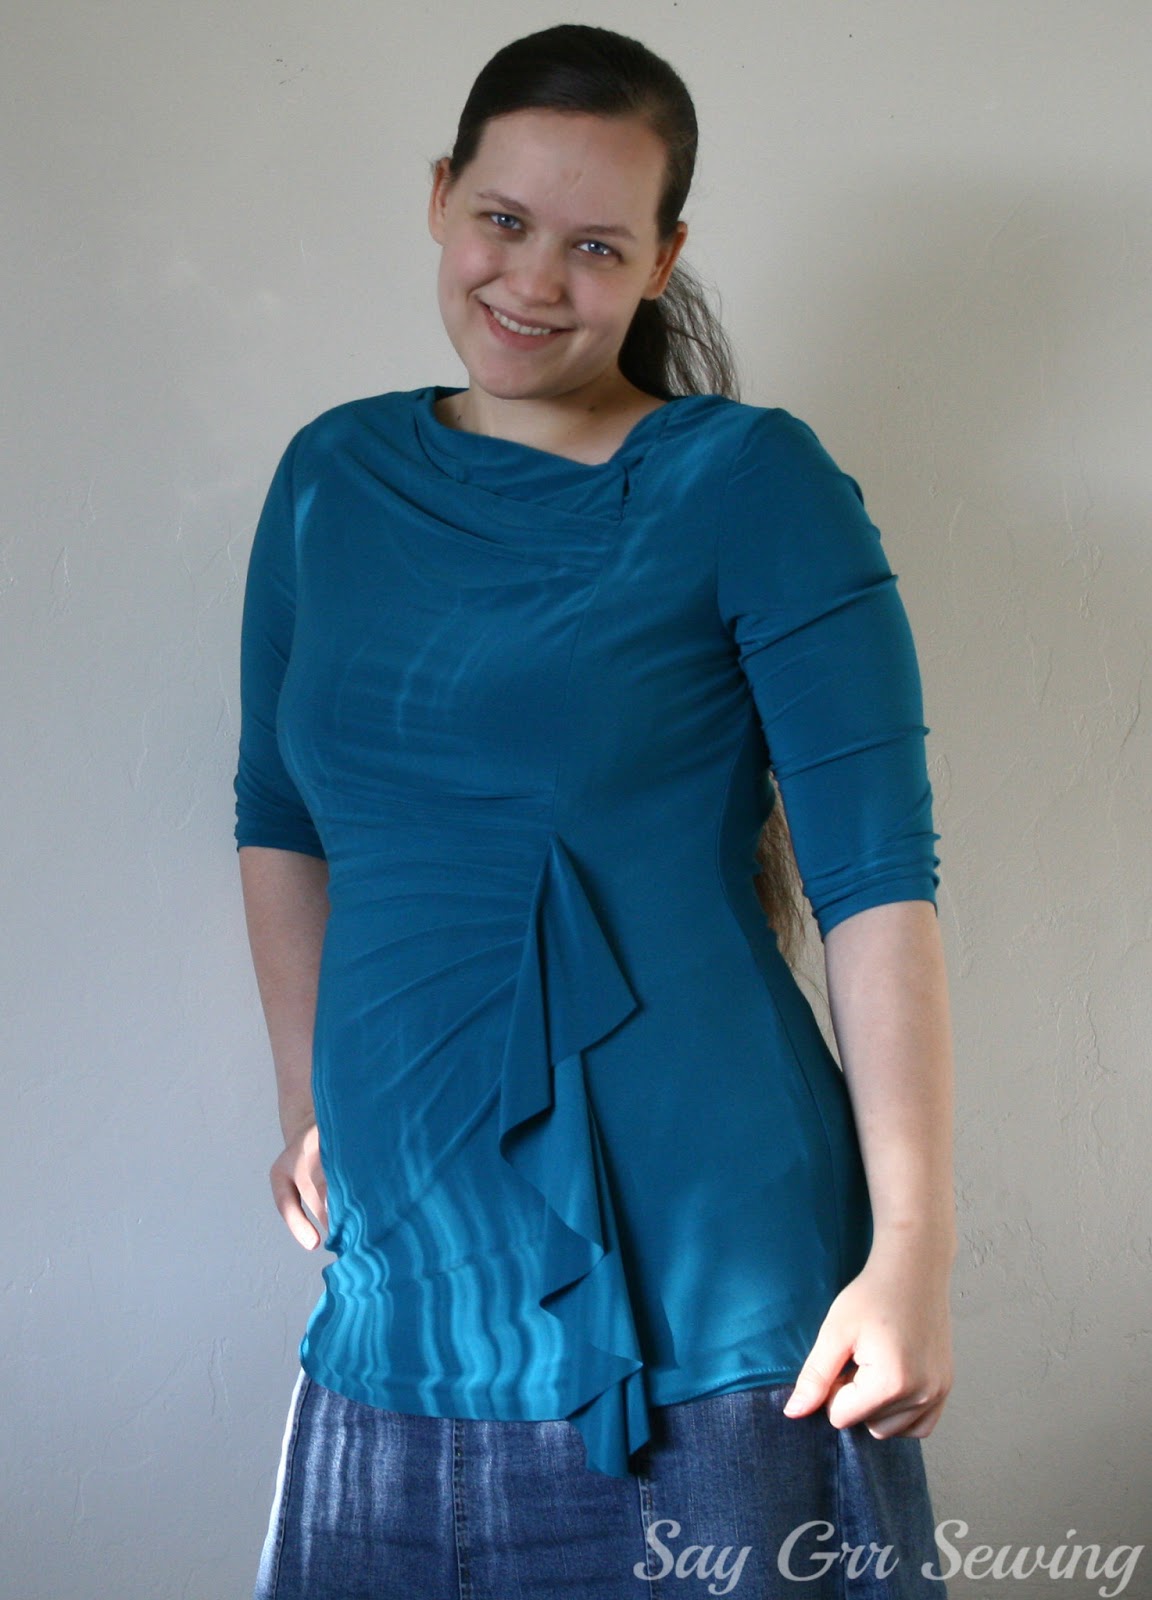
I've been gone for quite a while! We moved last week, and it took me most of the week before to pack, and most of this week to unpack. Honestly, I still haven't finished the little daughters' room. And that is why I've been rather absent... I not only had no time to sew, but my sewing stuff was packed up! I can't tell you how nice it is to have a pretty white wall for photographs though... ;-)
Anyway, today I finished this shirt that I've been thinking about for a while. I've been working on it, off and on, since I posted my Navy and Lace shirt, and I'm so happy it is finally done!
I used this tutorial from Made with Love to draft the cowl neck using my basic tee pattern, and it worked pretty well. I did notice that the shoulder seams tend to slide backward, but I think that may just be a problem common to cowl-necks. I also didn't have enough fabric to cut full long sleeves, but I managed to eke some trapezoids out of the remainder and added them for a slight bell sleeve.
I hemmed the sleeves and shirt with a twin needle... and I have yet to press them, hence the waviness. The fabric is a from Joann's, with a nice subtle print on it. It's also nice and thick and incredibly soft... much nicer than the other knits I've sewn with.
And that is all that I've sewn lately! I did buy the Negroni shirt pattern to attempt to make a button-up that will actually fit my husband, and have printed out and traced the pattern in his size. I need to wash my fabric a few more times before cutting it though, since I am using a lightweight 100% cotton twill, and it shrinks quite a lot.
I also invented a recipe for what I call 'creamsicle pie', and it was delicious! It includes jello, which isn't on my usual list of ingredients, but was interesting to work with. If anyone is interested in the recipe, let me know and I'll post about it. =)
Thanks for stopping by!
Anyway, today I finished this shirt that I've been thinking about for a while. I've been working on it, off and on, since I posted my Navy and Lace shirt, and I'm so happy it is finally done!
I used this tutorial from Made with Love to draft the cowl neck using my basic tee pattern, and it worked pretty well. I did notice that the shoulder seams tend to slide backward, but I think that may just be a problem common to cowl-necks. I also didn't have enough fabric to cut full long sleeves, but I managed to eke some trapezoids out of the remainder and added them for a slight bell sleeve.
I hemmed the sleeves and shirt with a twin needle... and I have yet to press them, hence the waviness. The fabric is a from Joann's, with a nice subtle print on it. It's also nice and thick and incredibly soft... much nicer than the other knits I've sewn with.
And that is all that I've sewn lately! I did buy the Negroni shirt pattern to attempt to make a button-up that will actually fit my husband, and have printed out and traced the pattern in his size. I need to wash my fabric a few more times before cutting it though, since I am using a lightweight 100% cotton twill, and it shrinks quite a lot.
I also invented a recipe for what I call 'creamsicle pie', and it was delicious! It includes jello, which isn't on my usual list of ingredients, but was interesting to work with. If anyone is interested in the recipe, let me know and I'll post about it. =)
Thanks for stopping by!
Sunday, March 3, 2013
Booper is 3!
This one turned 3 yesterday:
It's a little shocking that my first little baby has already been here for three years! She is a very sweet little person, the first to sympathize with any affliction, and somehow still full of energy and sass. She LOVES playing outside, tossing rocks or just sitting in the sun. She has an invisible friend named 'Gong' who she talks to regularly, and bosses around energetically. Even though her room is always a mess, she loves to put things in perfect rows and in the proper spot. That's my little Booper, my three-year-old daughter. =)
We celebrated Booper's birthday with chocolate cupcakes, freshly-grilled hamburgers, and some fun gifts at her grandparents' house. She was happy... she loves going to her grandparents' house, and seeing all her aunts and uncles makes it even more fun. =)
In addition to buying her a set of markers that she has been enjoying all day, I gave Booper a few options for a gift I could make her. She chose a hat, which was surprisingly easy to sew. =)
I also made her a dress, a size larger than her usual so it will fit all summer:
The dress was also fairly simple... a pre-made shirt cut shorter and some strategically gathered pieces of fabric added with a waistband and bow.
She's a little messy because she wore the dress all day before I took a picture of her... =)
I added a little fabric flower to the hat to match the dress:
I used this tutorial from I Heart Jenny's Art, with a couple modifications.... I added a couple inches to the band length so I could add elastic in the back, and I used fusible fleece to stiffen the brim, since I couldn't find transparency film in the stores I usually visit... it is still stiff enough, although a little more stiffness wouldn't hurt. =) My final band size was 24x2", and the diameter of my circle for the crown was 8". On the inside, instead of serging I pressed the edge of the inner brim in by a scant 1/2" before sewing.
I also changed my brim slightly from the hat I used to trace, since this hat was for a little person and not an adult. In case you don't have a hat to trace and want to make this, I scanned my pattern in so you can print it out: Kid-Sized Hat Brim Pattern (Oh, the joys of having a printer!) If you do use it, just make sure the white space inside the small square is 1" square when printed, and cut on the inside of the black lines. =) Anyway, I definitely recommend this tutorial! It was really easy to follow and I love the finished hat. I'm thinking of making one in my size. =)
Happy birthday to my sweet and spunky, clever and obstinate Booper!
Thanks for stopping by,
Linking up here:
| Scroll down for more information on the hat |
We celebrated Booper's birthday with chocolate cupcakes, freshly-grilled hamburgers, and some fun gifts at her grandparents' house. She was happy... she loves going to her grandparents' house, and seeing all her aunts and uncles makes it even more fun. =)
In addition to buying her a set of markers that she has been enjoying all day, I gave Booper a few options for a gift I could make her. She chose a hat, which was surprisingly easy to sew. =)
I also made her a dress, a size larger than her usual so it will fit all summer:
The dress was also fairly simple... a pre-made shirt cut shorter and some strategically gathered pieces of fabric added with a waistband and bow.
She's a little messy because she wore the dress all day before I took a picture of her... =)
I added a little fabric flower to the hat to match the dress:
I used this tutorial from I Heart Jenny's Art, with a couple modifications.... I added a couple inches to the band length so I could add elastic in the back, and I used fusible fleece to stiffen the brim, since I couldn't find transparency film in the stores I usually visit... it is still stiff enough, although a little more stiffness wouldn't hurt. =) My final band size was 24x2", and the diameter of my circle for the crown was 8". On the inside, instead of serging I pressed the edge of the inner brim in by a scant 1/2" before sewing.
I also changed my brim slightly from the hat I used to trace, since this hat was for a little person and not an adult. In case you don't have a hat to trace and want to make this, I scanned my pattern in so you can print it out: Kid-Sized Hat Brim Pattern (Oh, the joys of having a printer!) If you do use it, just make sure the white space inside the small square is 1" square when printed, and cut on the inside of the black lines. =) Anyway, I definitely recommend this tutorial! It was really easy to follow and I love the finished hat. I'm thinking of making one in my size. =)
Happy birthday to my sweet and spunky, clever and obstinate Booper!
Thanks for stopping by,
Linking up here: