Pages

Monday, July 30, 2012

Butterflies and Skorts

  I've completed the outfits I was sewing for the girls! They certainly took a while, I started working on these when I was in the middle of fabric frustrations.

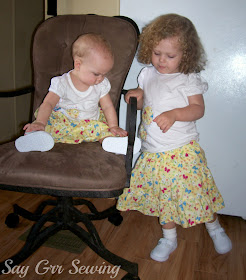
  The skirts tiered, with a paper-bag style waist. All the seams are French-seamed for a nice clean finish.

  Remember a while back, when I was attempting to make a bloomer pattern? These skirts are the reason for that. I wanted something underneath so when these two act like the little girls they are:
   You don't see diapers and unders, just bloomers. =)

 
   The shirts are reverse-appliqued, but with finished edges, then embroidered.

  I love these outfits! Booper even has a matching bonnet. Back when I was helping sew bonnets, this was one of the fabrics we used. When there was some left, guess who got to bring it home! =) I liked it so much I bought some extra so I could make outfits for both girls. Then there ended up being one extra bonnet too! It's a little big, but Booper loves it. I'm going to see if I have enough scraps to make one for Gaiw too, and I'm going to try to draft a pattern for it, which should be fun.

  Interested in seeing how to attach the bloomers and skirt together? I made my own pattern for both, so I was able to ensure that the waist on each was the same width, but if one was slightly bigger it wouldn't hurt to gather it down to fit. It would look a bit different than what I have here, but depending on how you did the elastic, it might not be noticeable at all.

  So, you start with a skirt and bloomers that are completely finished except for the waistband. Put the skirt into the bloomers, with both right side out. You want to line the top of the skirt up with the top of the bloomers:

  Pin and sew, and when you pull the skirt out it should look like this:

  Fold the skirt down over the bloomers:

  Pin some more, and sew a line for your elastic casing. I actually sewed two lines, one 1/2 inch down from the top, and one 3/4 inch below that with a 1 inch gap in it, then added elastic through the gap in-between those two rows of stitching.
  By the way, taking pictures of two girls at once is much more difficult than taking pictures of just one. That is especially true if your camera runs out of batteries every 2 minutes (not exaggerating, I wish I was) You get a lot of this:
One crawling away, the other scowling
  And a good bit of this:
Hello Screamy
  Then the batteries run out and you have to find another set. After a while you put one in a chair and get a not-terrible picture:

  But you really wanted one where they were both in it, so you try again. And then you get some of this:

 And this:

  So you go back to the chair idea. And it works! You get one decent(ish) picture!
   And then, since you have a blog, you suffer through about 10 more pictures and 2 more battery changes to get two more nice pictures.

  If you are interested in learning how to do the reverse-applique with the finished edges I did on the shirts, I took pictures and should be able to show you how in the next few days
Update: Reverse-applique how-to HERE

Thanks for stopping by!

PS: Would any of you be interested in buying a set like this for your little girl?

Linking up here: 150x200


Thursday, July 26, 2012

Refashioned Shirts

  So, I'm in the middle of sewing some stuff up for the girlies-I completed matching skirts for them and am halfway done with the first shirt. Since they aren't done yet and I want to have both sets finished before posting, I thought I'd show you all some refashions I did about a year and a half ago.

  The first one started with two grey t-shirts, both a little stretched around the neckline and a little plain.

 They became this:
   In case you are wondering, that is my second of three versions of my Circled Skirt... the first two had maternity waistbands, but I wore them even when I wasn't pregnant until they became too old and faded.

   Back to the shirts... I left one whole, and added pin tucks around the neckline to help raise it up a little. I cut the other up, and pleated a strip of it to add to the neckline, as well as adding a bow.

  I also made ties from the cut up shirt, and attached them at the sides of the new shirt as I was taking it in and adding a sewn-down strip across the front:

  That shirt also was worn until it wore out... in fact, I loved it so much that every now and then I pull it out and wear it again, although it has holes and is now too small.

  The second shirt started as a clearance rack man's shirt:

  But I loved the colors so I bought it and altered it a little. I cut the sleeves to just longer than the elbow, made new cuffs and put the sleeves into them with a little pleat, and cut the rest of the sleeves up for ruffles. I also took the sides of the shirt in so it wasn't so sack-like.


  Luckily, I have broad shoulders so that part was only a tad too big... not enough to worry about altering. And yes, this shirt still has buttons on the wrong side, but it's really not noticeable.
  I still wear this one. =)
  So try it! Find a cheap shirt on sale and alter to your heart's content, if you make a mistake you aren't out a lot of money or a lot of work. You can even take shirts that would otherwise be tossed to practice on.

Thanks for stopping by,


Thursday, July 19, 2012

Chocolate Cherry Mini-Tarts

  I mentioned that I've been doing a lot of cooking lately, and this is the latest thing I've made.

  Crispy little chocolate-coconut shells, filled with decadent chocolate ganache, topped with fresh juicy cherries... what's not to love?

  I saw a cherry-chocolate tart recipe somewhere a few days ago, but it was full of ingredients I didn't have on hand, so I closed the page. Later on, I decided to make my own version.
  Interested in making some yourself? Keep reading. =)

 You will need shredded sweetened coconut, sugar, cocoa powder, butter, heavy cream, semi-sweet or milk chocolate chips, and cherries.

Start by heating your oven to 325 degrees Fahrenheit and greasing a muffin tin with shortening:

  Melt 4 tablespoons butter over low heat, being careful not to burn it. Remove from heat and add a tablespoon of cocoa powder:

    2 cups of shredded sweetened coconut

    And 1 tablespoon of sugar

  Mix it all together really well:
 
  Divide the mixture between your muffin cups, about 1 packed tablespoon each, and press it slightly up the sides and in the bottom of the cups:
  
  Bake at 325 degrees Fahrenheit for about 10 minutes, until slightly crisp around the edges. While it is baking, pit your cherries:
  I don't have a cherry pitter and I wanted to leave the stems on, so I cut the cherries in half horizontally and twisted the pits out. You will need 3 cherries for each tin, 36 cherries total.
 
  By the time you are finished with the cherries, the crusts will probably be done baking. Pull them out, and start on the filling while they cool slightly.
 
  Pour 1/2 cup of heavy cream into a saucepan and heat it over low heat until little bubbles begin to form around the edges:

  Remove the pan from the heat and pour in half a bag (5-6 oz) of semi-sweet or milk chocolate chips. I used semi-sweet this time, but they were a little too rich for me, I would prefer milk chocolate:


  Mix so the chocolate is coated in cream and let sit for 5 minutes, then whisk them together:

  You should end up with a lovely smooth filling, like this. You can add a touch of vanilla extract here if you wish:

   Spoon or pour the filling into the coconut shells, a little over a tablespoon in each. Press your pitted cherries into the top.
  Refrigerate these until the filling has thickened and slightly set, an hour or so. To remove them from the pan, dip the bottom of it in hot water for about 30 seconds (I filled a larger pan with hot water, since my muffin pans don't fit in my sink) and pop the tarts out with a knife or fork.

  Serve immediately, or refrigerate for up to 3 days.
 
  I tried to take pictures with mine... brought them out into the perfect indirect natural light, as everyone recommends for great photos, and snapped away. I took at least 10 different pictures, and they all came out like this

   Blurry

  Worse, I didn't realize that they were so out of focus until I uploaded them today. I had to retry today, and under the stove light a few of them actually worked all right. =) Obviously, there aren't as many in this picture; that is because we ate most of them right after taking the first pictures. Considering that there are only 3 of us that are of tart-eating age, that should be a good testament to how delicious these are.


  Even if you don't like the texture of coconut, you should try them... my husband hugely dislikes coconut but he loved these. In fact, he said the crust was his favorite part. Just make sure you bake them until they are crispy.

    These would also be delicious topped with other fruits, raspberries or strawberries, whatever you like. You could even try using white chocolate in the filling for a sweeter treat.

 Here is the recipe all in one place:
Thanks for stopping by!

Tuesday, July 17, 2012

New Sewing Machine!!

  I found a sewing machine! I ended up with the Singer Quantum Stylist 9960, from Amazon. It was a little higher priced than I initially intended to get, $329 instead of $300, but considering the accessories that I didn't have to buy separately, I am pretty happy.   It arrived last night, and after figuring out how to wind the bobbin, the first thing I did was make up a sampler of some of the stitches:
   Obviously a little stabilizer underneath the fabric would have helped, but I was surprised how well most of the stitches came out on just plain cotton.
 

  So far, I love it! It's pretty easy to use, and I love the tack stitch and thread cutting features. I was pretty disappointed with the alphabets, as they are smaller than I expected and a little difficult to read. Also, letters like 'g' and 'y' don't hang down below the other letters, so they look a little funny.


  This machine is advertised as having 600 stitches, but it turns out that different lengths and the reverse/mirror images of stitches are counted as separate stitches. Here is what the machine can actually stitch:


  It's still a pretty good selection! Probably more than I will ever use. I do like having the different buttonhole options, and I really like that this machine doesn't eat fabric when I try to sew a buttonhole.

  Oddly enough, the description listed 14 feet that came with the machine, but I actually ended up with 19, plus a ruffler foot that I bought separately. The instructions included for attaching this foot aren't very clear, so I looked it up and used this link, which worked even though my machine is a Singer and not a Brother.
  
  So here is my new machine and its accessories:
  1. The manual
  2. Even-feed/walking foot
  3. Brush
  4. Small thread cap
  5. Blind hem foot
  6. Open toe foot
  7. Auxiliary spool pin
  8. Rolled hem foot
  9. Straight stitch/patch quilting foot
  10. Screw driver
  11. Button foot
  12. Seam ripper
  13. Screw driver for needle plate (this is genius)
  14. Satin foot
  15. Darning embroidery foot
  16. Overcasting foot
  17. Quilting bar
  18. Seam guide and screw
  19. Zipper foot
  20. Cording foot
  21. Extra needles
  22. Bobbins
  23. Fancy trim foot 
  24. Shank for special accessory foot
  25. Bias binder foot, presser part
  26. Single welt cord foot
  27. Stitch in the ditch foot
  28. Bias binder foot, binding part
  29. Clearance plate
  30. Braiding foot
  31. Braiding guide
  32. Buttonhole underplate
  33. Buttonhole foot
  It also came with a hard dust cover and an extension table. Lots of accessories, right?  It's going to be fun learning how to use them all! =)

 And now I'm off to sew, thanks for stopping by!