Pages

Sunday, May 29, 2016

The Shirt My Daughters Love

  I had this lovely fabric (a textured poly double knit) that I bought a couple of months ago from Sincerely Rylee, and decided on a whim to turn it into a peplum shirt for me. I used my usual knit shirt block, but with width added at the side seams to accommodate my current size, cropped it at the waist, and added a full-circle skirt.

  However, I wasn't very happy with the results! Although I'd based the shoulder-to-waist length off a shirt I love, it didn't work as well in this fabric and pulls up in the front.... I should have made it longer in the front by about an inch. Also, this fabric has a much softer horizontal stretch, so the width at the side seams was too much. It wasn't flattering, and the way it bubbled out over my belly didn't help. Still, my daughters gasped in delight when they saw it!

  I decided to add two box pleats under the bust to draw in some of the extra fabric... but that only accentuated the belly problem! What probably would have worked better is shirring the back, since that would smooth the front instead of bringing the extra fabric there.  

  I'll probably still wear this shirt, because the fabric is just lovely, but I'm not particularly happy with it. At least it twirls? And my sweet little girls tell me I'm pretty every time I put it on. =)

  It looks better when I tighten my abs as much as I can... so maybe in a few months it will be more flattering, and the size reduction when I stop nursing will probably help too.

  Good thing I have a little bit more of this fabric, and some in black/white as well! ;-)

  Thanks for stopping by,


Sunday, May 22, 2016

White Eyelet Bonnet

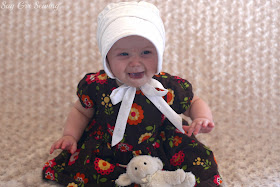
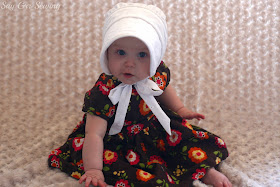
   A couple of months ago I realized that Foof could really use something to shade her face when we are outside, so I decided to make a bonnet for her.

  Having made and loved the Peekaboo bonnet pattern before, I decided to use that, with a couple of small changes.

  I chose to not make the bonnet reversible this time, and used plain white quilting cotton for the inside. I'd planned to stitch-in-the-ditch to finish the inside, but when the time came I just couldn't bring myself to do it and hand-stitched instead. It was much quicker with the piping only on the outside!

  Since I used a lightweight eyelet for the outer and didn't underline it, I applied interfacing to the lining of the brim.

  The main change, however, is the ties... I cut a strip of eyelet that was 36" by 2.5", marked where the bonnet would sit in it, and sewed the rest right sides together with a quarter-inch seam, making an angle at the ends. Next, I sewed the bonnet right sides together with the tie, leaving one long side unattached. Finally, I flipped the ties right side out, tucked in the seam allowance, and hand-stitched the final edge down to the bonnet.

  I like these wider and softer ties much better than the binding ties on my last version.

  I used plain white cotton to make the piping. I think I'd like it better with a finer piping cord for this size, but this is cute too.

  The lining is Kona cotton in Snow, and the outer is white eyelet that I bought at Jo-Ann years ago thinking I'd make myself a top. Clearly, that hasn't happened! ;-)

  I think this bonnet is just adorable, and I'm happy that Foofy doesn't mind wearing it, although it does seem to make her a bit sleepy sometimes!

  I just wish I'd made one of these years ago! ;-)

Thanks for stopping by,

Monday, May 16, 2016

Drop-Waist Knit Dress

  My oldest niece celebrated her second birthday in April. I'd initially planned to make a simple graphic tee for her, but it sort of evolved!

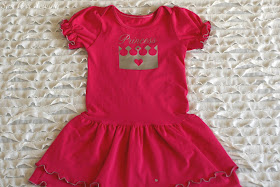
  As the only little girl in her house, she is definitely the princess of the family, so I designed a little crown and cut it from silver heat transfer vinyl.

   For the base, I used fuchsia knit - the same knit I used in this outfit. I decided to add puffed sleeves to the envelope-neckline bodysuit pattern that I've used before (but in a size 2T this time). I also cut the bodysuit portion off at the hip, and added a double-layered gathered skirt, and ended up with this!

  I used metallic thread for the twin needle stitching on the binding, and bulky nylon in the bobbin:

  I shirred an inch above the hem of the sleeve using elastic thread and metallic thread. I decided not to go all the way around the sleeve, because I think it might be more comfortable under the arm this way, and doing it the other way seems to make some pulling in the armscye.

  I used the metallic thread in the upper looper only while doing a serged lettuce-edge hem.... it was really finicky, and isn't as even as I'd like, but it's a really fun effect! I also applied one of the hearts that was cut out of the crown near the hem of the top skirt layer:

  The other heart cutout was added to the back shoulder:

  I should have stabilized those skirt gathers with clear elastic before sewing them to the bodice, but I'm a bit short on clear elastic.

  I really like this dress though! Hot pink and metallics are not my materials of choice, but I think they work really well here!

  Thanks for stopping by,

Friday, May 13, 2016

Collared Knit Shirt

The idea for this shirt was in the queue for a very long time. I tried to draft the collar for it last year, couldn't get it right, and set it aside for other projects. Then, when I made this jacket for Booper, I realized what I needed to do to make that collar work!

  So in March, I tested it out! I'm not sure what to call the collar- it's cut on the front piece with a notch at the center front, and a seam at the center back. I think I saw the idea first on a photo of a vintage dress, but I'm really not sure at this point!

  I initially interfaced the collar with knit interfacing but it still reduced the stretch too much, so I pulled it back out. This is unfortunately the closest photo I have of the collar: (If anyone has some tips on how to avoid overexposing red while properly exposing everything else, I'd love to hear them!)

    I had fun figuring out the construction sequence on this- first, with a regular sewing machine, I sewed the back collar seam for the outer and facing pieces. I sewed the facing to the collar just at the notch section, then used my serger to finish sewing the facing on, flipped it right side out, and pressed everything. Next, I sewed all the way across from the shoulder tip, around the back neckline, and to the other shoulder tip. I probably should have sewed that last pass on a regular sewing machine so I could pivot better at the corners, but it worked okay on a serger.

  The other feature of this shirt is flared sleeves... I just cut at an angle from the elbow and curved the hem of the sleeve slightly so it would be the same length all the way around, then used the first sleeve as my pattern piece for the second. I kind of wish I'd made a paper pattern piece too though, because the amount of flare is exactly what I wanted!

  I was really pleased with the collar and sleeves, but when I put the shirt on before hemming I was extremely disappointed!

  In spite of adding a width to my knit shirt pattern, the shirt was much too tight. In addition, my undergarments showed through, and I looked really pale in it. Fortunately the paleness turned out to just be the lighting near the mirror I was looking in. ;-) I managed to make the shirt wide enough through the belly and hips by opening the side seams and inserting a gusset. It's still slightly tight over the bust though.

  And the sheerness is solved by wearing a tank top under it... although layering means that it's not going to get nearly as much wear as it would otherwise.

  So I'm pretty happy with it after all, and I like the style enough that I'll probably make another shirt like this sometime in the future. =)

  The collar would probably look better a little bit tighter, but I really dislike things pressing against my neck, so this is more comfortable for me.

  When I first decided to make this I couldn't find any patterns with a collar like this, but this pattern was recently released, and looks like it has the same type! Also, the unfortunately not opaque fabric I used is from Girl Charlee. ;-)

Thanks for stopping by,


Wednesday, May 4, 2016

Dotted Chiffon Mori Dresses

I don't normally make Easter dresses for my daughters, but not too long before Easter the Mori Dress pattern was released and I kept seeing beautiful versions of it pop up. So I rummaged through my fabric collection to find something suitable, came across this fabric, and proceeded to make four dresses!

  The fabric was sold from Pick Your Plum as pink dotted chiffon, and based on the photos I'd expected a pale pink, but it's definitely more of a coral color... I wasn't too upset, coral is nice too, but it was a surprise!

  I'm not entirely sure this is chiffon either... it's much more stable than the chiffon I've worked with before and has a different texture to it, more like a georgette. It had the drape I wanted for this pattern, but I don't intend to buy fabric there again!

  Since it was slightly sheer, I lined the dresses with white batiste from fabric.com.

  Instead of lining the sleeve flounces, I hemmed them with a narrow rolled hem on my serger- I just love the drape of a single layer! I did the same for the hem, but I think I'd be happier if I'd stuck with the pattern there.

  I can't really comment on the sizing since I printed the pattern wrong and traced and cut the dresses before realizing it wasn't right... the sizing square was right, but the margins were trimmed!

  I lengthened the skirt for the three older girls, but ended up cutting off quite a bit of the length I'd added as they looked too much like nightgowns with it.

  I made the ties wider too:

  This pattern is designed to slip on over the head without any closures, which isn't my favorite because my daughters are crazy with their elbows and tend to pop the seams on things like this... I've needed to repair two side seams and a shoulder seam so far. 

  I might make the skirt fuller for any future dress versions of this pattern, but I would keep it the same for top versions.

   Those sleeve flounces are gorgeous though- I'm even thinking about adding them to other patterns!

  One thing to watch on the 6 month size is the neckline width... it's made to accommodate round little heads, but on Foof it was definitely oversized. I added a couple of awkward tucks at the shoulder seam to make it not fall off her shoulders.... I might take those back out when she's grown a bit but right now they are necessary.

  I loved the pattern with all of my changes (and Heidi, the designer, was super-nice and helpful when I thought the pattern was messed up because I'd printed it wrong!) and I'd like to make it as designed at some point. =) But I'd also like to change it up further and make some like Delia and Sarah made! 

Thanks for stopping by,