For my middle sister's birthday in March, I made her a shirt from Jalie 2805. (Of course!) And I added some heat-transfer vinyl. (Of course!) =) Buuuuut I also made some design changes! I used this sunflower knit -from Girl Charlee, but no longer available- for the back, sleeves and neckband:
I used it as a hem band as well:
The front and sleeve bands (I used the 3/4 length sleeves) were made using yellow ponte, from Girl Charlee some time ago... the same fabric I used in this outfit!
I moved the shoulder seam to the front, inspired by this cute dress, added width to the front so I could gather it, then put some faux leather (also from Girl Charlee) in the seam:
Since the sunflower fabric was thinner than I expected and somewhat see-through, I underlined the back only with some white knit. I used the underlining to enclose the shoulder seam, since it was going to be sewn there anyway! That seam was pretty bulky, what with the gathered ponte, two back layers, and folded faux leather... it was pretty difficult to sew! But it looks nice anyway:
I 'designed' two of the lettering styles for the vinyl myself, and used a quote I've seen in a few places. I wasn't sure how well the vinyl would stick to the ponte, or if the ponte would melt, so I tested it out on a scrap first, and it seemed to work fine... I didn't try washing it though. I didn't have quite enough brown vinyl to make the quote as big as I wanted to, but I think it worked anyway.
And here's the whole thing! I really love this shirt! Especially the gathered piped forward shoulder seam- I definitely want to use that again sometime. =)
I'm rather enjoying making all of these birthday gifts... I'm trying all kinds of things I wouldn't normally try. =)
Thanks for stopping by,
Pages
▼
Thursday, April 28, 2016
Tuesday, April 19, 2016
Tatted Lace Watch
About six years ago a friend requested that I learn how to tat using some books and materials she had. I gave it a try, and spent quite some time studying it. I was able to figure out needle tatting but something just didn't click with shuttle tatting, so I gave all her supplies back and didn't try again until recently.
Last December, I decided I needed to make at least one more attempt at shuttle tatting, and bought this Craftsy class. I found the class hard to watch, but I recommend it anyway... the concepts are clearly demonstrated and I finally learned how to shuttle tat! Once I'd had a bit of practice I decided to tat a gift for my mother-in-love's birthday.
I used a free bookmark pattern to tat this watch, and left off the tassel. I also joined the chains in the center across the length of the pattern. I was worried the whole way through that it would be too small, delighted when it fit my wrist perfectly, and terribly disappointed when it was too big for my mother-in-love! If I'd taken out one repeat it probably would have been perfect.
I used Lizbeth size 10 thread in charcoal for this one. It seems like the perfect weight for this application... I think even size 20 would be too delicate for a watch.
I used these bracelet findings as the fastener, and used these jump rings to attach them.
I dismantled an inexpensive watch and attached that using four more jump rings... it isn't the most elegant attachment but I wanted it to be easily removable if the watch broke.
Here's how it looks from the back:
I wanted the presentation to match the gift, so I made a small box from chipboard and packaging paper and spray-painted it with metallic paint:
And for the inside, I sewed a cover for a folded piece of batting, and fastened the watch around that.
I really love this one! And I am so happy that can finally shuttle tat! I just finished some simple trim for the sleeves of a baby gown that I have yet to sew, and I have other ideas churning that I want to make time for. It's perfect for things like waiting at doctor's offices... even more so than knitting, because it's smaller. Basically what I'm saying is that I'm enamored and I want to tat all the things now. ;-)
Thanks for stopping by,
Thursday, April 14, 2016
Shirts With Sass
Making birthday gifts for each of my closest relatives hasn't been too bad so far... it helps that I'm keeping things pretty simple for most of the gifts. ;-) But I've managed to give handmade for every birthday on my list so far! Today I have a batch of four t-shirts to share. =)
First, I sewed up this funny shirt for my father-in-law:
I used black 12oz knit from Nick Of Time Textiles for these shirts. The black isn't currently available, but there are a few other colors. The package was shipped to the wrong address (I managed to retrieve it thanks to the wonders of social media!) but the customer service was great about it, and I am really pleased with the knit! I would absolutely buy this again. It's thick, stretchy, soft, and has great recovery, plus hasn't pilled or faded in the wash.
I used white heat transfer vinyl for this one. As usual, it is Siser Easyweed bought from Expressions Vinyl.
I made a washi tape bow to top the packaging on this one, and it looked pretty cool, but I wish I hadn't bothered as it was tossed in the garbage without even a second glance. I didn't get photos of any of the other packages!
Next, I made a shirt for my husband using the same materials:
I used Jalie 2918 in various sizes to make all of these. They are all the crew-neck, short-sleeved version. I haven't been particularly happy with the way my twin-needle stitching has turned out, so on this and the previous shirt I used fusible hem tape to stick the hems in place and stabilize them before sewing. It helped to reduce the tunneling quite a bit but I dislike the reduced stretch. The stitches popped in a bunch of places on my husband's shirt too, so that was disappointing!
In case you are wondering... my husband requested this shirt, and I clearly don't know everything! ;-)
Third on the list was my tall young brother-in-law! I used orange heat transfer vinyl on this one. I meant to add a couple inches of length to the body of the shirt but completely forgot when cutting it, so it's not as custom as I meant for it to be, but it didn't look too short.
This saying may have been a bit too sassy! Everyone who read it winced slightly then politely chuckled! ;-)
And finally, for my youngest brother-in-law, I made a blue shirt instead. This fabric is the denim color 12oz cotton lycra from Nick of Time Textiles, and is superb! It has a tiny bit more of a starchy feel than the black after the pre-wash, but I think it will be just as soft after a couple of washes.
I also used orange vinyl on this one:
For both of the brother-in-law shirts, I finally bought some bulky nylon thread for my bobbin, and it really, really helped! It's wonderfully stretchy, so I'm not worried about thread breakage at all, and it also helped with the tunneling!
I added tags from some printed ribbon that I bought years ago in all of the shirts. I'm not entirely happy with the neckbands on these... using the pattern piece works fine in a fabric with a softer stretch or ribbing, but with this fabric I think I should narrow or shorten the neckband a bit.
And now I'm down to only about 6 unblogged projects... guess I'd better go sew! ;-)
Thanks for stopping by,
Thursday, April 7, 2016
Baby Shoe Tights
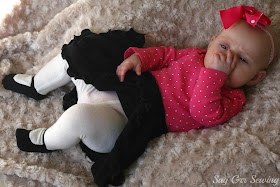
Here's another thing I made in January- these cute baby tights for Foof!
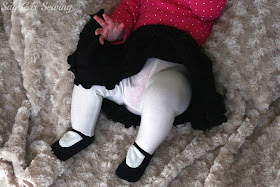
At the time I made these, Foof had a whole bunch of cute little shirts that she'd never worn because she didn't have anything to go with them. I decided to make her some quick circle skirts (also in these photos!) but I didn't want her legs to get cold. So I added some baby tights, but I wanted something more interesting than just plain tights. Hence, shoe tights! =)
I considered using Sew Much Ado's cute free footed baby pants pattern and adapting it, but eventually decided to start fresh, since I wanted a different look and fit. I took a whole bunch of measurements and used a combination of intuition and prior pattern-making experience (which admittedly is not much) to draw up the pattern... it worked surprisingly well! The ones worn with the pink shirt and black skirt are the first version, made with some knit scraps.
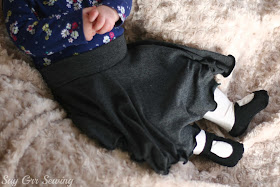
I was really happy with how they turned out, but I wanted to make a couple of small tweaks, so I added those and sewed up a pair with grey shoes. I couldn't find those ones to take pictures, but they weren't all that great anyway... 1/4" difference is a really huge difference on tiny baby feet, and the original proportions were much better. So I did some much tinier tweaks, including using reverse applique for the part where the tights peek through the 'shoe' instead of sewing it as an inset piece, and made a third pair.
They turned out cute too, although I think just between the first and third pair would be best! These were easier to sew too, because I split the shoe along the inner heel so I could sew it to the tights in the flat instead of in the round.
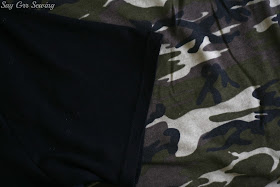
The white parts are rayon spandex leftover from the lace shirt at the bottom of this post (this knit really doesn't hold up well. It bags out and pills badly... I suspect that may be characteristic of rayon knits.)
The black for the shoes and black circle skirt is from Girl Charlee, and leftover from various other creations. I used black fold-over elastic for the waistband of this skirt, and white fold-over-elastic for the waistbands on the tights.
The grey for this circle skirt and for the disappearing grey tights (I still haven't found them) is leftover from this dress and this shirt... I did a yoga-style waistband on this skirt.
It's frowned upon, I know, but I actually used a straight stitch for the majority of the sewing on the tights, and just stretched the fabric as I went. They've held up surprisingly well! After 3 months of washing and wearing, the stitches only popped in one small spot near the ankle. I actually was trying NOT to stretch the fabric on the inset on the first pair of tights, but tiny stretchy pieces of fabric and a machine that wants to eat knits aren't a great combination, so they stretched quite a bit there.
I wish I had some better photos of these tights, because they are really ridiculously adorable, but Foof was not cooperating for photos! She couldn't sit up on her own yet when I took these (she can now) and she was mad about not being held.
I used the shoe portion of these tights with a few more tweaks to make the little pleather shoes in this post. =) Speaking of which, I recently and out of desperation tried a different leather needle from the same package in my sewing machine. It was a tight squeeze but it fit! And it sewed on one layer of leather without skipping! (I haven't tried two layers yet.) So I am really, really happy about that!
I originally made these to wear with the shirts and skirts, but I love them even more paired with little dresses. I need an excuse to make a fourth pair of these so I can get them just right... maybe I will just because they are cute! I had fun with these ones anyway! =)
Thanks for stopping by,


