Pages

Tuesday, March 29, 2016

Leather-Bound Art Journal

  I'm rather behind in posting about the things I've made this year... this gift was made back in January! I've been spending most of my limited free time actually making stuff instead of talking about what I've made, so I've got quite the collection of things to share! =)

  When I was looking for ideas for my sweet sister-in-love's birthday I happened again across this guide for binding a paperback that I'd bookmarked quite some time ago. I loved the idea, but I decided to adapt it and make the book too, so that I could use high-quality watercolor paper. (This particular sister-in-love is a fantastic artist!)

  I have an old Reader's Digest craft book that is a sort of primer on a variety of hobbies, and it has a section on bookbinding, so I used that as a starting point. I had to do things a bit differently though, partly because my materials are a bit different and mostly because I don't own most of the recommended tools.

  To start, I folded my paper (affiliate link, I used less than half of the sheets) into signatures. I'd planned for 4 sheets per signature, but the paper was quite a bit sturdier than I'd expected, and I ended up only using 1 sheet per signature. Then I stacked the signatures, and made lines at intervals along the folded edge of the stack with a pencil. I poked holes in each mark with a darning needle, then bound them together using waxed linen cord and linen binding tape (affiliate links). I unfortunately tore the paper in a couple of spots by pulling the thread toward me instead of in the direction of travel, but it still worked.

  Here's the outside of the book at this stage:

  And standing:

  After sewing the pages,  I glued the endpapers (I used scrapbooking paper) on... they are only glued in a small strip near the folded edges, and underneath the tapes. Then I cut the front edge of the pages to be more even, but I wish I hadn't because my cutting skills are abysmal and it ended up much messier than if I'd just left it! I also pressed my thumb into the front edge while gently hammering the sewn edge to create a gentle curve (but it really didn't do much!).

  Next, I glued on a super (a strip of white muslin fabric), but I forgot that I was supposed to trim it to be shorter than the spine! I glued the tapes down at the same time, and trimmed them to the same width as the super. I used this glue. (Affiliate link... I have heard that Elmer's glue works perfectly well too.) I also added a headband (affiliate link) at the top and bottom edges along the fold. At this point the book was finished, and just needed a cover!

   For this section, I followed the instructions in the guide. I used two sheets of chipboard and this leather (affiliate links)... the leather was just a tad thicker than I think would have been best, but still worked. I designed a front and back cover in the Silhouette studio, cut it from paper with the Silhouette, and used that as a guide to cut the chipboard by hand with a utility knife. I was hoping to cut the chipboard with the Silhouette, but it was too thick to feed properly. Cutting it was by far the most difficult part of all! I did it over several evenings and had to take quite a few breaks because my hands were cramping up. It was totally worth it though,

  I glued on backing pieces, then glued the leather to that. I used a knitting needle to press the leather into all of the nooks and crannies... I had to go over it all several times to stretch the leather enough!

  Then I added the spine piece and trimmed, folded, and glued the edges of the leather:

  The finished cover:

  And the back:

  Then it was time to attach the cover to the book! What that entailed was gluing the endpapers- along with the super and linen tapes- to the inside of the cover, then tying a cord tightly around the spine and leaving it under a stack of heavy books overnight to dry. And it was done!

  I am so happy with the end result!

  That being said, there are a few things I would do differently next time... I would gently curve the spine piece before applying the cover:

  I would either not cut the front edge, or use some pieces of wood and clamps to hold it tightly while cutting for a smoother result (If I really started to do a lot of bookbinding I would probably invest a bookbinding press).

  I'd prefer to actually sew the headband instead of using a premade strip, because I don't like the ridges the strip left (although I suppose those could be avoided by cutting the strip slightly narrower or a lot wider than the spine), and I should have used a smoother cord for tying the spine.

  I would also be more careful and accurate in measuring and cutting the spine piece of chipboard... mine is wider than it was supposed to be, which means that the front edges of the pages are closer to the front edge of the covers than they should be.

  Here's a picture of the endpapers:

  Even though I'd change a few things next time, I pleased with this for my first-ever book!

  It's not going to replace sewing as my hobby, but I would definitely like to make more books in the future. And if my writing relatives finish some stories I would be delighted to make hand-bound copies of those! ;-)

Thanks for stopping by,

Wednesday, March 16, 2016

Birthday Ice Cream Outfit And Apron

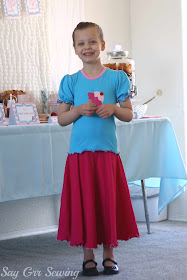
  In addition to the party I threw for Booper's 6th birthday, I made her an outfit.

  I used Jalie 2805 as the basis for the shirt, lengthening it slightly. 

  I altered the short sleeve into a slightly longer puffed sleeve, with shirring and a bright pink lettuce-edged hem. I used regular sewing machine thread rather than serger cones for the loopers when I did the lettuce-edging, and it was interesting to see how much stiffer the edging is this way!

  The hem was lettuce-edged the same way:

  I used a strip of pink for the neckband:

  And I added a layered vinyl ice cream cone to the front! This was my first time layering vinyl, and it was pretty simple! I used Siser Easyweed Heat transfer vinyl for the brown, pink, dark pink, and green, but the tan is Firefly Craft, which seems to be pretty good quality, and the red was bought at a daily deal site some time ago, and is unfortunately see-through! It turned out cute though!

  The skirt is a simple circle skirt with an elastic waistband (which sadly doesn't quite match).

  I lettuce-edged the hem of the skirt too, with baby pink thread:

  All of the fabrics for this were from Girl Charlee... the skirt fabric is this one.

  I used this pink for the neckband.

  And the shirt was made from this blue.

  I'm pretty happy with this outfit, although I'm not particularly pleased with the fit of the shirt on Booper. This is the same size I've made her previously, so I'm not sure if the knit exacerbated the armscye wrinkling or if her shoulder slope has increased. Looks like I'll need to do a sloped shoulder adjustment next time!

  For Booper's actual gift, I made her something she's been requesting for months- an apron.

  There are a ton of cute free apron patterns out there, but I just made this pattern up myself, and other than the shoulder straps needing to be moved outward a bit, it's exactly what I was envisioning.

  It's long, because Booper wanted it long. It's flared, so it can easily fit over her dresses. And it has ruffles, because Lindsay's adorable ruffled apron (and free pattern!) made me realize how much better ruffled aprons are than unruffled ones. ;-)

  I used this fabric for the body of the apron, and searched through my collection for coordinates. I've used the brown before for the inner ears of this elephant, and Booper and I have also made an elastic-waisted skirt from it before.

  The pink is, I think, leftover from this skirt I made several years ago. 

  To finish off the apron, I sewed up this paper-pieced block (I got this free for signing up to the Sewing Loft newsletter some time ago, but I do think it's worth the $4 it costs now.) I'm not sure quite what was going on with some of the corners (possibly an attempt to prevent dog-ears?) but that was my only complaint.

  The tan for the cone is actually the reverse of a brown-printed fabric... I couldn't find anything else that was close to what I wanted! And that absolutely perfect sprinkles fabric was sent to me by Karen a while back. =) The pink is quite a bit thinner than the other fabrics and wrinkled when I pressed it, and I didn't line things up perfectly when sewing the cone, but otherwise I love how this turned out! I added panels to either side of the finished ice cream, then rounded the edges. I lined the pocket with more of the pink before top-stitching it on to the apron.

  The final thing of note in this apron is the straps. Booper, like me, dislikes things pulling on her neck, so I took inspiration from an apron in a magazine also sent to me by Karen, and made the neck straps cross the back, go through some loops, and become the waist ties. I love this, and want to try it on an apron for myself too!

  I had a lot of sewing-machine difficulties while making this, especially on the pocket and ruffles, but I really love how it turned out. 

And so does Booper!

  Thanks for stopping by,

Sunday, March 13, 2016

Ice Cream Shoppe Birthday Party

  I had a ridiculous amount of fun putting Booper's birthday party together this year!

  I let Booper pick the party theme by browsing the party sections of Girl, Inspired and Craftiness is Not Optional, and she loved the  adorable ice cream shoppe party that Jess threw best, so I did my best to imitate that. I was also inspired by this ice cream fabric (which I used in Booper's gift) and imitated one of the ice cream cones from the fabric to use in the printables.

  I started by drawing up some invitations in Illustrator:

  I made envelopes to match... my printer really didn't want to cooperate for most of the things I printed and left black smudges on some things, but I did get it all printed!

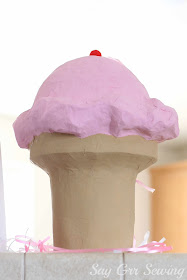
  I broke out the paper-mache and made an ice-cream-cone-shaped pinata... I started with a cone made from poster board, a balloon, and wads of paper, then covered it all in 2 layers of paper-mache. I gently sanded it to get rid of the worst lumps, painted it with acrylic paints and hot-glued a red pom-pom on top.

  Then I cut a flap in the bottom, and a bunch of little slits. I added candy and ribbons in the slits with only one being knotted, then taped it shut. I added too much tape though... it was trying to fall open when I first taped it, but by the party time the 'winning' ribbon didn't open the flap, so I had to un-tape it to get the candy to fall out! I also should have used much smaller candies, as a lot of the pieces got stuck and had to be helped along.

  Since the party was indoors, and most of the guests were pretty young, I thought this was a better alternative to a traditional pinata! I'm pretty happy with how it turned out, although I have no idea what to do with it now that the party is over!

  For another fun thing for the kids, I painted a sundae on another sheet of poster board so we could play 'Pin the Cherry on the Sundae'. It took a while! And my husband thought I was crazy for hand-painting something for kids to stick stickers on... but I've been wanting to practice painting lately and thought this was a good thing to do it on!

  I drew a cherry in Illustrator, printed a bunch of them out on sticker paper, and used the Pix-scan mat in my Silhouette to cut them. I didn't calibrate my camera with it first (this is the first time I've used that mat) so it isn't quite a perfect cut, but still pretty impressive! The photo above is the only one with one of those cherries in it though. Here's a detail shot of the painting... I definitely feel like I have a better idea of how to handle the brush after painting this:

  I also designed some little coloring books in Illustrator, and set them in a stack with a bunch of crayons:

  There's a regular cone, a sundae bowl,

 a soft-serve cone, and a milkshake in them:

  I was playing around with these designs in Illustrator to see what they might look like colored in, and I loved the results so much that I printed each off letter sized, matted them with painted poster board, and hung them on my wall for the party:

  The colors are a little bit more accurate in this photo:

  I made favor bags for all of the kiddos by printing on white paper bags... the only way I could get these to print was by tricking my printer. I'd set it to print as letter sized, take out all of the paper, then hit 'print'. And then, once it told me I was out of paper, I would put a bag in and print that! 

  The bags included starburst, a super-ball, an 'ice cream shooter' toy, a dimensional ice cream sticker (not actually meant for kids, but seriously adorable and matched the party too well not to include) and bubbles in an ice cream container. The favors are all from Amazon.

  I also found these cute ice-cream cups at Hobby Lobby, and wrapped them up as prizes for whoever won the 'Pin the Cherry' game. Two cups, because I didn't know whether a boy or girl would win and my nephews don't like pink! But of course I didn't get a photo of the green one.

  I finally figured out how to make a helium tank work (turns out it says it in actual words on the side of the tank, not just the pictures that are on the outside of the box) so I put up a few helium balloons in some corners:

  For the food table, I hung eyelet fabric and ruffle fabric (I'd have preferred to just use the ruffle fabric, but the piece I had was too small and didn't look right by itself) and added a banner:

  I taped some non-helium balloons to cones made of shipping paper and added a pom-pom on top- these didn't turn out as adorable as I thought they would but they still worked! I tried helium balloons first but the weight of the cone was too much for them to stay afloat.

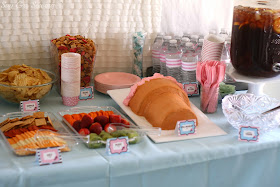
  Here's the entire food table:

  I made the cake with strawberry cake mix, which is unfairly delicious but definitely didn't do me any favors when it came time to frost it, because it was very delicate and fell apart easily. 

  Still cute though!

  I made iced tea, raspberry-flavored saltwater taffy, and punch (although I didn't make the punch until the guests arrived, so it's not in these photos) and wrapped water bottles with some striped paper.

  We had Kettle chips and snack trays and strawberry-maple chex mix:

  I set out bowls and two kinds of cones (although apparently I swapped the tags for the sugar and cake cones!) I also made strawberry-flavored saltwater taffy.

  I was planning on making the syrups but decided the night before the party that I should just buy them and transfer them to other bottles!

  I also set out rainbow sprinkles, chopped peanuts, and maraschino cherries:

  And finally, I made some ice cream. It was, without question, the best ice cream I've ever made! Possibly even the best I've ever eaten. Three flavors, vanilla, strawberry and chocolate.

  I printed tags for all of the foods but they were mostly ignored... I'd do it again anyway, because I think they really helped everything to look cohesive.

  And those blurry signs in the front say 'Pick a vessel, Scoop a flavor, Serve some sauce, and Add some garnish'. ;-)

  All in all, I'm super happy with how this all turned out! It was a lot of work, but mostly a lot of fun! I made an outfit and a gift for Booper too, so I'll be back before too long with the details on those. =)

Thanks for stopping by,